2-12
HDR-CX550/CX550E/CX550V/CX550VE/XR550/XR550E/XR550V/XR550VE_L2
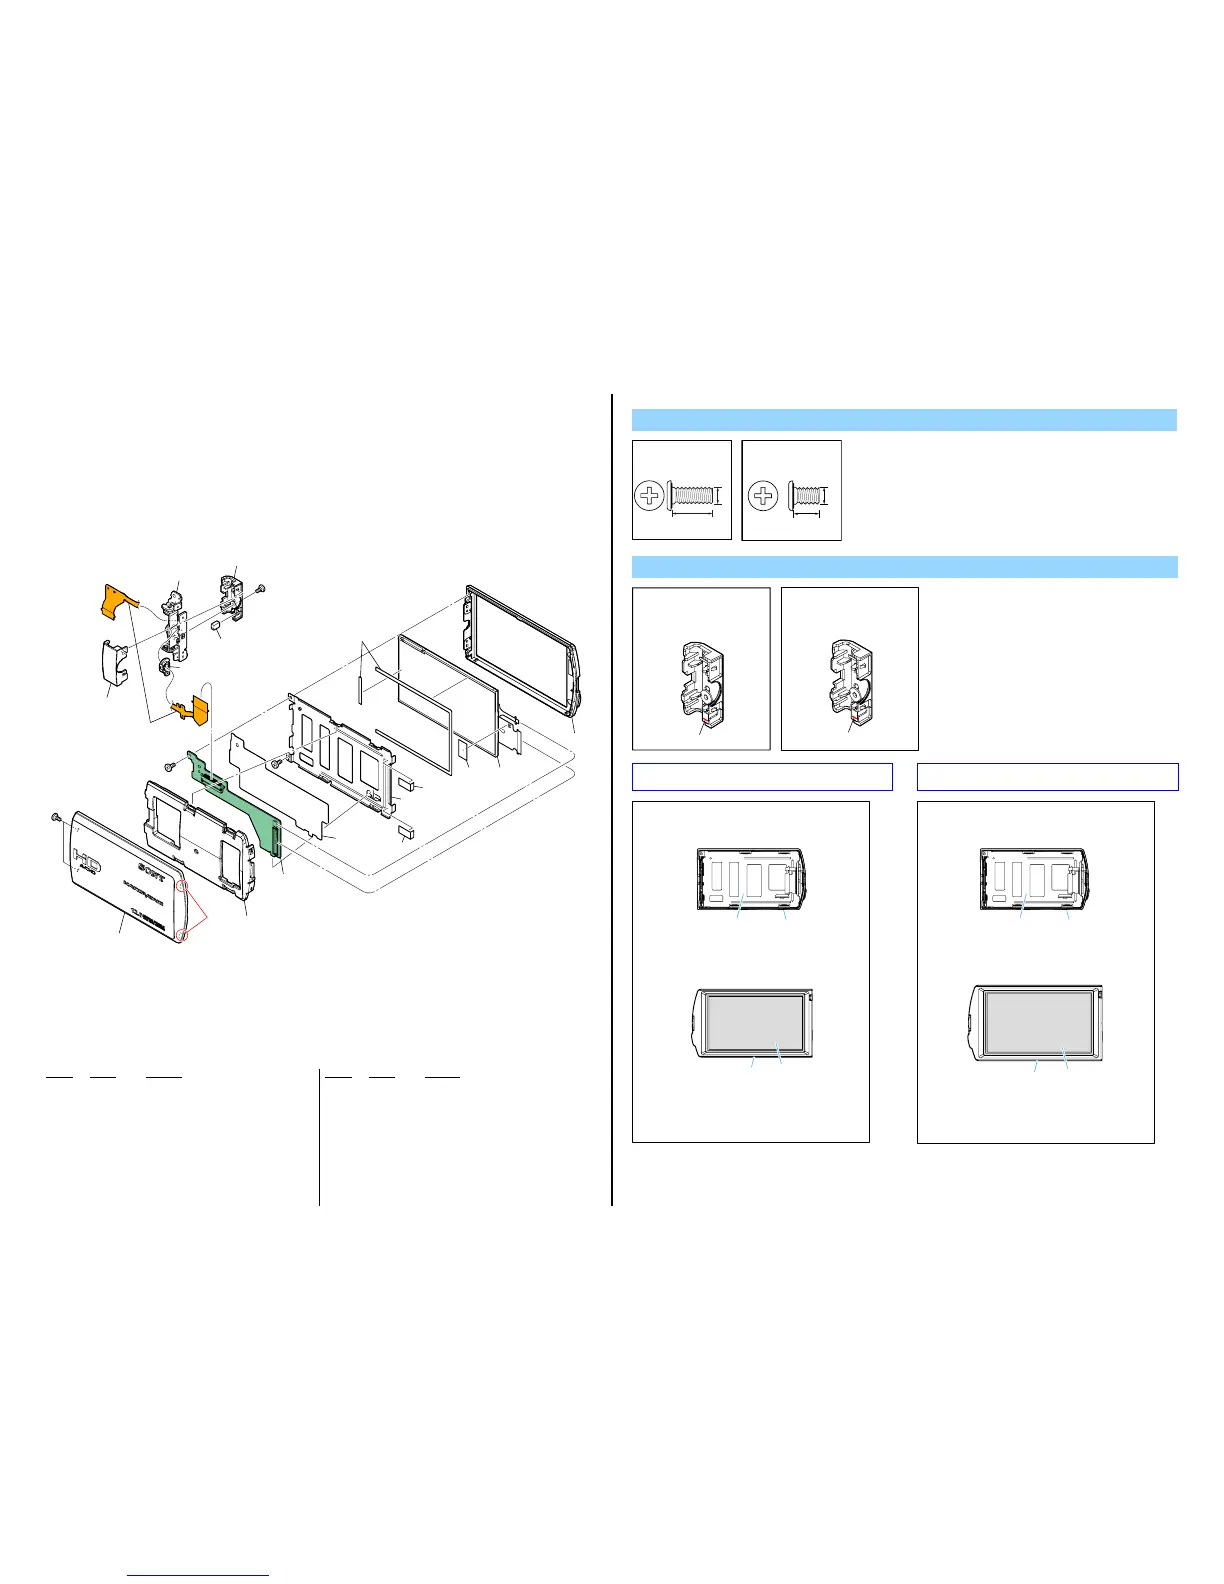
2-1-10. LCD SECTION
ns: not supplied
Ref. No. Part No. Description Ref. No. Part No. Description
451 4-178-058-01 P CABINET C (CX550/CX550E/CX550V/CX550VE)
451 4-178-058-11 P CABINET C (XR550/XR550E/XR550V/XR550VE)
* 452 4-178-061-01 MOLD, LCD INNER
453 A-1765-173-A PD-408 BOARD, COMPLETE
454 4-178-060-01 LCD FRAME
* 455 4-178-006-01 SHEET (5X13)
456 4-182-483-01 CUSHION, LCD (346)
457 4-178-059-01 P CABINET M
* 458 4-178-062-01 COVER (O), HINGE
459 1-880-390-11 FP-1208 FLEXIBLE BOARD (Note 2)
* 460 4-167-146-01 CLAMP, FLEXIBLE (346)
461 X-2547-062-1 HINGE (346) ASSY
462 1-471-504-11 MAGNET (ND5X3.5X2.4-B) (Note 1)
* 463 4-178-063-01 COVER (U), HINGE
LCD901 A-1763-666-A LCD BLOCK ASSY (SERVICE) (Note 3)
#2 2-635-562-31 SCREW (M1.7)
#14 2-599-475-11 SCREW (M1.7)
Screw
Note
#2: M1.7 X 4.0
(Black)
2-635-562-31
4.0
1.7
#14: M1.7 X 2.5
(Silver)
2-599-475-11
2.5
1.7
Note 1:
Put the marking side
together on the position
of figure when
you install the magnet.
Marking
PD-408
459
(Note 2)
458
460
463
451
452
453
455
455
455
457
456
LCD901
(Note 3)
ns
(Claw)
#2
462
(Note 1)
#2
461
#14
#14
454
Note1: マグネットを取付け
る際は,マ−キング
面を図の位置にあわ
せてください。
マーキング
Note 2:
Note 3:
LCD Frame
P Cabinet M
Push the LCD Frame from the side in the back,
and check whether there is between LCD unit
and the P cabinet M the space.
Check whether LCD unit is at the center of the
window frame.
When LCD unit shifts from the center of the
window frameInstall the LCD unit again, and align
the LCD unit to the center of the window frame
(align the upper and lower, right and left, even).
LCD Unit
Window Frame
(Don't be stranded Pcabinet M on a LCD unit.)
Note 3:
後ろ側からLC D フレームを押し、LC D ユニットと
PキャビネットMの間 に隙間が無いことを確認
してくだ さい。
PキャビネットM
LC D フレーム
LC D ユニット
窓枠
LC D ユニットが窓枠の中央にあるか確認して
くだ さ い 。
LC D ユニットが窓枠の中央からずれている場合は
、
LC D ユニットが窓枠の中心(上下左右均等)に
なるように取り付け直してください。
(PキャビネットMがLCDユニットに乗り上げない
ように)
Note2:
Refer to “Assembly-1: The methode of attachment of
FP-1208 Flexible Board” when installing.

 Loading...