11|Page
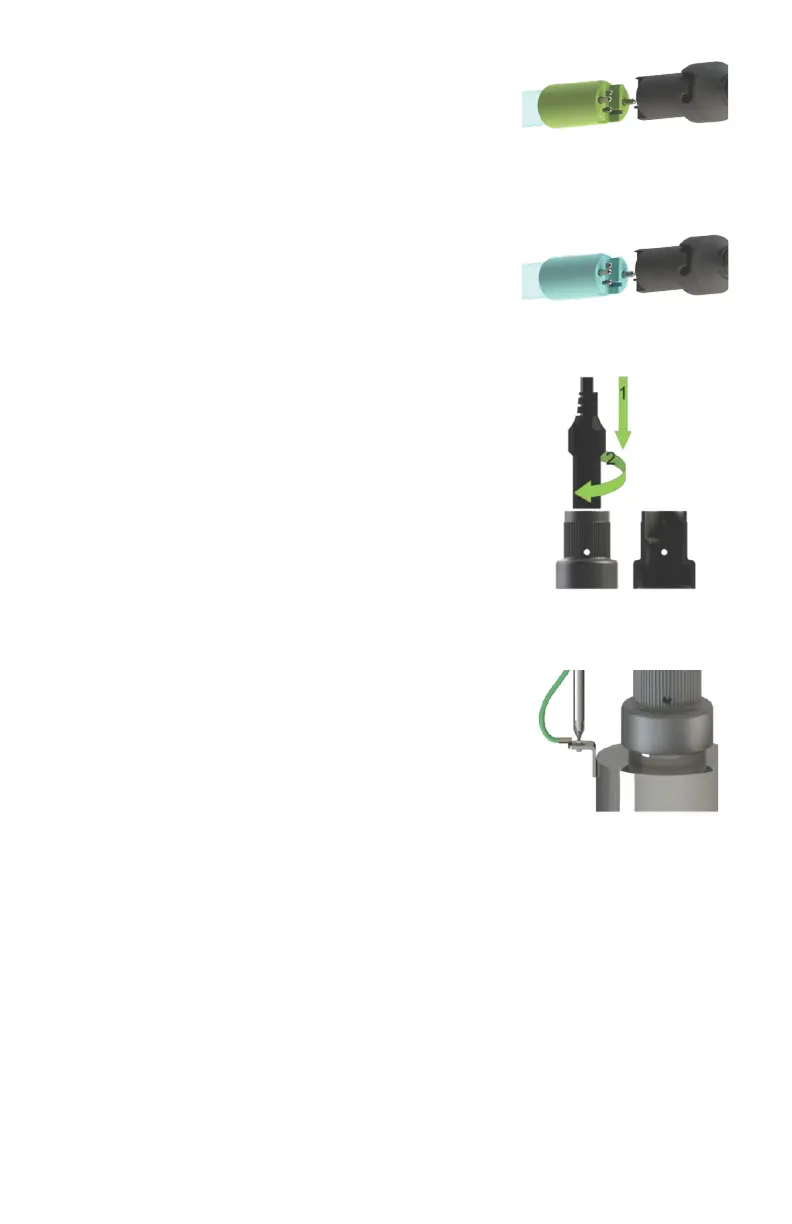
Step 13: Plug the lamp connector into the lamp. Note the
keying for proper alignment (see Figure 8a, 8b). Insert the
lamp connector into the gland nut and turn the connector
approximately ¼ turn to lock the connector to the gland nut as
in Figure 9.
Step 14: Tighten the capve ground screw to the ground lug
on the UV reactor to ensure proper grounding(Figure 10).
Step 15: Your system is now ready to be plugged into the
appropriate GFCI protected outlet. Refer to the following
secon before any water is allowed to ow through the system.
System Disinfecon
With a new installaon, or any me the UV system is shut
down for service, without power, or is inoperave for any other
reason, the lines in the home or facility could be contaminated.
Use the following steps to fully disinfect the lines throughout
the enre home or facility.
Step 1: Check for and remove any “dead ends” in the lines
throughout the home as these can harbor bacteria. Plug in the
UV system and wait unl it is ready for operaon.
Step 2: Remove the lter cartridge from the last sump and ll
it with 1-2 cups of household bleach (most are 5.25% chlorine).
Replace the sump and slowly turn on the water supply.
Step 3: At a water outlet, run the water unl bleach can
be smelled. Repeat this for all faucets, toilets, shower heads,
refrigerators, outdoor taps, the washing machine, dishwasher,
etc. at the home or facility. Once nished, wait a minimum of 30
minutes before connuing.
Step 4: Reinstall the lter cartridge into the sump and ush
the chlorine soluon by opening all faucets unl chlorine can
no longer be detected. Your home has now been completely
disinfected with your UV system ready to inacvate any
microorganisms that enter the home.
Cleaning the Quartz Sleeve
Depending on the water quality, the quartz sleeve may require
periodic cleaning. At a minimum, the quartz sleeve should be
cleaned on an annual basis. The following steps outline a basic
cleaning procedure.
Step 1: If a by-pass assembly is installed, shut the inlet valve
o to prevent water ow through the system. Otherwise, turn
o main water inlet valve (and/or turn o the water pump).
Step 2: Disconnect power cord of UV system from electrical
outlet.
Figure 8a. Standard
Output UV Lamp
Connecon
Figure 8b. High Output
UV Lamp Connecon
Figure 9. Lamp
Connector
Figure 10. Ground
Screw Connecon
 Loading...