45
ENGLISH
EN
Original instructions for use
5.7 STOPPING
1. Release both clutch levers. Note. If the snow thrower
continues rotating - see ADJUSTING THE CONTROL
WIRES below.
2. Close the fuel cock (J).
3. Remove the ignition key. Do not turn the key!
If the machine is left unattended, stop the engine
and remove the ignition key.
5.8 STARTING
1. Start the engine as above. Let the engine run a few
minutes to warm before use.
2. Set the chute deflector.
3. Turn the adjustment lever and set the deflector to throw
the snow in the direction of the wind.
4. Set the gear lever to a suitable position.
Never actuate the gear lever with the engine
standing still. This will destroy the gearbox.
5. Press down the auger clutch lever (A in fig. 7) to activate
the auger and discharge fan.
Watch out for rotating auger. Keep hands, feet,
hair and loose clothing away from any moving
parts on the machine.
6. Press down the drive lever (D in fig. 7). The snow
thrower now moves forward or backwards depending on
the gear you have chosen.
5.9 DRIVING TIPS
1. Always run the engine on full throttle or next best.
The silencer and surrounding parts become very
hot when the engine is running. Risk of burns.
2. Always adapt the speed to the snowy conditions.
Regulate the speed with the gear stick not the throttle.
3. Snow is more effectively removed directly after falling.
4. Always throw the snow in the direction of the wind if
possible.
5. Adjust the shoes with the screws (A in fig. 1) to suit the
ground conditions:
- On flat ground, e.g. asphalt, the shoes should be about
3 mm under the scraping blade.
- On uneven ground, e.g. gravel paths, the shoes should
be about 30 mm under the scraping blade.
Always adjust the shoes so that gravel and stones
are not fed into the snow thrower. There is a risk
for personal injury if these are thrown out at high
speed.
Ensure the shoes are adjusted the same on both sides.
6. Adapt the speed so that the snow is thrown in an even
stream.
If snow fastens in the chute do not try to remove it
before:
- Releasing both clutch levers. Stopping the engine.
Removing the ignition key.
- Disconnecting the starting cable from the spark
plug.
- Do not put your hand inside the chute or auger.
Use the chute clearing tool supplied.
5.10 AFTER USE
1. Check for loose or damaged parts. If required, change
damaged parts.
2. Tighten loose screws and nuts.
3. Brush all the snow from the machine.
4. Move all the controls backwards and forwards a few
times.
5. Put the choke in position
6. - Disconnecting the starting cable from the spark plug.
Do not cover the machine while the engine and
silencer are still warm.
6 MAINTENANCE
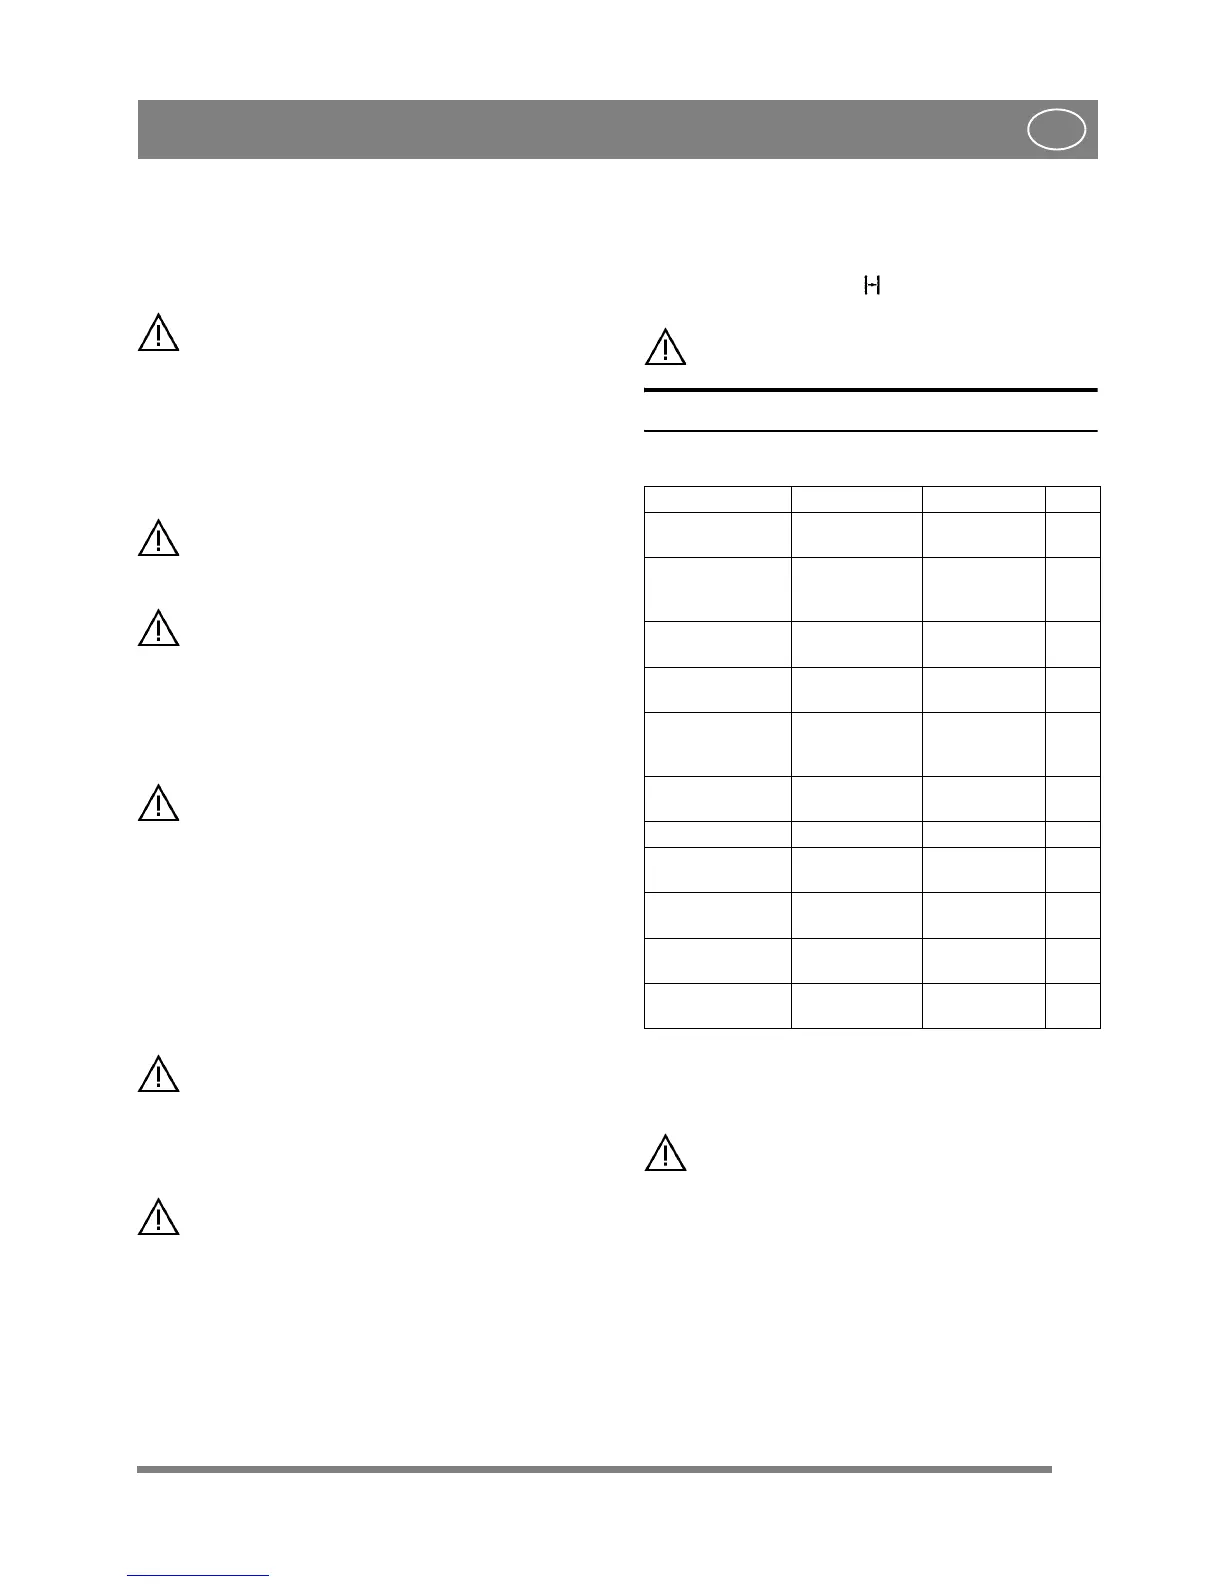
6.1 MAINTENANCE SCHEDULE
6.2 OIL CHANGE
Change the oil the first time after 2 hours of operation, and
subsequently every 25 hours of operation or once a season.
Change oil when the engine is warm.
The engine oil may be very warm if it is drained off
directly after the engine is shut off. So allow the
engine to cool a few minutes before draining the
oil.
1. Lean the snow thrower slightly to the right so that the oil
draining plug is the lowest point of the engine.
2. Unscrew the oil draining plug.
3. Let the oil run out into a container.
4. Screw back the oil draining plug.
5. Fill with new oil: See BEFORE STARTING above for
type.
Oil amount in the crankcase: 0.8 litre
Service item Frequency Type Par.
Safety test Before every
start
5.6
Motor oil change After 2 hour and
then every 50:th
hour.
SAE 5W30 -
10W40
6.2
Drive belts, check After 2 hour and
then every year.
7.5
Auger shaft, lubri-
cate
10 hour Lithium grease
7.2
Mechanism for
chute rotation,
lubricate/check
10 hour 10W oil
7.1
Deflector, lubri-
cate
10 hour 10W oil
-
Wires, lubricate 10 hour 10W oil
-
Linkages, lubri-
cate
10 hour 10W oil
-
Tyre pressure,
check
50 hour
3.7
Auger worm gear,
check
50 hour Winter weight
worm gear oil
-
Spark plug check/
replace
100 hour RC124YC
6.3
 Loading...