22.4 Inspecting and Maintaining the
Cutting Blades
WARNING
■ To reduce the risk of personal injury from unin‐
tended activation, remove the battery before
inspecting the cutting blades or carrying out
any maintenance,
9.1. To help prevent inju‐
ries, always wear heavy-duty work gloves
when handling the hedge trimmer or its cutting
blades, 6.3. STIHL recommends having the
cutting blades sharpened by an authorized
STIHL servicing dealer.
Although it is best to have the cutting blades
sharpened by a dealer on a workshop sharp‐
ener, it is possible to use a flat crosscut sharpen‐
ing file.
Sharpen the cutting blades when cutting per‐
formance begins to deteriorate, i.e., blades fre‐
quently snag on branches or fail to cut material
cleanly.
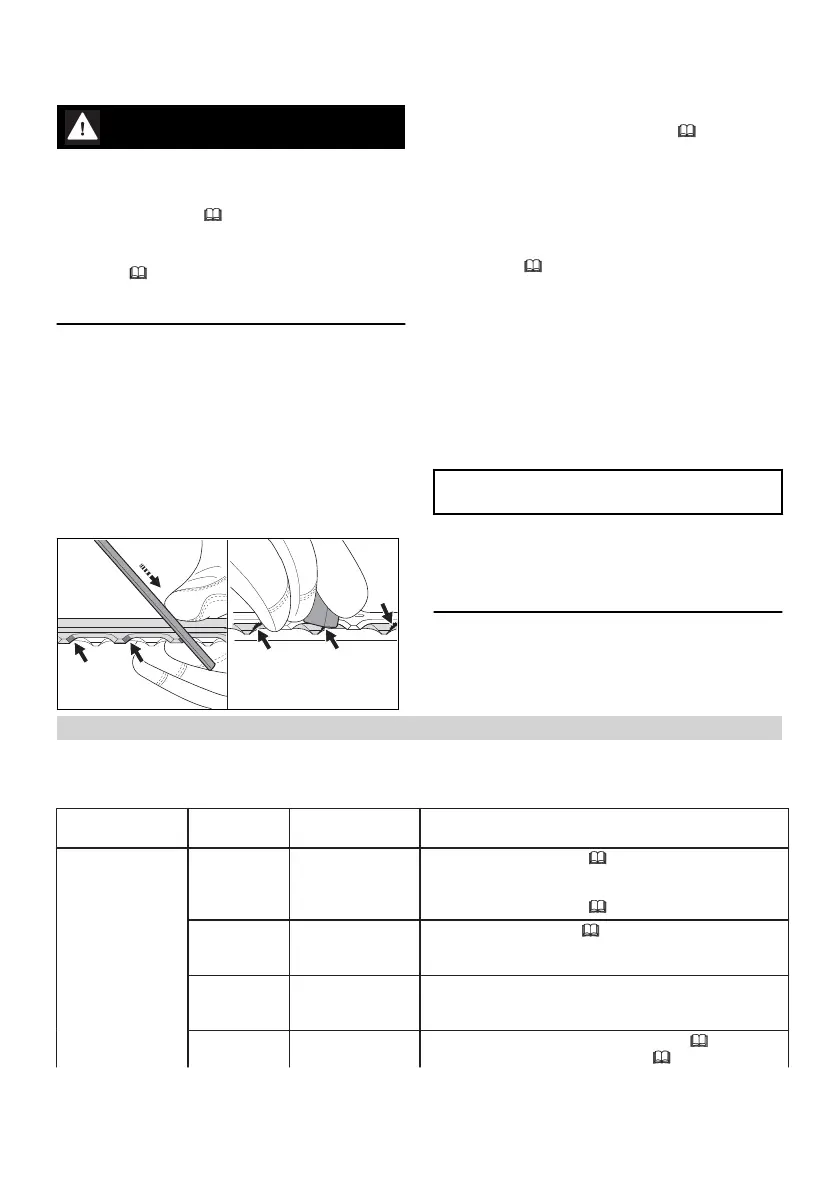
To sharpen the cutting blades with a file:
► Sharpen each cutting edge of the upper cut‐
ting blade with a sharpening file. Always file
toward the cutting edge with a forward motion
matching the sharpening angle,
24.2.
Sharpen on the forward stroke. Lift off the
blade on the backstroke.
► Only sharpen the cutting edges. Do not file
blunt projecting parts of the cutting attach‐
ment, or the cutting blade guard. Make sure
your sharpening stroke matches the sharpen‐
ing angle, 24.2.
► Turn the hedge trimmer over and sharpen the
cutting edges of the lower cutting blade.
► Use a whetstone to remove any burrs from the
cutting edges. Remove as little material as
possible.
► After sharpening, wipe away filing or grinding
dust with a dry or slightly dampened cloth and
then spray the cutting blades with a resin sol‐
vent, such as STIHL Resin Remover and
Lubricant.
NOTICE
■ Operating the machine with dull or damaged
cutting blades may overload the motor. Keep‐
ing the cutting blades sharp helps maintain
cutting performance and the expected life of
the product.
23 Troubleshooting Guide
23.1 Hedge Trimmer and Battery
Always remove the battery before carrying out any inspection, cleaning or maintenance.
Condition LEDs on
Battery
Cause Remedy
Hedge trimmer
does not start
when switched
on.
No electrical
contact between
hedge trimmer
and battery.
►
Remove the battery, 14.2.
► Visually check the electrical contacts in the bat‐
tery compartment and on the battery.
►
Reinsert the battery, 14.1.
1 LED
flashes
green.
Battery has low
charge.
►
Charge the battery, 11.
1 LED glows
red.
Battery too hot /
too cold.
► Allow the battery to warm up or cool down grad‐
ually at ambient temperatures of about 50 °F to
68 °F (10 °C to 20 °C).
4 LEDs flash
red.
Malfunction in
battery.
►
Remove the battery and reinsert it, 14.
►
Switch on the hedge trimmer, 15.1.
English 23 Troubleshooting Guide
24 0458-019-8201-A
 Loading...