OM3750 Rev. 5 11 January 2004
Page 9 of 24
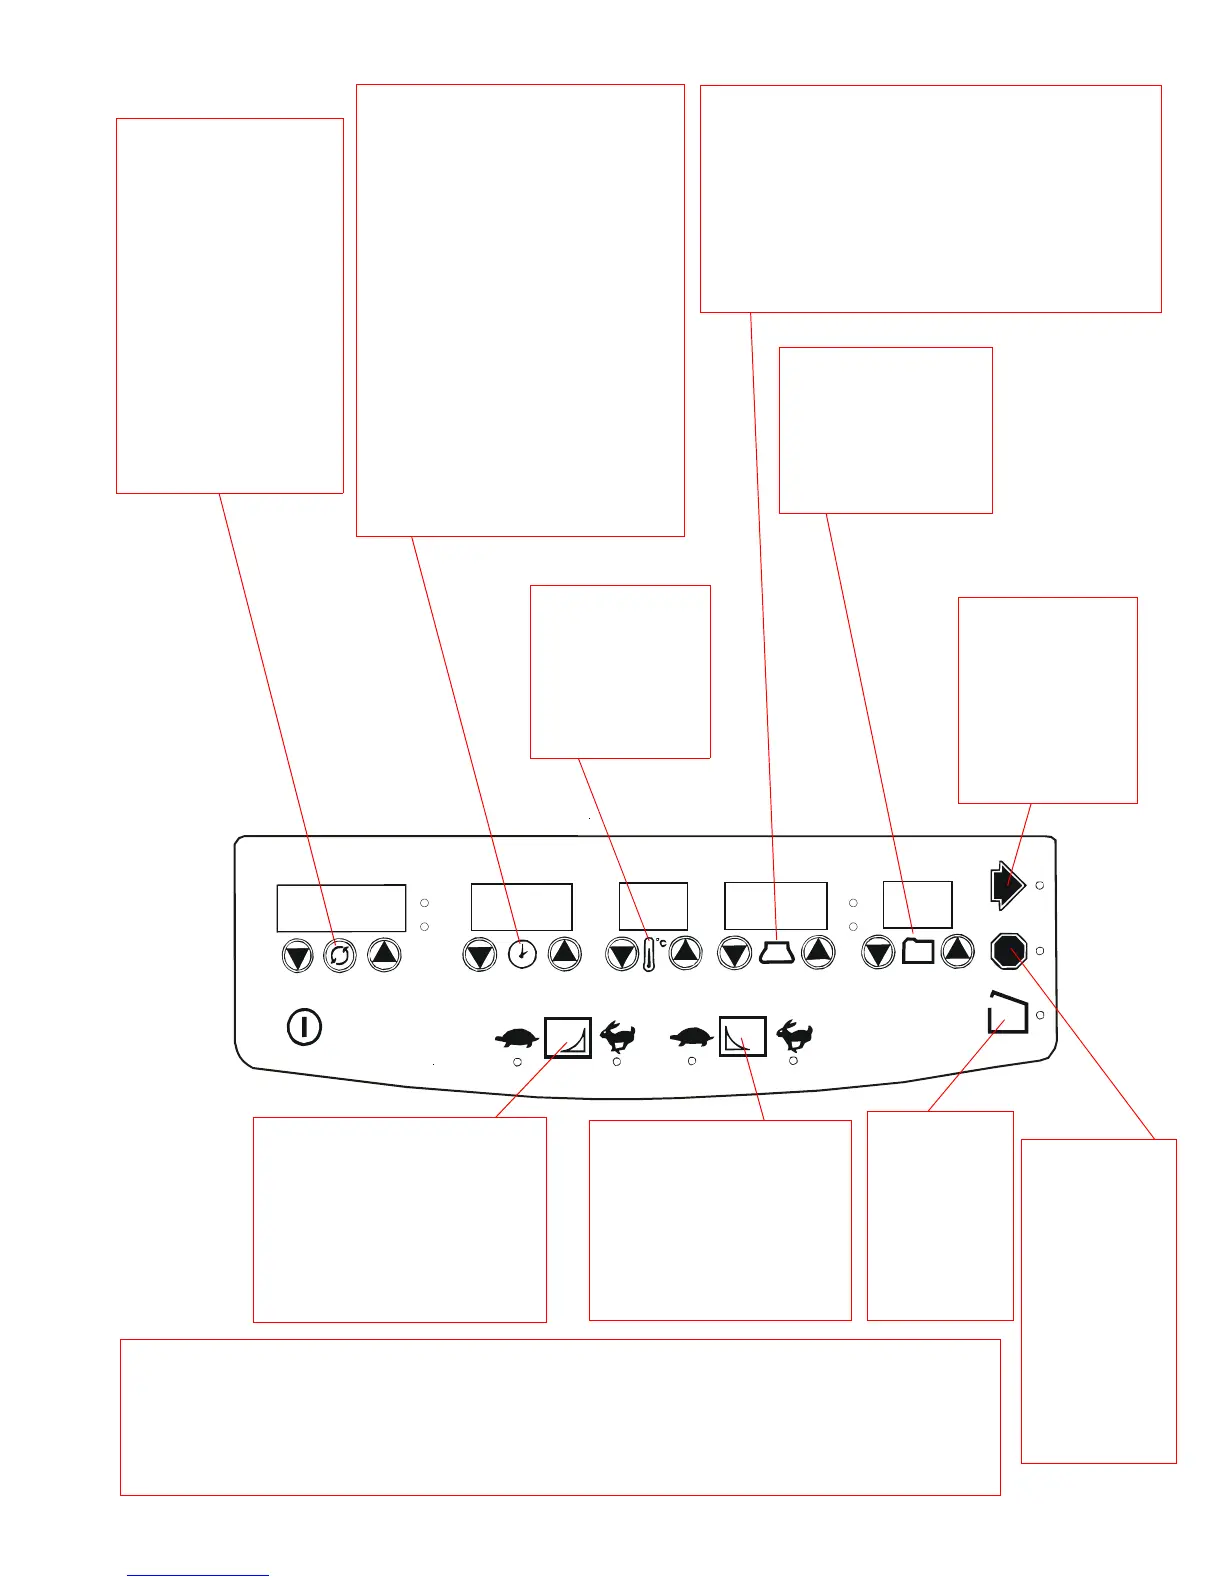
3.6 Front Panel
RPM
RCF
Rotor
Radius
Speed/Force display:
The rotor speed in RPM or
force in RCF. Press this
symbol to toggle between
RPM and RCF. Use the
arrow keys to change the
set speed or force. The
display shows speed within
50 RPM. It never requires
calibration. Select speed in
increments of 100 RPM,
from 1,000 through 8,500
RPM. Select RCF in
increments from 1 - 1,000
xg by 50 xg and above
1,000 xg by 100 xg. The
numeric display can also
display warning or error
messages.
Time display: The number in the display
(above this symbol) indicates time. Below
ten minutes, time is displayed as
minutes:seconds. Above 10 minutes, just
minutes are displayed.
Time is set in:
1 second increments from
1 - 59 seconds.
15 second increments from
1 - 5 minutes.
1 minute increments from
5 - 99 minutes.
In normal timed mode, the system counts
down from the set point. In time Hold or
momentary spin modes, the system counts
up.
In At-Start mode, the timer begins counting
at the start of a run. In At-Speed mode, the
timer begins counting when the rotor
reaches 95% of the set speed.
Temperature display:
The number in the
display (above this
symbol) represents
temperature in degrees
Celsius, from − 9 °C
through + 40 °C
(Refrigerated only).
Rotor/Radius Key: The display (above this symbol) indicates the
selected rotor number or the rotor radius, in centimeters. The
rotor/radius key toggles between the two displays. The
applicable Thermo Electron rotor numbers are supplied in the
memory, along with their maximum radii, in centimeters. To
select a rotor number, toggle to ROTOR, and press an arrow
key under the rotor/radius display. To change the radius,
toggle to RADIUS, and press an arrow key under the rotor/
radius display. Note that the radius cannot be changed to a
radius larger than the maximum radius, or less than the
minimum radius, for the selected rotor.
Program key: This key saves
the currently displayed
desired settings as stored
programs 1 through 99. The
numeric display (above this
symbol) shows the stored
program number and mode
of operation.
Use the arrow keys to view or change the Set parameters for Speed/Force, Time, Temperature (Refrigerated only) Rotor/
Radius, or Program. The first time the key is pressed the numeric display switches from Actual readings to Set parameters,
without changing them. If you press the key a second time the selected parameter increases or decreases once for each
depression. If you hold the key down, the setting will keep changing until you release the key.
The longer you hold the key the more rapidly the setting changes. Hold a key down to approach a desired setting. Then
press the up or down key repeatedly to select the exact setting. When you release the arrow keys for 3 seconds the display
returns to the Actual readings.
This key starts a run. A
run is governed by the
Set parameters (manual
or programmed). The
associated green light
blinks, until the rotor
reaches 95% of the set
run speed. The light
stays on until the end of
the run.
This key unlocks
the cover. This key
is inoperative if a
run is in progress.
Pressing it will not
stop the run. The
cover will not
unlock until the
rotor has slowed to
below 100 rpm.
This key stops a run.
(A run will also stop
automatically when
the set time has
elapsed or the start
key is released in
momentary mode.)
The red light will
flash to indicate the
rotor is still slowing
down (braking or
coasting). When the
run ends the red light
stays on indicating
that the rotor has
stopped.
This key controls rotor braking. If
the yellow light over the rabbit is lit,
full braking is selected. If the
yellow light over the turtle is lit,
slow braking is selected. (This
means the rotor will coast down
from 500 RPM.) If both lights are
out, all braking is disabled and the
rotor will coast from operating
speed to a stop.
This key controls rotor acceleration up
to 400 RPM. If the yellow light over the
rabbit is lit, full acceleration is selected.
If the yellow light over the turtle is lit,
slow acceleration is selected. Slow
acceleration takes from 15 to 35
seconds to achieve 400 RPM,
depending on the rotor and its contents.
After 400 RPM, full acceleration is
applied until the set speed is reached.

 Loading...