EasyManua.ls Logo

Toshiba e-STUDIO 203S User Manual

Toshiba e-STUDIO 203S
96 pages
To Next Page IconTo Next Page
To Previous Page IconTo Previous Page
Page #22 background imageLoading...
Page #22 background image
20
3
Chapter 3
This chapter explains basic copying functions.
NORMAL COPYING
Using the document glass
1
Open the document cover/RADF, and place the original face
down on the document glass.
[How to place the original]
Align the original with the original scale and the
centering ( ) mark.
2
Gently close the document cover/
RADF.
By factory default, when a copy is made with
the document cover/RADF cover open, the
function for preventing excessive toner use
activates and "CHECK ORIGINAL" appears
in the display. (See the
"Check RADF open
function" (p.21)
.)
3
Select the number of copies and any other copy settings, and
then press the [START] key ( ).
Copying books or originals with folds or creases
Press down on the document cover/RADF while
copying as shown. If the document cover/RADF is
not completely closed, shadows may appear on the
copy or it may be fuzzy. Straighten originals that
have folds or creases before placing it on the
document glass.
The document glass can scan up to 8-1/2" x 14" original.
When a copy is made, the edges will not be copied (image loss). For
the image loss, see the "SPECIFICATIONS" (p.82).
To stop copying in the middle of a run, press the [CLEAR] key ( ).
For the copy settings, see pages 23 through 35.
Note
mark
Original scale
Note
MAKING COPIES
Get other manuals https://www.bkmanuals.com
Question and Answer IconNeed help?

Do you have a question about the Toshiba e-STUDIO 203S and is the answer not in the manual?

Toshiba e-STUDIO 203S Specifications

General IconGeneral
BrandToshiba
Modele-STUDIO 203S
CategoryCopier
LanguageEnglish

Summary

CAUTIONS

Caution Label and Usage Warnings

Details on caution labels, safe usage practices, and installation site considerations.

Safety Precautions for Laser Use

Specific safety measures related to the laser product and radiation exposure.

Chapter 1 PREPARATIONS

POWER ON AND OFF

Instructions for powering the machine on and off, including safety warnings.

Chapter 2 LOADING PAPER

Chapter 3 MAKING COPIES

NORMAL COPYING

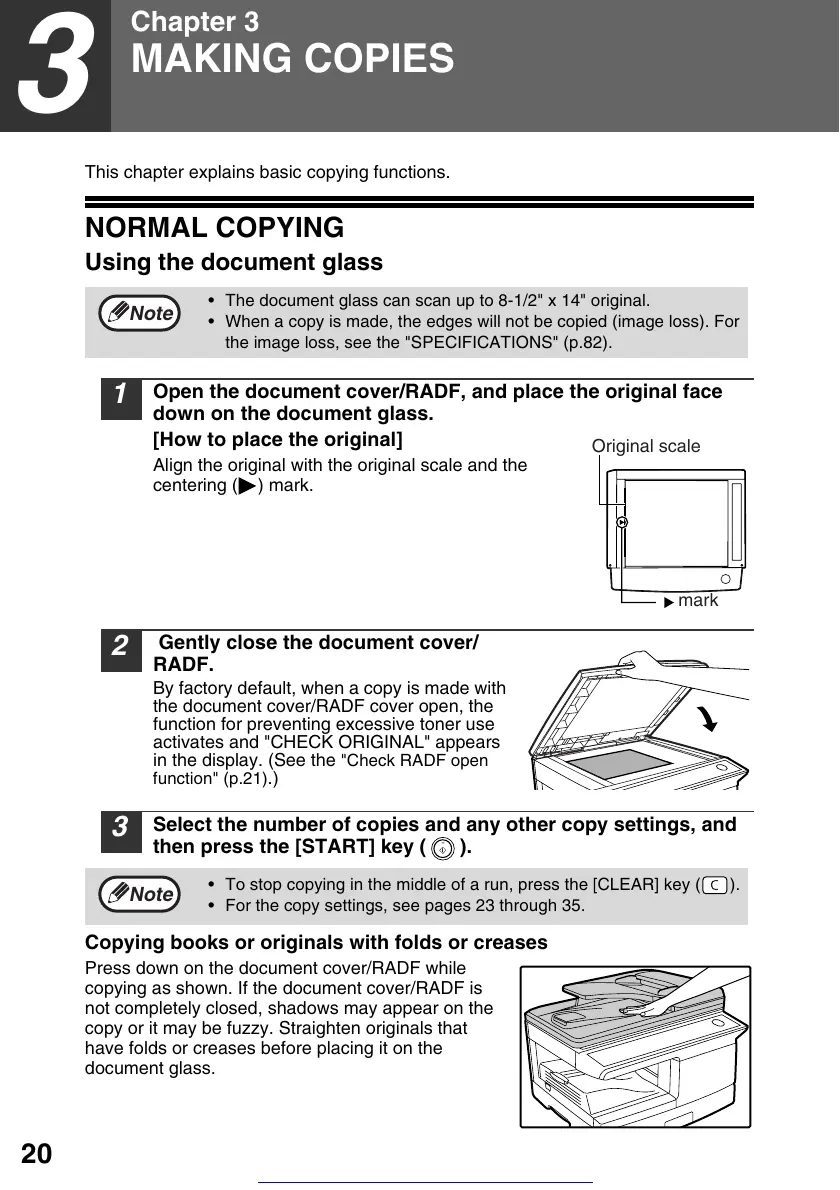
Step-by-step guide for basic copying using the document glass and RADF.

Copying Functions

Instructions for adjusting copy darkness, reduction, and enlargement.

Chapter 4 CONVENIENT COPY FUNCTIONS

AUTOMATIC TWO-SIDED COPYING

Guide to creating two-sided copies from originals using document glass or RADF.

Chapter 5 INSTALLING THE SOFTWARE

INSTALLING THE SOFTWARE

Step-by-step guide for installing the machine's software on a computer.

SETTING UP BUTTON MANAGER

Instructions for configuring Button Manager to link with scanner events.

Chapter 6 PRINTER/SCANNER FUNCTIONS

USING THE PRINTER MODE

Procedure for printing, including basic steps and job cancellation.

USING THE SCANNER MODE

Guide to using the scanner mode, including panel operations and computer scanning.

Chapter 7 USER SETTINGS

Chapter 8 TROUBLESHOOTING AND MAINTENANCE

DISPLAY MESSAGES

Explanation of error indicators and display messages with causes and remedies.

TROUBLESHOOTING THE MACHINE

Common operational problems and their solutions for the machine.

MISFEED REMOVAL

Detailed instructions for removing paper misfeeds in various locations.

TONER CARTRIDGE REPLACEMENT

Procedure for replacing the toner cartridge when it is empty or near empty.

Related product manuals