VCU1525 Acceleration Platform User Guide 45
UG1268 (v1.0) November 13, 2017 www.xilinx.com
Chapter 3: Board Component Descriptions
Each voltage listed in Table 3-10 is scaled through a resistor attenuator network and the
resulting scaled voltage is connected to the specified MSP432 board management
controller ADC channel.
Rail load current measurements other than V
CCINT
are not implemented on the VCU1525
board. V
CCINT
load current is measured by the U41 LTC3884 power controller using inductor
DCR measurement techniques.
Vccint Regulator Circuit
The VCU1525 PCIe CN1 edge connector provides limited 12V power (5.5 amperes max.). The
V
CCINT
power circuit is comprised of six phases to allow a two-step additional power
increase when the auxiliary 12V power is applied through the 2x4 power connector JP1,
shown on page 17 of the VCU1525 schematic [Ref 7]. JP1 is split into two sections, each with
its own PRSNT detection circuit.
V
CCINT
power is incrementally increased as follows:
• PCIe edge connector 12V power only results in V
CCINT
phase 1 voltage at 35 amperes
max.
• Plugging a 4-pin 2x2 12V connector into JP1 pins 1-2-5-6 enables 12V AUX0
recognition, and V
CCINT
phase 2, 3, and 4 come on (phase 1–4 max. current is 110
amperes).
• Plugging an additional 4-pin 2x2 12V connector into JP1 pins 3-4-7-8 enables 12V
AUX1 recognition, and V
CCINT
phase 5 and 6 come on (phase 1–6 max. current is 160
amperes).
• The Linear Technology LTpowerPlay GUI (with PMBus access to the primary LTC3884
U41 voltage controller phases 1/2 regulator only) assumes equal current sharing by the
LTC3874 slave controllers (phases 3/4 U40, and phases 5/6 U39), so the total V
CCINT
rail
current reported is the measured phases 1/2 current x 3.
Cooling Fan Connector
[Figure 2-1, callout 17]
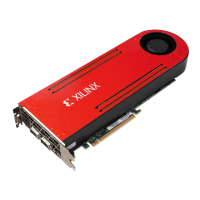
The VCU1525 board cooling fan connector J4 location is shown in Figure 2-1. The VCU1525
cooling assembly enclosing the entire board is shown installed in Figure 1-1 VCU1525
Reconfigurable Acceleration Platform (Active Cooling).
Note:
Figure 1-1 shows the active version of the board showing the whole-board fan enclosure
installed.
The VCU1525 board uses a TI LM96063 (U1) fan controller, which autonomously controls the
fan speed by controlling the pulse width modulation (PWM) signal to the fan based on the
die temperature via the FPGA's DXP and DXN pins. The fan rotates slowly (acoustically quiet)
when the FPGA is cool and rotates faster as the FPGA heats up (acoustically noisy).
 Loading...