of the fractured surface to line up the two pieces Tack-weld
or clamp parts in position If the crack has not separated
the casting, a vee-groove can be chipped out with a dla-
mond-polnt chisel Chip an inch or so beyond the visible
ends of the crack as it may extend under the surface. On
cracked water jackets, where only a sea! is required, the
depth of the groove need only be one-half the thickness
of the casting.
Keep the casting as cool as possible and do not expect to
complete a weld in cast iron as rapidly as in the same length
in mild steel Use a smaller rod and a slightly higher current
than for the same thickness of steel. Lay a short bead, about
an inch long, at one end of the crack and peen it immediately
with a cross-peen hammer or blunt chisel to spread the
weld metal and relieve locked-up stresses, Do not strike the
edges of the casting. Place the second bead at the opposite
end of the crack and the next in the center, etc (fig 1)r
AllOW enough time between welding to permit your bare
hand to be held on it Never use water or a blast of air
to cool the casting Although cracks may not show up
immediately, the locked-up stresses due to uneven cooling
will cause the casting to fail after it is back in service_ Wire
brush each bead before depositing the next Then continue
to fill the groove with short weld beads as before, working
rapidly when depositing and peening the bead Allow plenty
of time for cooling. Examine the casting for cracks that may
develop during cooling periods if any of the beads crack,
chip them out and re-weld If cracking persists, preheat
the entire casting slowly to a dull red heat with an oxyacety-
lene torch or blow-torch When the preheated method is
used, the welding can be continuous After completing the
weld, cover the casting with warm dry sand or slaked lime
so it will cool slowly
Malleable iron is ordinary gray cast iron that has been heat
treated to give it a tough ductile outer skin The method of
welding is the same as for cast iron
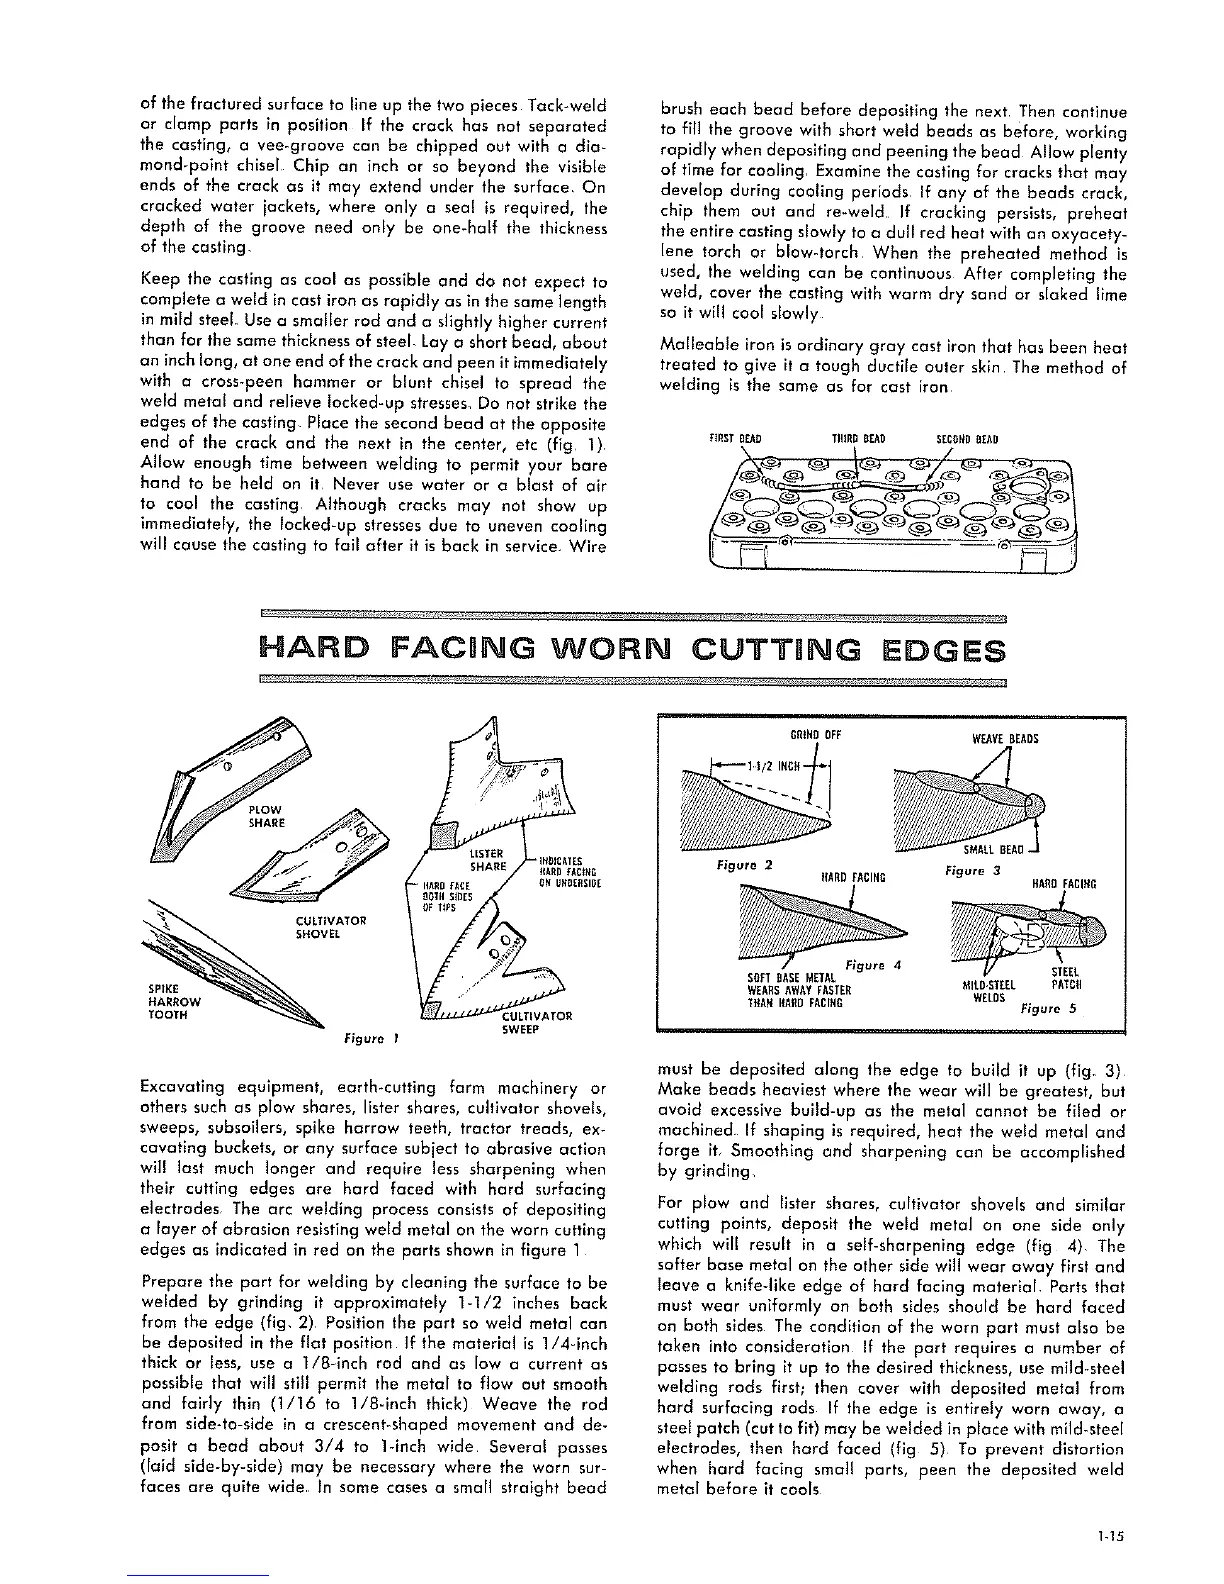
HARD FACING WORN CUTTltNG EDGES
PLOW
CULTIVATOR
SHOVEL
SPIKE /
HARROW
TOOTH .'ULTIVATOR
SWEEP
Figure I
Excavating equipment, earth_cutting farm machinery or
others such as plow shares, lister shares, cultivator shovels,
sweeps, subsoilers, spike harrow teeth, tractor treads, ex-
cavating buckets, or any surface subject to abrasive action
wil! last much longer and require less sharpening when
their cutting edges are hard faced with hard surfacing
electrodes The arc welding process consists of depositing
a layer of abrasion resisting weld metal on the worn cutting
edges as indicated in red on the parts shown in figure 1
Prepare the part for welding by cleaning the surface to be
welded by grinding it approximately 1-1/2 inches back
from the edge (fig. 2) Position the part so weld metal can
be deposited in the flat position If the material is 1/4_inch
thick or less, use a I/8-inch rod and as low a current as
possible that will still permit the metal to flow out smooth
and fairly thin (1/16 to 1/8-1nch thick) Weave the rod
from side-to-side in a crescent-shaped movement and de-
posit a bead about 3/4 to 1-1nch wide Several passes
(lald side-by-slde) may be necessary where the worn sur-
faces are quite wide In some cases a small straight bead
DRtHO OFF WEAVEDEARS
Figure 2
RARD EACIRR
SMALLBEAR-
Figure 3
HA_DEACIHR
SOFTBASEMETAL
WEARSAWAYEASTER MILD,STEEL PATCD
TRAHRAflDFACIDG WELDS
Fieure 5
must be deposited along the edge to build it up (fig. 3)
Make beads heaviest where the wear will be greatest, but
avoid excessive build-up as the metal cannot be filed or
machined If shaping is required, heat the weld metal and
forge it. Smoothing and sharpening can be accomplished
by grinding.
For plow and lister shares, cultivator shovels and similar
cutting points, deposit the weld metal on one side only
which will result in a self-sharpenlng edge (fig 4) The
softer base metal on the other side will wear away first and
leave a knlfe-like edge of hard facing material Parts that
must wear uniformly on both sides should be hard faced
on both sides The condition of the worn part must also be
taken into consideration If the part requires a number of
passes to bring it up to the desired thickness, use mild-steel
welding rods first; then cover with deposited metal from
hard surfacing rods If the edge is entirely worn away, a
steel patch (cutto fit) may be welded in place with mild-steel
electrodes, then hard faced (fig 5) To prevent distortion
when hard facing small parts, peen the deposited weld
metal before it cools
1-15
 Loading...