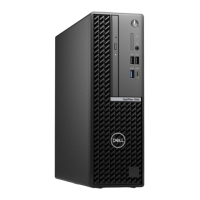
c. Lift the processor out of the socket [3].
Installing the processor
Steps
1. Align the processor with the socket keys.
2. Align the pin-1 indicator of the processor with the triangle on the socket.
3. Place the processor on the socket such that the slots on the processor align with the socket keys.
4. Close the processor shield by sliding it under the retention screw.
5. Lower the socket lever and push it under the tab to lock it.
6. Install the:
a. heat sink
b. fan duct
c. optical drive
d. hard drive assembly
e. front bezel
f. cover
7. Follow the procedure in After Working Inside Your Computer.
Removing the VGA daughter board
Steps
1. Follow the procedure in Before Working Inside Your Computer.
2. Remove the:
a. cover
b. fan duct
3. To remove the VGA daughter board:
a. Remove the screws that secure the VGA connector to the computer [1].
b. Slide the VGA connector to release it from the computer [2].
c. Remove the screw that secures the VGA daughter board to the computer [3].
d. Lift the VGA daughter board using the handle to remove it from the computer [4].
Removing and installing components
17
 Loading...