15
Instrucciones de Instalación
A4
MONTE EL HORNO (cont.)
P
o
pc
or
n
C
o
n
v
e
n
i
en
c
e
C
o
o
k
i
n
g
E
xp
re
s
s
C
o
o
k
P
o
t
at
o
S
t
a
rt
P
a
u
s
e
C
a
n
c
e
l
O
f
f
B
ev
e
r
age
R
ehea
t
Se
t
C
lock
Tu
r
nt
abl
e
Su
r
fa
c
e
Li
gh
t
V
en
t
Ad
d
30
S
ec
.
Po
w
e
r
L
e
v
e
l
0
8
5
2
7
4
1
9
6
3
C
o
o
k
T
i
m
e
D
ef
r
o
s
t
W
e
i
g
h
t/
T
i
m
e
Ti
m
e
r
O
n
/
O
f
f
5
4
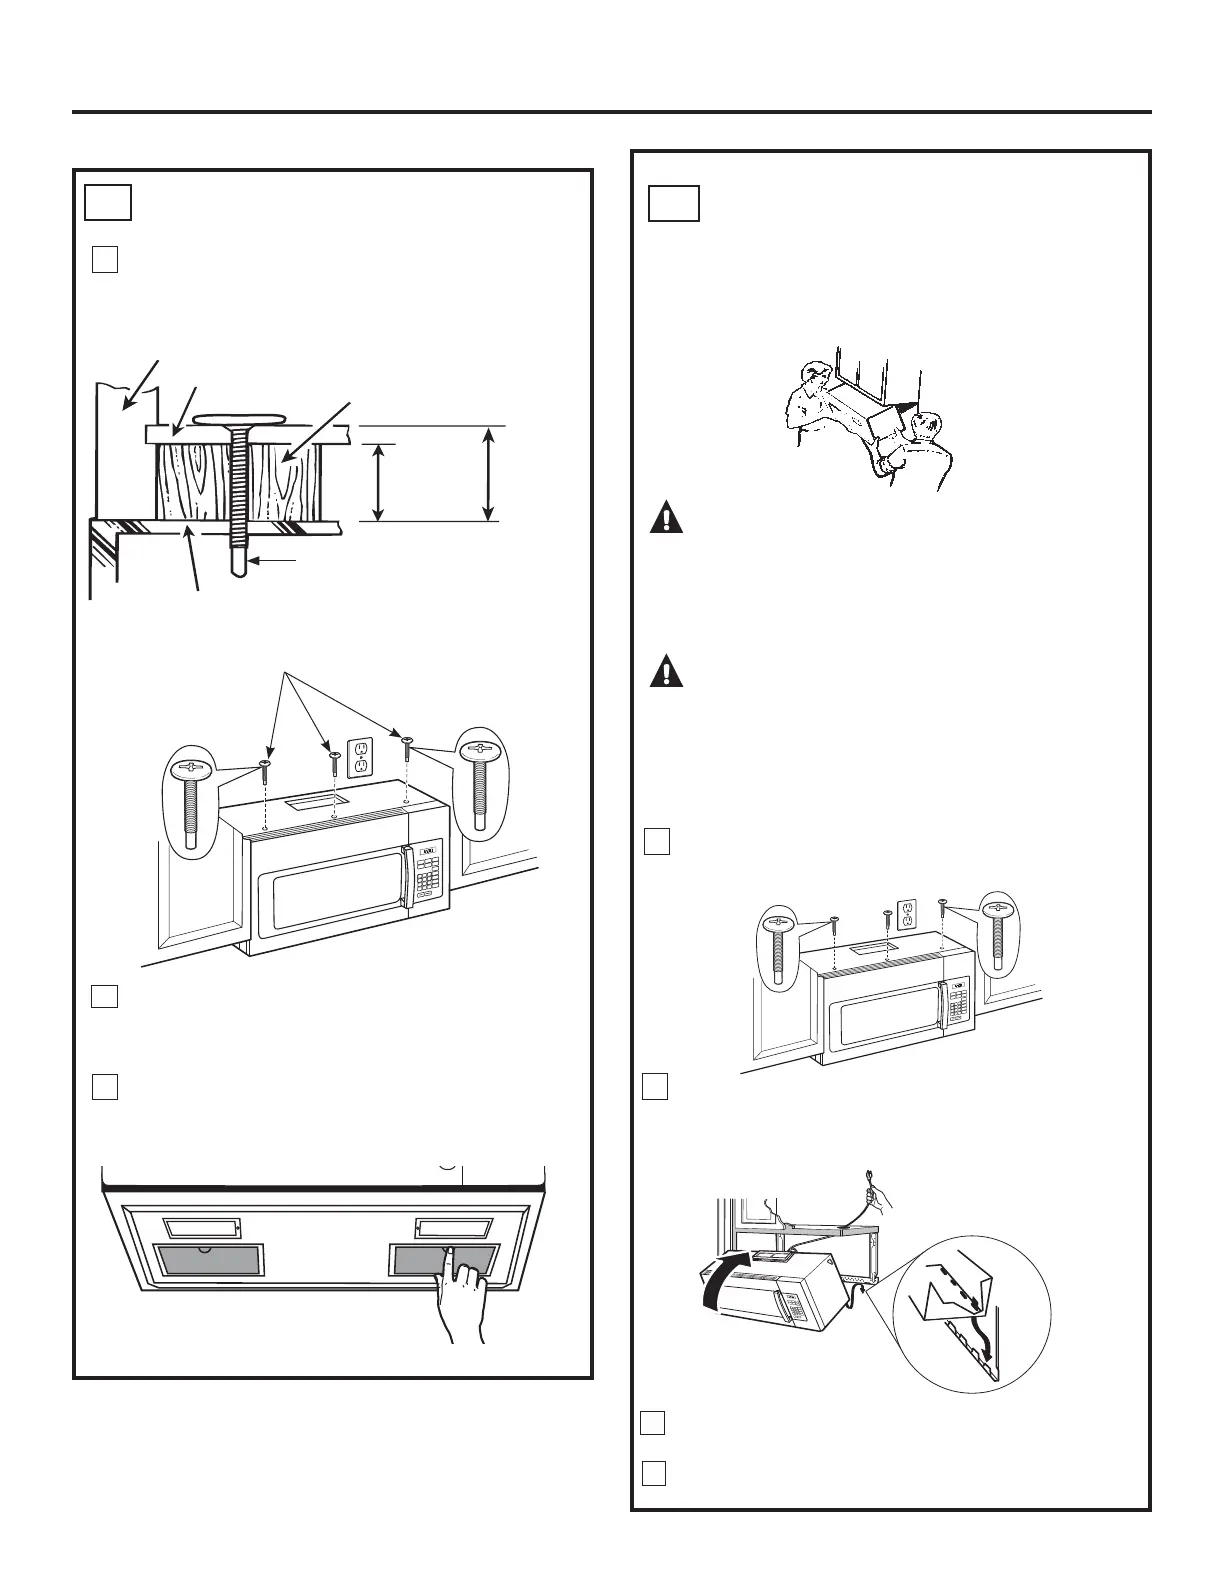
Ajuste los tres tornillos en la parte superior
del horno microondas. (Al ajustar los tornillos,
sostenga el horno microondas en su posición
contra la pared y el gabinete superior).
Instale los filtros de grasa. Consulte el Manual del
Propietario embalado con el horno microondas.
Inserte 3 tornillos autoalineantes (1/4” – 28 x 2 ¼”) a
través de los agujeros del gabinete superior externo.
Dé dos giros completos a cada tornillo.
3
Frente del Gabinete
Estante Inferior del Gabinete
Bloque de relleno
Parte Superior del Horno
Microondas
Equivalente a
la Profunidad
del Hueco
del Gabinete
Tornillo Autoalineante
Tornillos Autoalineantes
Esta distancia
NO puede
superar
las 2” para
asegurar una
instalación
adecuada
,167$/$&,Ï15((03/$=2'(/
FILTRO DE CARBÓN SIN ACCESO A
LOS TORNILLOS SUPERIORES Y LA
UNIDAD YA FUE MONTADA
A5
DESMONTE EL HORNO MICROONDAS
PRECAUCIÓN: $ILQGHHYLWDUHOULHVJR
de lesión personal (lesión en la espalda u otras lesiones
GHELGRDXQSHVRH[FHVLYRGHOKRUQRPLFURRQGDVR
GDxRVVREUHODSURSLHGDGGHEHUiFRQWDUFRQODD\XGD
GHGRVSHUVRQDVSDUDLQVWDODUHVWHKRUQRPLFURRQGDV
IMPORTANTE: No tome ni use la manija durante el retiro.
ADVERTENCIA:
Riesgo de Descarga
Eléctrica. Puede ocasionar lesiones o la muerte: Si retira
ODXQLGDGFRQHQFLPHURVGHPHWDOFXEUDHOH[WUHPRGHO
DJXMHURGHOFDEOHGHOVXPLQLVWURGHFRUULHQWHFRQDLVODQWH
SDUDHOFDEOHGHOVXPLQLVWURGHFRUULHQWH
IMPORTANTE: Si no se usan bloqueos de filtro, se podrán producir
daños en la caja debido al ajuste excesivo de los tornillos.
P
o
pc
o
rn
C
o
n
v
e
n
i
en
c
e
C
o
o
k
i
n
g
Ex
p
re
s
s
C
o
o
k
P
o
t
at
o
S
t
a
rt
P
a
u
s
e
C
a
n
c
e
l
O
f
f
B
ev
e
rage
R
ehea
t
Se
t
C
l
o
ck
Tu
rnt
abl
e
Su
r
fac
e
Li
gh
t
V
en
t
Ad
d
30
S
ec
.
Po
w
e
r
L
e
ve
l
0
8
5
2
7
4
1
9
6
3
C
o
o
k
T
i
m
e
D
ef
r
o
s
t
W
ei
g
h
t
/
T
i
m
e
Ti
m
e
r
O
n
/
O
f
f
P
o
p
c
o
r
n
C
o
n
ve
n
i
e
n
c
e
Co
o
k
i
n
g
E
x
p
re
s
s
C
o
o
k
P
o
t
at
o
S
t
ar
t
P
a
u
s
e
C
a
n
c
e
l
O
f
f
B
e
v
e
r
a
g
e
R
e
h
e
a
t
S
e
t
C
lo
c
k
T
ur
n
ta
b
l
e
S
u
r
f
ac
e
L
i
gh
t
V
e
n
t
A
d
d
3
0
S
e
c
.
P
ow
e
r
L
e
v
e
l
0
8
5
2
7
4
1
9
6
3
C
o
o
k
T
i
m
e
D
e
f
r
o
s
t
We
ig
h
t
/
T
i
m
e
T
i
m
e
r
O
n
/
Of
f
Afloje los 3 tornillos en la parte superior del horno
microondas (dentro del gabinete).
1
Levante el horno microondas, incline el mismo hacia
adelante, y desenganche las ranuras en el extremo
inferior trasero sobre las cuatro lengüetas inferiores
de la placa de montaje.
2
Reemplace el filtro usando instrucciones de la
sección A3.
Vuelva a instalar la unidad siguiendo las
instrucciones de A4.
3
4
 Loading...