UM ColorVu DS-2CExxDFT-Fxx 122919NA 11
4. Fix the camera to the ceiling with supplied screws.
Figure 10, Affix Camera to Ceiling
NOTE:
The supplied screw package contains self-
tapping screws and expansion bolts.
5. For a concrete wall/ceiling, expansion bolts are
required to fix the camera. For a wood wall/ceiling,
self-tapping screws are required.
6. Connect the corresponding power cord and video
cable.
7. Power on the camera to check whether the image on
the monitor is at an optimum angle. If not, adjust the
surveillance angle.
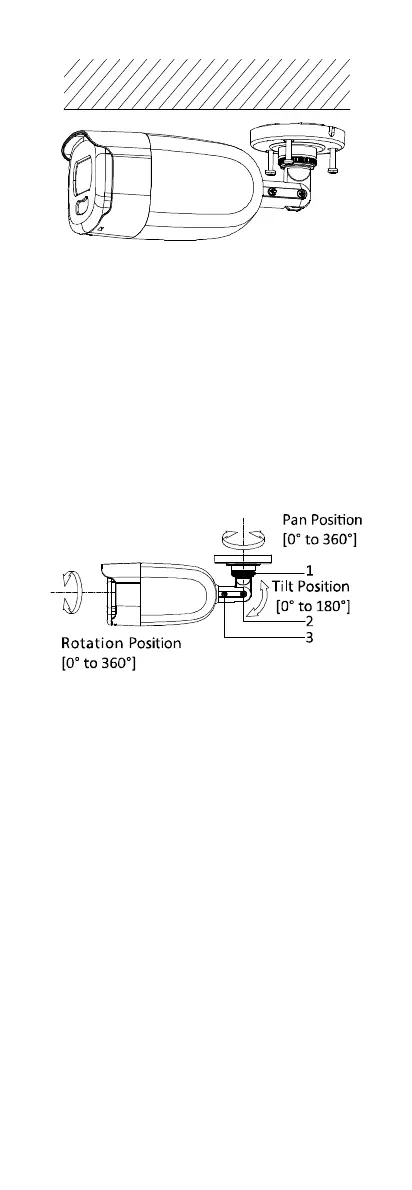
Figure 11, 3-Axis Adjustment
1) Loosen the No.1 adjusting screw to adjust the
pan position [0° to 360°]. Tighten the No.1
adjusting screw.
2) Loosen the No.2 adjusting screw to adjust the
tilting position [0° to 180°]. Tighten the No. 2
adjusting screw.
3) Loosen the No.3 adjusting screw to adjust the
rotation position [0° to 360°]. Tighten the No.3
adjusting screw.
2.2.2 Ceiling/Wall Mounting with Junction Box
Before You Start
You need to purchase a junction box separately.
1. Paste the drill template on the ceiling/wall.
2. Drill screw holes and the cable hole (optional) in the
ceiling/wall according to the drill template holes.

 Loading...