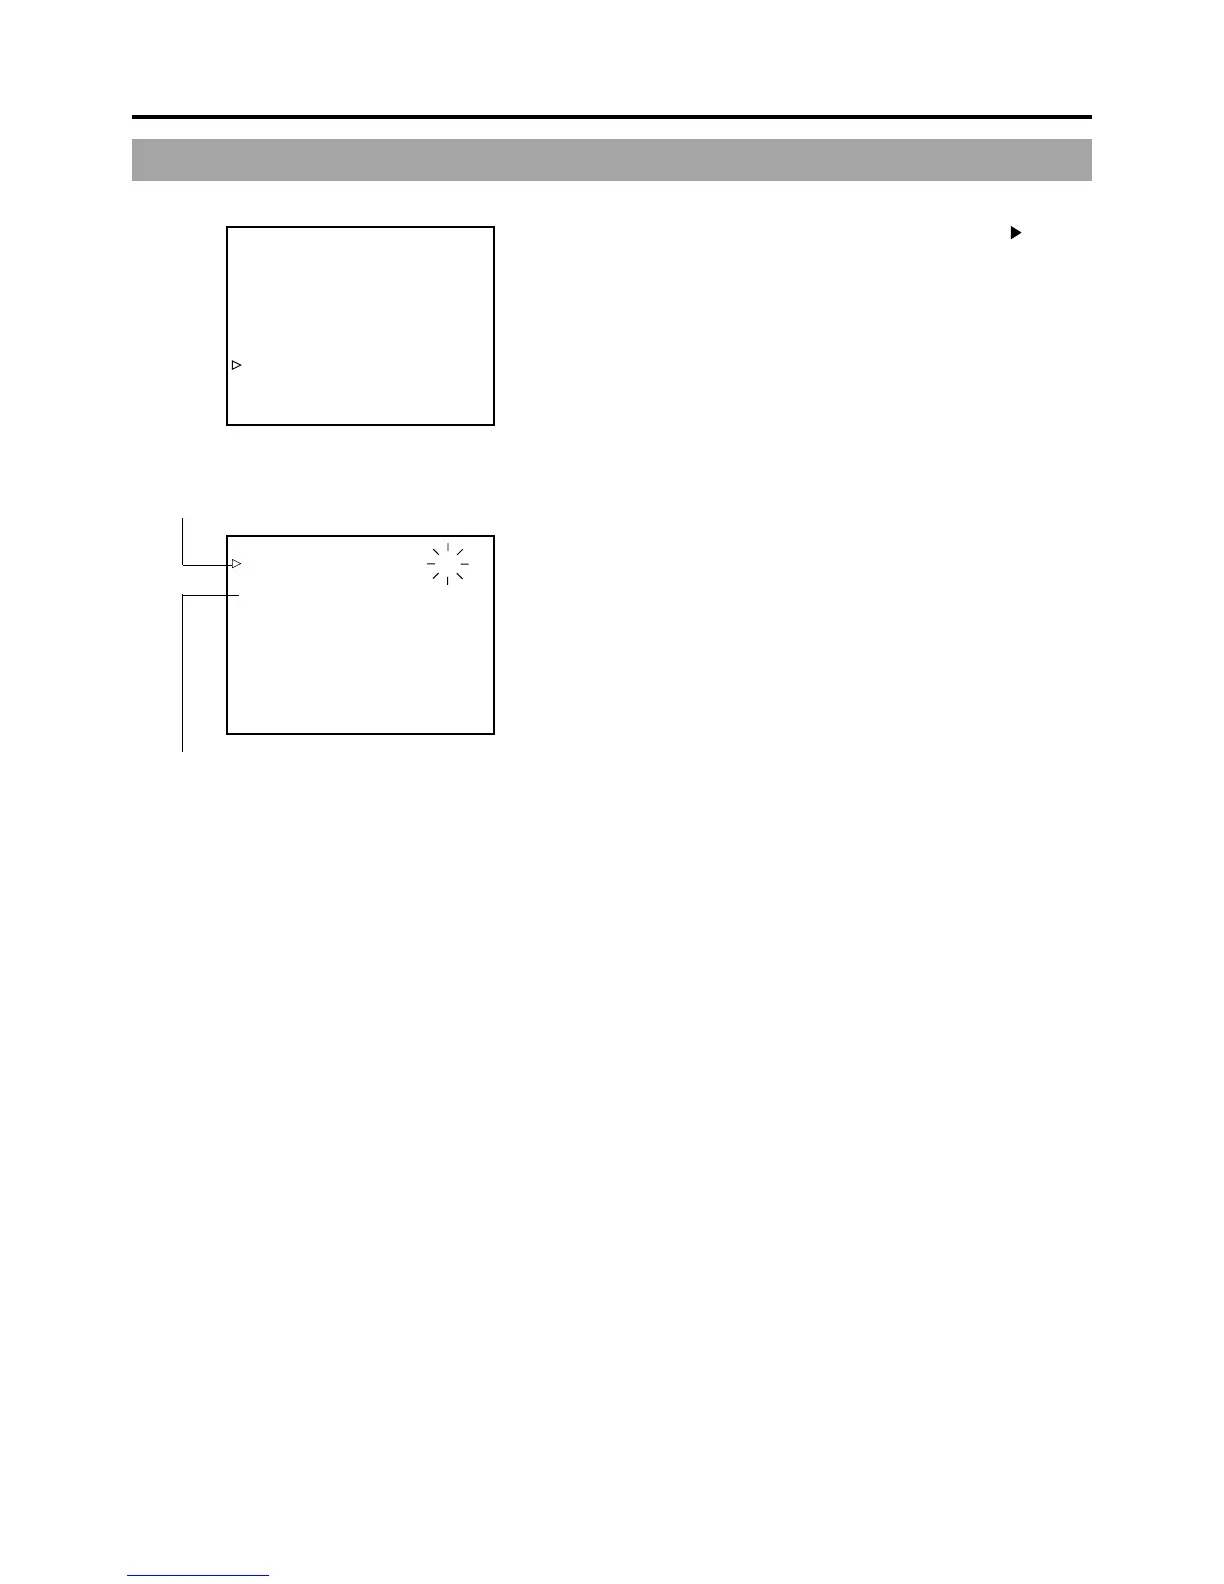
EasyManua.ls Logo

JVC GY-DV5000 User Manual

JVC GY-DV5000
94 pages
To Next Page IconTo Next Page
To Previous Page IconTo Previous Page
Page #42 background image
42
5. PREPARATIONS
––– TIME/DATE –––
DISPLAY ON
DISPLAY MODE BARS+CAM
DATE REC OFF
DISPLAY STYLE DATE+TIME
DATE STYLE MM/DD/YY
TIME STYLE 24HOUR
SEC DISPLAY ON
CLOCK ADJUST..
PAGE BACK
––– CLOCK ADJUST –––
DATE(MM/DD/YY) 12/12/02
TIME 09:33
PAGE BACK
Time (Hour:Min)
6.
Display the screen for setting the date and time.
Rotate the SHUTTER dial to align the cursor (
) with the
CLOCK ADJUST item, and then press the SHUTTER dial.
The CLOCK ADJUST screen appears.
7.
Set the date and time.
The blinking digit is the one to be set.
1 When the SHUTTER dial is pressed, the blinking digit
moves to the next digit.
2 When the SHUTTER dial is rotated, the value of the
blinking digit changes.
When the SHUTTER dial is rotated upward, the value
becomes higher. When rotated downward, the value
becomes smaller.
3 Repeat the procedure described in 1 and 2 above to
set the month, day, year, hours, minutes.
The digits indicating seconds cannot be set.
4 Press the SHUTTER dial in sync with a time signal to
enter the date and time precisely.
8.
When all the settings are completed, rotate the SHUTTER
dial to align the cursor with the PAGE BACK item, and then
press the SHUTTER dial.
The TIME/DATE menu screen returns.
9.
To return to the normal screen, use either of the following
methods.
Press the STATUS button
or
Return to the TOP MENU screen and then select the EXIT
item from the TOP MENU screen before pressing the
SHUTTER dial.
TIME/DATE menu screen
DATE (Year/Month/Day)
CLOCK ADJUST menu screen
5-4 Setting, Displaying and Recording the Date and Time (Cont’d)

Table of Contents

Other manuals for JVC GY-DV5000

Questions and Answers:

JVC GY-DV5000 Specifications

General IconGeneral
BrandJVC
ModelGY-DV5000
CategoryCamcorder
LanguageEnglish

Summary

Controls, Indicators, and Connectors

Front Section Controls and Connectors

Identification and function of controls on the front of the camcorder.

Right Side Controls

Identification and function of controls on the right side of the camcorder.

LCD and Viewfinder Indications

Explanation of status screens, alarm messages, and menu display.

Power Supply Options

AC Power Operation

How to operate the camcorder using the AC power adapter.

Battery Pack Operation

Information on using optional battery packs for portable power.

Preparations for Use

Loading and Unloading Cassettes

Procedure for inserting and ejecting videocassettes.

Settings and Adjustments Before Shooting

Initial Camera Settings

Recommended initial settings for power, switches, and filters.

White Balance Adjustment

Methods for setting white balance, including auto and FAW functions.

Recording Level Adjustment

Adjusting audio input levels for manual and auto modes.

Shooting Operations

Basic Recording Procedure

Step-by-step guide for starting and stopping recording.

Playback Modes

Playback Procedure

Steps to play back recorded videocassettes.

Using External Components

Connecting with DV Components

Connecting to other DV devices for dubbing digital signals.

Menu Screen Operations

Camera Operation Menu

Settings for camera functions like shutter, gain, and aspect ratio.

Audio/Video Menu Settings

Adjustments for audio levels, sampling frequency, and video output.

LCD/VF Menu Settings

Settings for zebra patterns, safety zones, and display indicators.

Camera Section Features

Full-Time Auto White Balance (FAW)

Automatic white balance adjustment for changing lighting conditions.

Iris (Brightness) Adjustment

Methods for adjusting lens iris for optimal exposure.

Adjusting Shutter Speed

How to set shutter speed for special effects or motion control.

Gain (Sensitivity) Adjustment

Adjusting gain for low-light conditions and sensitivity boost.

Other Information and Specifications

Alarm Indications and Actions

Explains alarm messages, warnings, and troubleshooting indicators.

Troubleshooting Guide

Solutions for common symptoms and potential malfunctions.

Related product manuals