Page 17
SETTINGS Menu Interface SETTINGS (Continued)
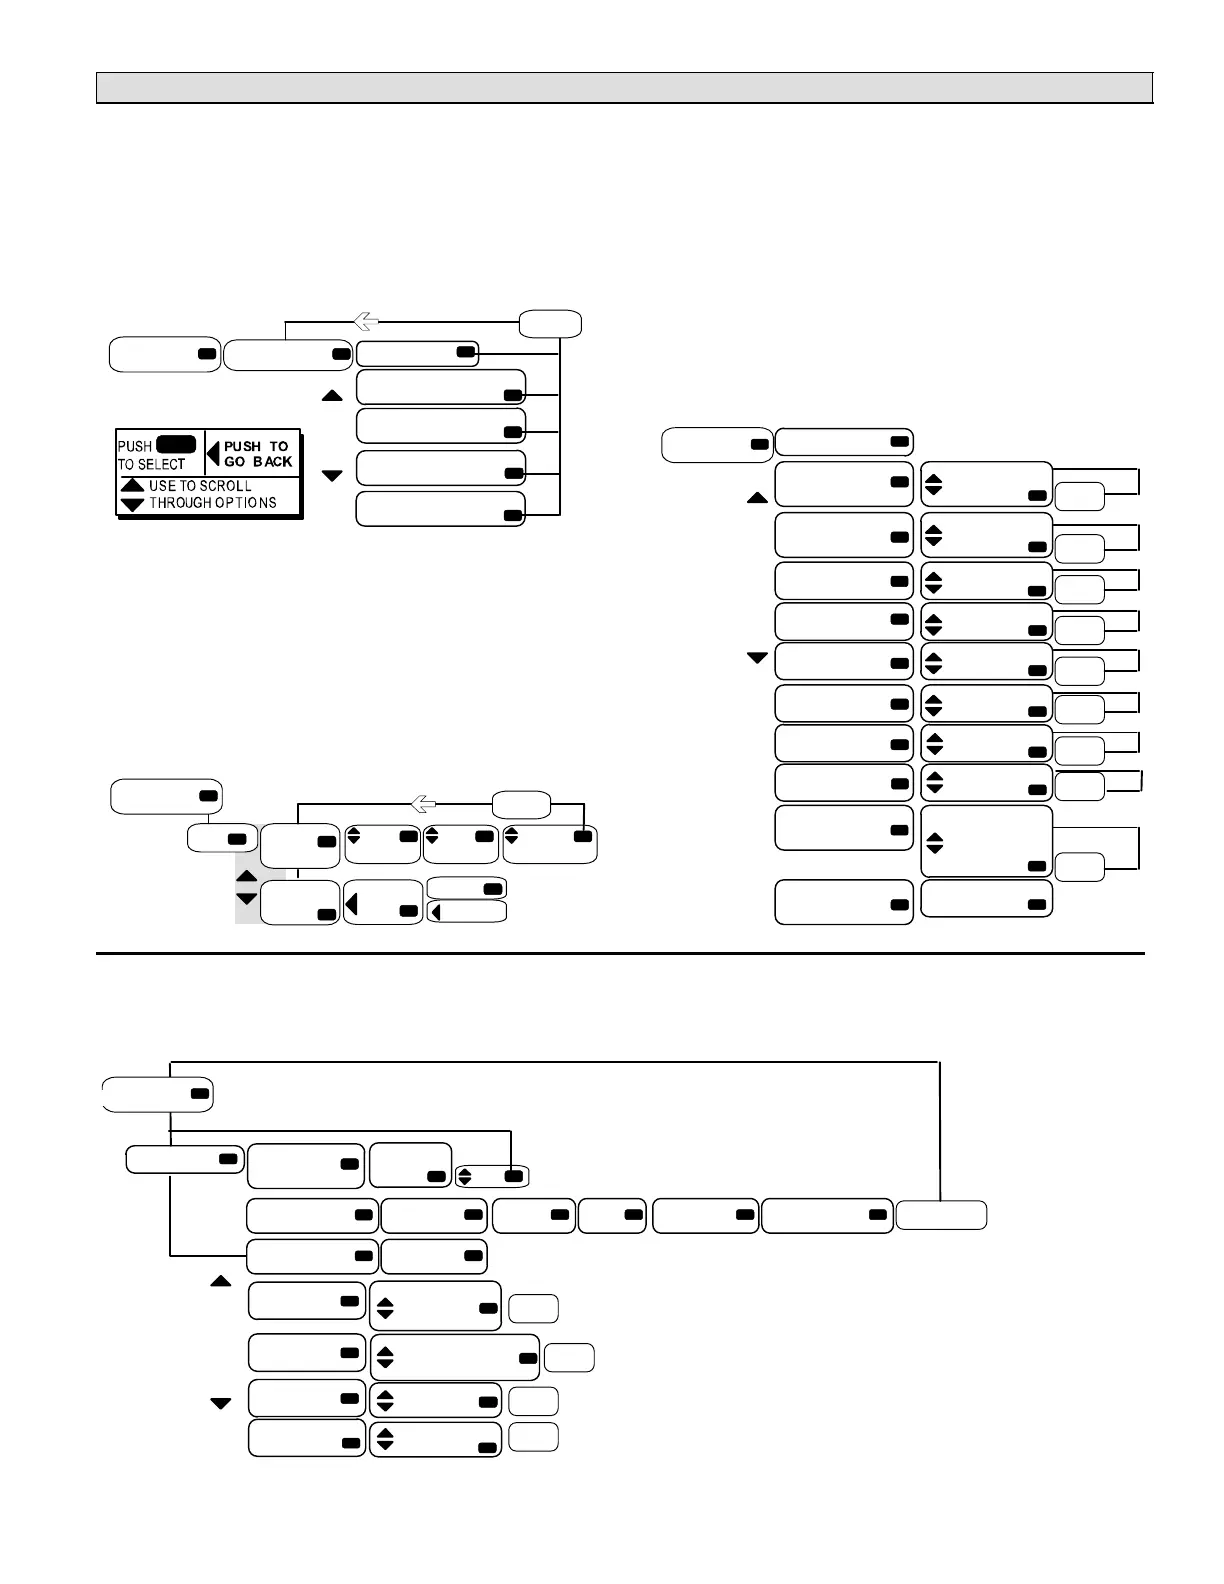
SETTINGS > CONTROL > SMOKE MODE
When you select SMOKE MODE, default settings will be in
place. You may adjust those settings to suit the building’s
requirements. The following diagram shows the SMOKE
MODE menu’s structure and illustrates how to use the con-
trols to make changes.
SMOKE MODE
Use arrows
to move
UNIT OFF
BLWR OFF, EXH ON,
DAMPER SHUT
PURGE−BLWR ON, EXH
ON, DAMPER OPEN
NEGATIVE−BLWR ON, EXH
ON, DAMPER SHUT
POSITIVE−BLWR ON, EXH
OFF, DAMPER OPEN
CONTROL
! SET !
SETTINGS > CONTROL > ECTO
When you select ECTO, default settings will be in place.
You may adjust those settings to suit the building’s require-
ments. The following diagram shows the ECTO menu’s
structure and illustrates how to use the controls to make
changes.
BLOCK/
PARAM/
COUNT
RESET TO
FACTORY
ECTO
ECTO
B#: X
[0, 3 TO 9]
ARE YOU
SURE?
YES
NO
M2 RESET
P#:XX
[1 TO 25]
CNT:XXX
[2 TO 255]
! SET !
CONTROL
SETTINGS > INSTALL > (all except NEW M2)
Use SETTINGS > INSTALL as shown in the following dia-
gram; default settings will be used. Use menu to change
language used, and ancillary components installed. An ex-
pert manual and service software are available for more
complex installations (see Table 6, Page 20). If any alarms
are present, take corrective action prior to installation.
NOTE − The M2 should be reset in order for changes to be
updated within the controller.
Use INSTALL > FLOAT SWITCH to set up a condensate
pan overflow switch. Use INSTALL > UPDATE DISPLAY
SOFTWARE to install new display software.
Use arrows to move
EXIT
BOOTLOADER
BY HOLDING
BACK ARROW
FOR ~ 3
SECONDS
INSTALL
NEW M2 (SEE PREVIOUS DIAGRAM)
NOT INSTALLED
DAMPER ECON
MOAD ! SET !
ENGLISH
LANGUAGE FRENCH
SPANISH ! SET !
FLOAT NOT INSTALLED
SWITCH INSTALLED ! SET !
BLOWER NOT INSTALLED
PROVING SW INSTALLED ! SET !
DIRTY NOT INSTALLED
FILTER SW INSTALLED ! SET !
BLOWER NOT INSTALLED
OVERLOAD S135 INSTALLED ! SET !
PHASE NOT INSTALLED
MONITOR INSTALLED ! SET !
UV LAMP NOT INSTALLED
INSTALLED ! SET !
ELECTRIC NOT INSTALLED
HEAT 1 STAGE
STAGES 2 STAGES
3 STAGES
4 STAGES ! SET !
UPDATE DISPLAY
DISPLAY WILL RESET ! RESET !
SOFTWARE
SETTINGS > INSTALL > NEW M2
Use SETTINGS > INSTALL > NEW M2 to go through the setup and change settings as needed when installing a replace-
ment M2 (new M2 units have no factory pre−sets).
Use arrows to move
Y/N
! SET !
! SET !
! SET !
NEW M2
M2 RESET
INSTALL
AFTER RESET, RETURN TO SETTINGS > INSTALL > NEW M2 AND SCROLL TO
CATALOG NO. AND CONTINUE CONFIGURING THE BOARD TO MATCH THE UNIT.
CLEAR ARE YOU
ALL SURE?
CONFIGURATIONS
UNIT SERIAL NO. XXXXXXXXX UNIT NO. XXX MODEL NO. XXXXXXXXXXXX
CATALOG NO. XXXXX
NOT INSTALLED
DAMPER MOAD
ECON
EXHAUST NOT INSTALLED
STAGES 1 EXHAUST STAGE
2 EXHAUST STAGES
HUMIDITROL NO
YES
PHASE/VOLTAGE NOT INSTALLED
DETECTION INSTALLED
WHEN INSTALLING A NEW M2, ENTER THE SERIAL, UNIT NO.
AND MODEL NO. THE M2 WILL AUTOMATICALLY RESET.
! SET !
 Loading...