16
INSTALLATION INSTRUCTIONS
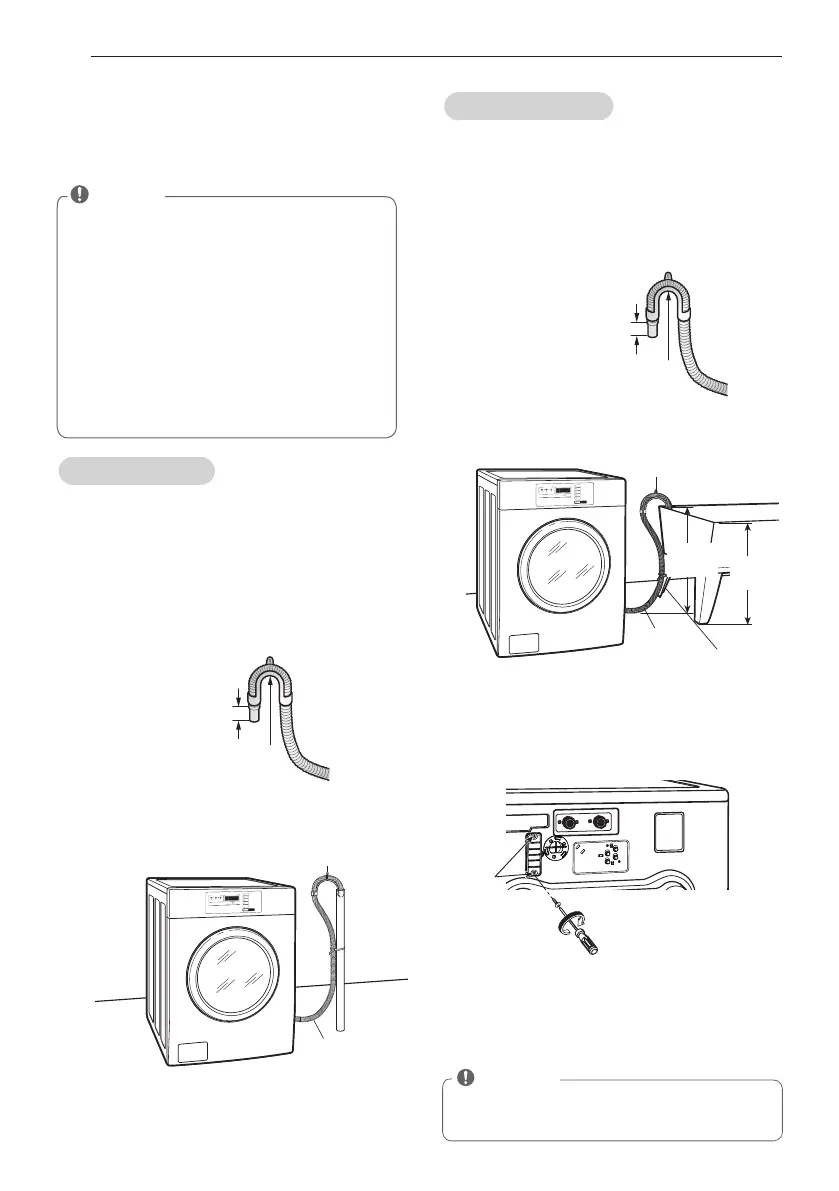
Connecting the drain line
Secure the drain hose in place to prevent
moving and leaking.
Using a standpipe
1
Clip the end of the hose into the elbow
bracket.
- Connect the elbow bracket within 4 inches
(10 cm) from the end of the drain hose.
If the drain hose is extended more than
4 inches (10 cm) beyond the end of the
elbow bracket, mold or microorganisms
could spread to the inside of the washer.
Using a laundry tub
1
Clip the end of the hose into the elbow bracket.
- Connect the elbow bracket within 4 inches
(10 cm) from the end of the drain hose.
If the drain hose is extended more than
4 inches (10 cm) beyond the end of the
elbow bracket, mold, or microorganisms
could spread to the inside of the washer.
2
Hang the end of the drain hose over the side
of the laundry tub.
3
Use a tie strap to secure the drain hose in
place.
Elbow Bracket
Drain Hose
No more than
4 inches (10 cm)
Elbow Bracket
No more than
4 inches (10 cm)
Elbow Bracket
Drain Hose
Elbow
Bracket
Tie Strap
Laundry Tub
max. 39.4”
(1.0 m)
max. 39.4”
(1.0 m)
2
Insert the end of the drain hose into the
standpipe.
3
Use a tie strap to secure the drain hose in
place.
NOTE
• The drain hose should be properly secured.
Failure to properly secure the drain hose
can result in flooding and malfunction.
• Total height of the hose end should not
exceed 39,4 inches (100,0 cm) from the
bottom of the washer.
• The drain must be installed in accordance
with any applicable local codes and regula-
tions.
• Make sure that the water lines are not
stretched, pinched, crushed, or kinked.
Connecting the auto dosing
1
Unscrew the 2 screws on the protective
cover and remove the cover.
2
Connect the auto dosing harness from
Accessory parts.
NOTE
• The voltage of the auto dosing machine
should be the same as the washer's voltage.
 Loading...