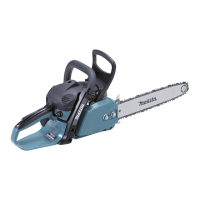
26
(see “Checking the chain tension”).
7-5. Cleaning the air lter (Fig. 69)
CAUTION: To prevent eye injury, always wear eye
protection when cleaning the lter with compressed air!
Do not use fuel to clean the air lter.
Insert the universal wrench vertically through the slotted plug
(*).
Loosen the screw (1) counter-clockwise and remove the hood
(2).
Push up the combination switch (3) (Choke position) to
prevent dirt particles from falling into the carburetor.
Pull the air lter cover tab (4) slightly in the direction of the
arrow, and remove the air lter cover.
Remove the air lter (5).
IMPORTANT: Cover the intake opening with a clean cloth to
prevent dirt particles from getting into the carburetor.
If the lter is very dirty, clean it in lukewarm water with
dishwashing detergent.
Let the air lter dry completely.
If the lter is very dirty, clean it frequently (several times
a day), because only a clean air lter provides full engine
power.
CAUTION:
Replace damaged air lters immediately.
Pieces of cloth or large dirt particles can destroy the
engine!
(Fig. 70)
Insert the air lter (5).
Put on the air lter cover.
Note: The air lter cover tab (4) will engage automatically if
the air lter cover is properly positioned.
Push down the combination switch (3) and press the throttle
(6) all the way down one time in order to deactivate the
throttle lock.
Put on the hood (2). When doing so make sure that the lower
pins (7) on both sides of the hood engage properly (when
correctly assembled, the pins should not be visible).
Tighten screw (1) clockwise.
7-6. Replacing the spark plug (Fig. 71)
CAUTION:
Do not touch the spark plug or plug cap if the engine is
running (high voltage).
Switch off the engine before starting any maintenance
work. A hot engine can cause burns. Wear protective
gloves!
The spark plug must be replaced in case of damage to the
insulator, electrode erosion (burn) or if the electrodes are very
dirty or oily.
Remove the lter cover (see “Cleaning the air lter”).
Pull the plug cap (8) off the spark plug. Use only the
combination wrench supplied with the saw to remove the
spark plug.
Electrode gap
The electrode gap must be 0.6 mm.
CAUTION: Use only the following spark plugs: NGK CMR6A.
7-7. Checking the ignition spark (Fig. 72)
Press the loosened spark plug (9) with the ignition cable
rmly connected against the cylinder using insulated pliers
(not near the spark plug opening).
Put combination switch (10) in the “ON” position.
Pull the starter cable hard.
If the function is correct, an ignition spark must be visible near
the electrodes.
7-8. Checking the mufer screws (Fig. 73)
Unscrew 3 screws (11) and remove the upper half of the
mufer (12).
Note: For saw models with catalytic converters (EA3500S,
EA3501S), remove the converter along with the upper mufer
half.
The screws on the bottom mufer half (13) are now
accessible, and it is possible to check them for tightness.
If they are loose, tighten by hand (Caution: do not over-
tighten).
7-9. Replacing/cleaning the spark arrester
screen (country specic) (Fig. 74)
The spark arrester screen should be checked and cleaned
regularly.
Unscrew 3 screws (11) and remove the upper half of the
mufer (12) and then the spark arrester screen (14).
Caution: Do not use sharp or pointed objects for screen
cleaning. Damaged or misformed screen wires may result.
Reassemble the spark arrester screen and the upper mufer
half, and then tighten the screws.
7-10. Replacing the starter cable/ Replacing
the return spring pack/Replacing the starter
spring (Fig. 75)
Unscrew three screws (1).
Remove fan housing (2).
Remove the air guide (3) from the fan housing.
CAREFUL! Injury hazard! Do not unscrew screw (7) if the
return spring is under tension.
If the starter cable is to be replaced although it is not broken,
it will be necessary to rst de-tension the cable drum return
spring (13).
To do this, use the grip to pull the cable all the way out of the
fan housing.
Hold the cable drum with one hand, and with the other push
the cable into the space (14).
Carefully let the drum turn until the return spring is no longer
under tension.
Unscrew screw (7) and remove the driver (8) and spring (6).
Carefully remove the cable drum.
Remove any cable pieces.
Thread a new cable (dia. 3 mm, length 900 mm) as shown
in the illustration (don’t forget the washer (10)) and knot both
ends as shown.
Pull knot (11) into the cable drum (5).
Pull knot (12) into the starter grip (9).
Put the drum on its spindle and turn it slightly until the return
spring engages.
Place the spring (6) in the driver (8) and place them together
in the cable drum (5) while turning slightly counter-clockwise.
Insert screw (7) and tighten.
Guide the cable into the slot (14) on the cable drum and turn
the drum with the cable clockwise three times.
 Loading...