12
90-10122R30
GB
oe
FUEL & OIL
oec13
OIL RECOMMENDATION
Mercury or Quicksilver Premium TC-W3 2-cycle oil is recommended for your
engine. For added protection and lubrication, Mercury or Quicksilver Premium
Plus TC-W3 2-cycle oil is recommended. If Mercury or Quicksilver outboard oil is
not available, substitute another brand of 2-cycle outboard oil that is NMMA
Certified TC-W3. Severe engine damage may result from use of an inferior oil.
eeg8
oeg4
NEW ENGINE GASOLINE/OIL BREAK-IN MIXTURE
Use a 50:1 (2%) gasoline/oil mixture in the first tank of fuel. Follow the table below
for mixing ratios. Use of this fuel mixture combined with oil from the oil injection
system will supply adequate lubrication during engine break-in.
After the break-in fuel mixture is used up, it is no longer necessary to add oil with
the gasoline.
Note: At the end of the break-in period, visually check to see if the oil level in the
oil injection tank has dropped. Oil usage indicates the oil injection system is
functioning correctly.
oeh2
GASOLINE/OIL MIXING RATIO CHART
Gas/Oil
Ratio
1 Gallon Gas
(3.8 Liters)
3 Gallons Gas
(11.5 Liters)
6 Gallons Gas
(23 Liters)
50:1
(2%)
3 fl. oz.
(89 ml) Oil
8 fl. oz.
(237 ml) Oil
16 fl. oz.
(473 ml) Oil
oer1
MIXING GASOLINE AND OIL
Portable Tank - Pour one gallon (4 liters) of gasoline into tank. Add the correct
amount of oil and mix thoroughly. Add the remainder of gasoline.
Built-in Tank - Using a funnel, pour the correct amount of oil slowly with the
gasoline as tank is filled.
goe5
2
1
3
oem9
FILLING OIL INJECTION SYSTEM
1
Check oil level using the sight gauge in front of the outboard.
2 Remove the fill cap and fill tank with oil. The oil tank capacity is 96 fl. oz. (3.2
liters). Reinstall fill cap and tighten securely.
FILLING REMOTE OIL TANK (IF EQUIPPED)
3
Remove the filler cap and fill remote tank with oil. Oil tank capacity is 3 gallons
(11.5 liters). Reinstall filler cap and tighten securely.
4 Check oil level in the engine oil injjectin tank (Step 1). The oil level should be
1/2 full to completely full. Refill if necessary.
IMPORTANT: Always make sure the oil tank caps are threaded on tight. An
air leak will prevent oil flow to the engine.
oee8
FILLING FUEL TANK
WARNING
Avoid serious injury or death from a gasoline fire or explosion. Always
stop the engine and DO NOT smoke or allow open flames or sparks in the
area while filling fuel tanks.
Fill fuel tanks outdoors away from heat, sparks, and open flames.
Remove portable fuel tanks from boat to refill them.
Always stop engine before refilling tanks.
Do not completely fill the fuel tanks. Leave approximately 10% of the tank volume
unfilled. Fuel will expand in volume as its temperature rises and can leak under
pressure if the tank is completely filled.
Portable Fuel Tank Placement in the Boat
Place the fuel tank in the boat so that the tank vent will stay higher than the fuel
level in the tank under normal boat operating conditions.
gog142
1
2
3
4
5
6
7
8
9
1
1
2
3
3
4
5
7
9
6
6
og
FEATURES & CONTROLS
oge11
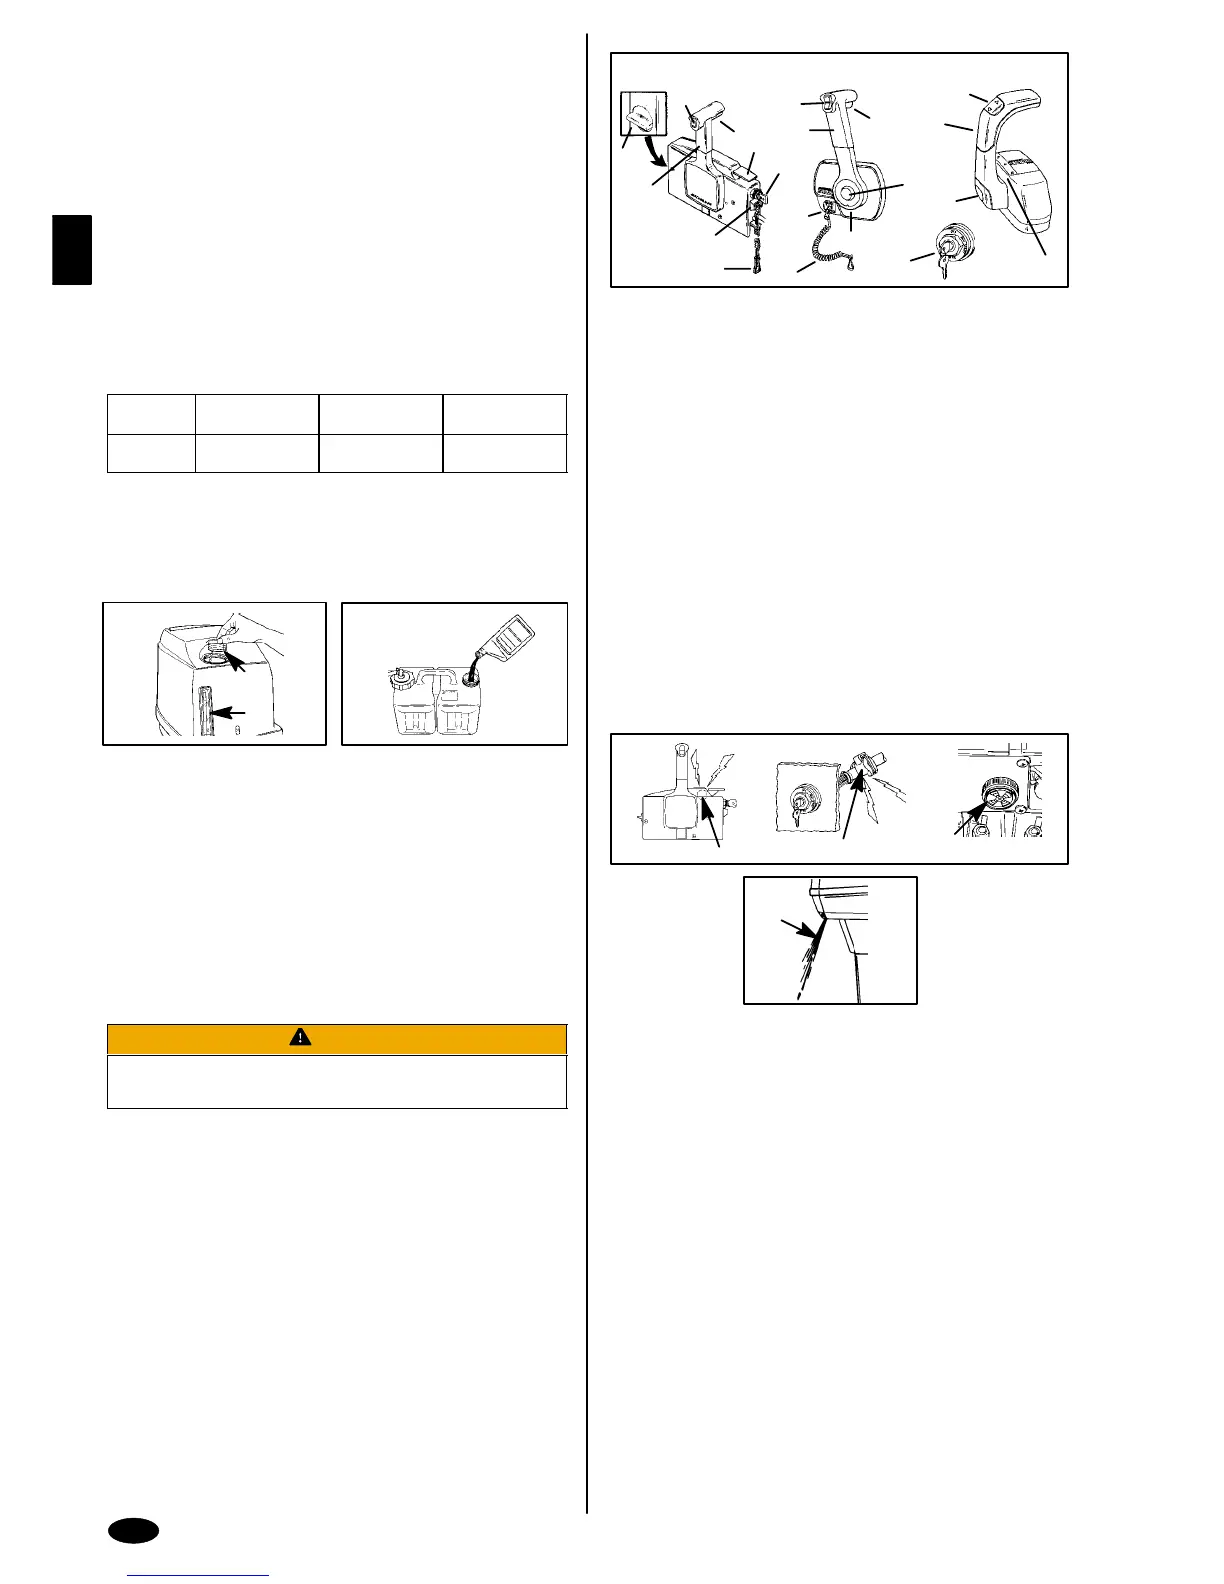
REMOTE CONTROL FEATURES
Your boat may be equipped with one of the Mercury Precision or Quicksilver
remote controls shown. If not, consult your dealer for a description of the functions
and operations of the remote control.
1 Control Handle - Forward, Neutral, Reverse
2 Neutral Release Lever
3 Trim/Tilt Switch (if Equipped) - Refer to Power Trim Operation.
4 Lanyard Stop Switch - Read the Lanyard Stop Switch safety explanation and
Warning in the General Information Section.
5 Lanyard - Read the lanyard stop switch safety explanation and warning in the
General Information Section.
6 Throttle Friction Adjustment - Console Controls require cover removal for
adjustment.
7 Ignition Key Switch - Off, On, Start, Choke
8 Fast Idle Lever - Raising lever will increase engine idle speed in neutral. Refer
to Starting the Engine in the Operation Section.
9 Throttle Only Button - Pushing in the button will enable you to advance the
control handle for increasing engine idle speed without shifting outboard into
gear. Refer to Starting the Engine in the Operation Section.
gog49
1
c
d
a
b
ogb35
WARNING SYSTEM
1
The outboard warning system incorporates a warning horn inside the boat. The
warning horn on remote control operated models may be located (a) inside the
remote control or (b) connected to the key switch under the dash. On tiller
handle models the warning horn is located below the tiller handle (c).
The warning horn will emit a continuous beep. This will alert the operator to one
of two problems: EITHER an engine overheat condition OR low oil level in the oil
injection tank. See explanations “2” and “3” following.
2 Engine overheat If the engine overheats, the warning horn will sound.
Immediately reduce throttle speed to idle. Shift outboard into neutral and check
for a steady stream of water (d) coming out of the water pump indicator hole.
If no water (d) is coming out of the water pump indicator hole or flow is intermittent,
stop engine and check water intake for obstruction. If no obstruction is found, this
may indicate a blockage in the cooling system or a water pump problem. Have the
outboard checked by your dealer. Operating the engine while overheated will
cause engine damage. See the following note.
 Loading...