22
90-10122R30
GB
goh86
2
1
3
oh
MAINTENANCE
ohq5
GEAR CASE LUBRICATION
When adding or changing gear case lubricant, visually check for the presence of
water in the lubricant. If water is present, it may have settled to the bottom and will
drain out prior to the lubricant, or it may be mixed with the lubricant, giving it a milky
colored appearance. If water is noticed, have the gear case checked by your
dealer. Water in the lubricant may result in premature bearing failure or, in freezing
temperatures, will turn to ice and damage the gear case.
Whenever you remove the fill/drain plug, examine the magnetic end for metal
particles. A small amount of metal filings or fine metal particles indicates normal
gear wear. An excessive amount of metal filings or larger particles (chips) may
indicate abnormal gear wear and should be checked by an authorized dealer.
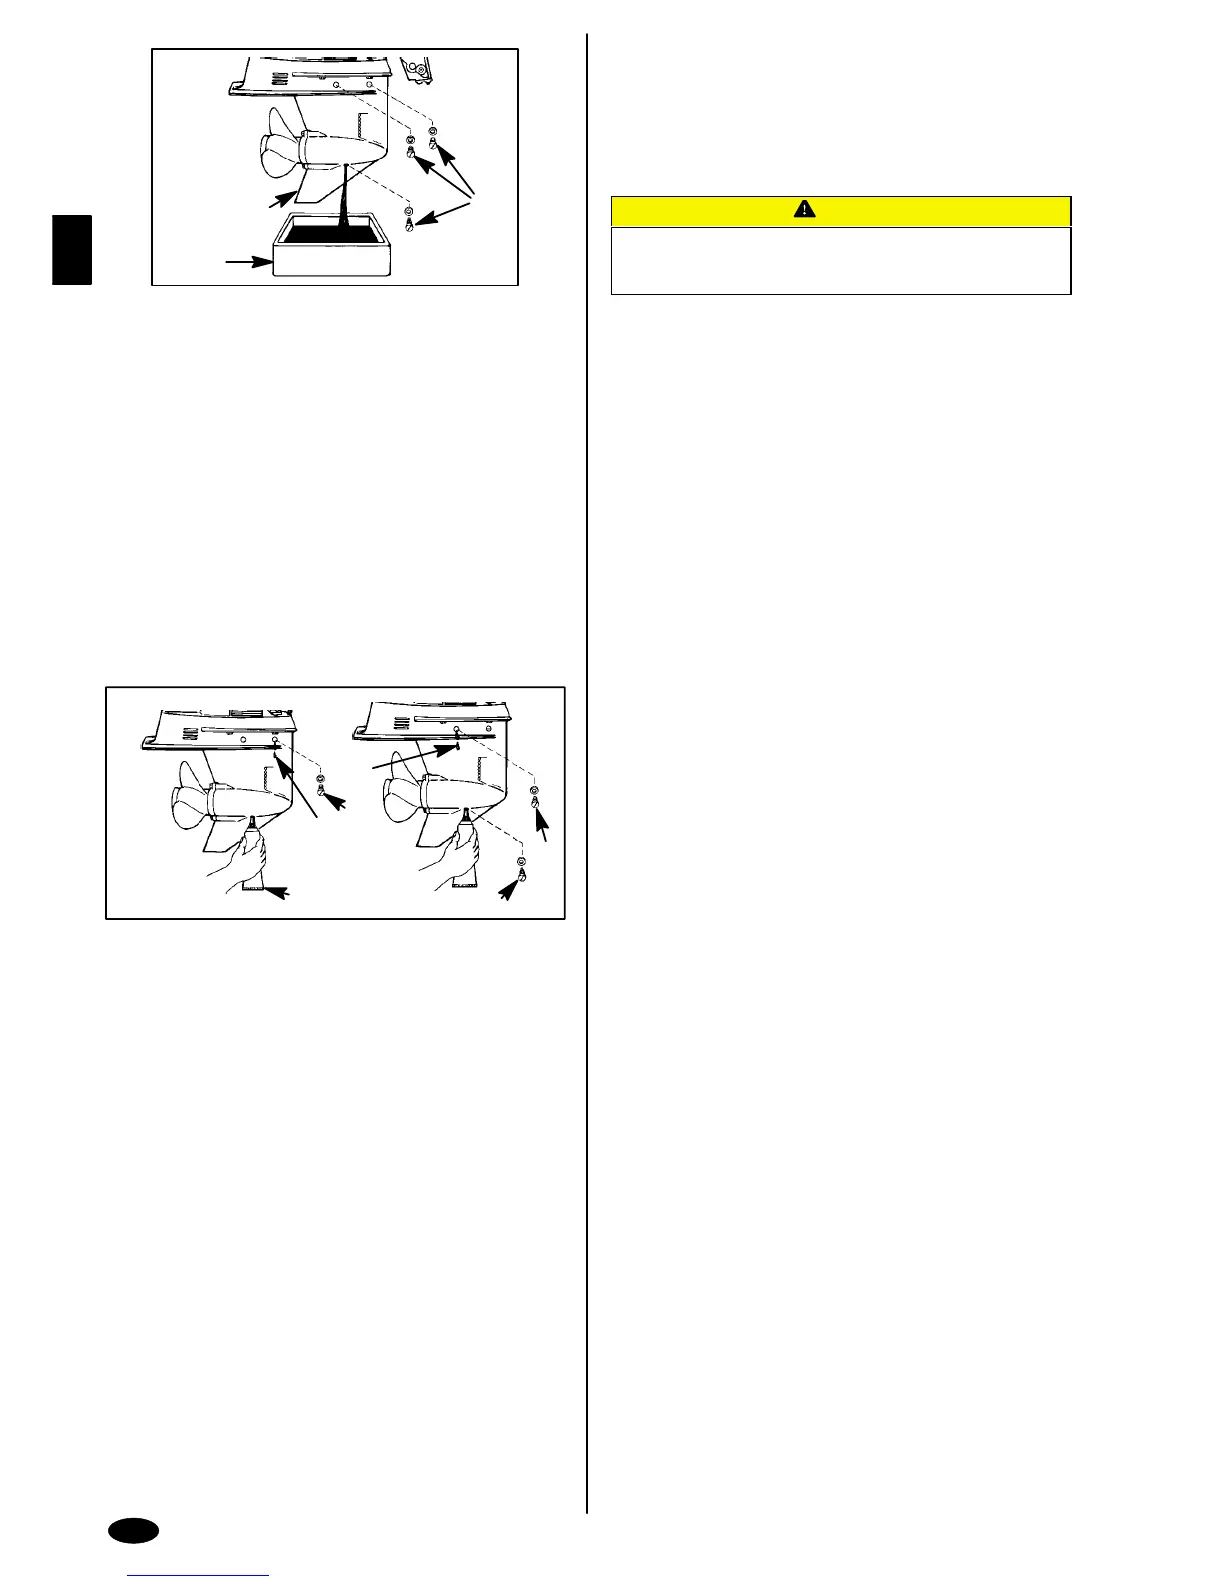
Draining Gear Case
1 Place outboard in a vertical operating position.
2 Place a drain pan below outboard.
3 Remove vent plugs and fill/drain plug and drain lubricant.
ohv10
Gear Case Lubricant Capacity
3-1/4 in. (83mm) Diameter gear case: Approximately 11.5 fl. oz. (340 ml).
4-1/4 in. (108mm) Diameter gear case: Approximately 22.5 fl. oz. (666ml).
goh87
1-6
a
c
b
d
e
f
Checking Lubricant Level and Filling Gear Case
1 Place outboard in a vertical operating position.
2 Remove the front vent plug (a) and rear vent plug (b).
3 Place lubricant tube (c) into the fill hole and add lubricant until it appears at the
front vent hole (d). At this time install the front vent plug and sealing washer (a).
4 Continue adding lubricant until it appears at the rear vent hole (e).
5 Stop adding lubricant. Install the rear vent plug and sealing washer (b) before
removing lubricant tube.
6 Remove lubricant tube and reinstall cleaned fill/drain plug and sealing washer
(f).
ohr1
SUBMERGED OUTBOARD
A submerged outboard will require service within a few hours by an authorized
dealer once the outboard is recovered from the water. This immediate attention by
a servicing dealer is necessary once the engine is exposed to the atmosphere to
minimize internal corrosion damage to the engine.
oi
STORAGE
oia2
STORAGE PREPARATION
The major consideration in preparing your outboard for storage is to protect it from
rust, corrosion, and damage caused by freezing of trapped water.
The following storage procedures should be followed to prepare your outboard for
out of season storage or prolonged storage (two months or longer).
CAUTION
Never start or run your outboard (even momentarily) without water circu-
lating through all the cooling water intake holes in the gear case to pre-
vent damage to the water pump (running dry) or overheating of the en-
gine.
oib11
Fuel system
IMPORTANT: Gasoline containing alcohol (ethanol or methanol) can cause
a formation of acid during storage and can damage the fuel system. If the
gasoline being used contains alcohol, it is advisable to drain as much of the
remaining gasoline as possible from the fuel tank, remote fuel line, and
engine fuel system.
Fill the fuel system (tank, hoses, fuel pump, and carburetor) with treated
(stabilized) fuel to help prevent formation of varnish and gum. Proceed with
following instructions.
1. Portable Fuel Tank - Pour the required amount of Gasoline Stabilizer (follow
instructions on container) into fuel tank. Tip fuel tank back and forth to mix
stabilizer with the fuel.
2. Permanently Installed Fuel Tank - Pour the required amount of Gasoline
Stabilizer (follow instructions on container) into a separate container and mix
with approximately one quart (one liter) of gasoline. Pour this mixture into fuel
tank.
3. Place the outboard in water or connect flushing attachment for circulating
cooling water. Run the engine for ten minutes to allow treated fuel to reach the
carburetor.
oic4
Protecting External Outboard Components
4. Lubricate all outboard components listed in the Inspection and Maintenance
Schedule.
5. Touch up any paint nicks. See your dealer for touch-up paint.
6. Spray Quicksilver or Mercury Precision Lubricants Corrosion Guard on
external metal surfaces (except corrosion control anodes).
oid12
Protecting Internal Engine Components
Note: Before performing Steps 7 and 8, make sure the fuel system has been
prepared for storage. Refer to Fuel System on previous page.
7. Place the outboard in water or connect flushing attachment for circulating
cooling water. Start the engine and let it run in neutral to warm up.
8. With engine running at fast idle, stop the fuel flow by disconnecting the remote
fuel line. When engine begins to stall, quickly spray Quicksilver or Mercury
Precision Lubricants Storage Seal into carburetor until engine stops from lack
of fuel.
9. Remove the spark plugs and inject a five second spray of storage seal around
the inside of each cylinder.
10.Rotate the flywheel manually several times to distribute the storage seal in the
cylinders. Reinstall spark plugs.
oie1
Gear Case
11. Drain and refill the gear case lubricant (refer to maintenance procedure).
 Loading...