29
CHAPTER 4: HP/MP RMS MODULE
The HP/MP RMS module is used in the following loudspeak-
ers with HP-2, HP-4, MP-2, and MP-4 amplifiers.
When equipped with an RMS module, Meyer Sound loud-
speakers can be connected to an RMS network and moni-
tored with Compass control software. Some Meyer Sound
loudspeakers, such as the M-Series loudspeakers, come
standard with an RMS module already installed. For other
Meyer Sound loudspeakers, an RMS module is available as
an option that can either be factory installed or installed at a
later date by a qualified service technician.
The following sections document how to install and use the
HP/MP RMS module:
■ “Installing the HP/MP RMS Module” on page 29
■ “Installing the Mute Jumper on the HP/MP RMS Module”
on page 33
■ “HP/MP RMS User Panel” on page 34
■ “Neuron ID for HP/MP RMS Modules” on page 34
■ “Resetting the HP/MP RMS Module” on page 35
NOTE: The HP/MP RMS module includes a
Mute Jumper that enables the loudspeaker’s
mute and solo capability when installed. Meyer
Sound currently ships RMS-equipped loudspeakers
with the Mute Jumper installed. These mute-enabled
loudspeakers can be identified by the blue “ME”
sticker on the HP/MP RMS user panel. Older RMS-
equipped loudspeakers can be easily mute-enabled
by installing the Mute Jumper. For more information,
see “Installing the Mute Jumper on the HP/MP RMS
Module” on page 33.
INSTALLING THE HP/MP RMS MODULE
This section documents installing the HP/MP RMS module.
The installation procedure requires the following:
■ Standard #2 Phillips screwdriver
■ 3/8-inch nut driver
■ Fluke 87 multimeter or equivalent ohmmeter
NOTE: Before adding an RMS module to loud-
speakers with amplifiers manufactured before
1997, the loudspeakers must be retrofitted with TPL
control boards and RMS-ready user panels. The first
two digits of the loudspeaker’s serial number indicate
its year of manufacture; serial numbers starting with
96 or a lower number require retrofitting. For informa-
tion, contact Meyer Sound Technical Services.
NOTE: Make sure to hold the HP/MP RMS
module by its edges. Avoid touching any of the
components on the module.
To install the HP/MP RMS module:
1. Remove the loudspeaker’s AC power cable and audio
cable and place the loudspeaker on a clean, low-static
firm surface. Orient the loudspeaker with the top facing
up. Wait at least five minutes before removing the HP/MP
RMS module.
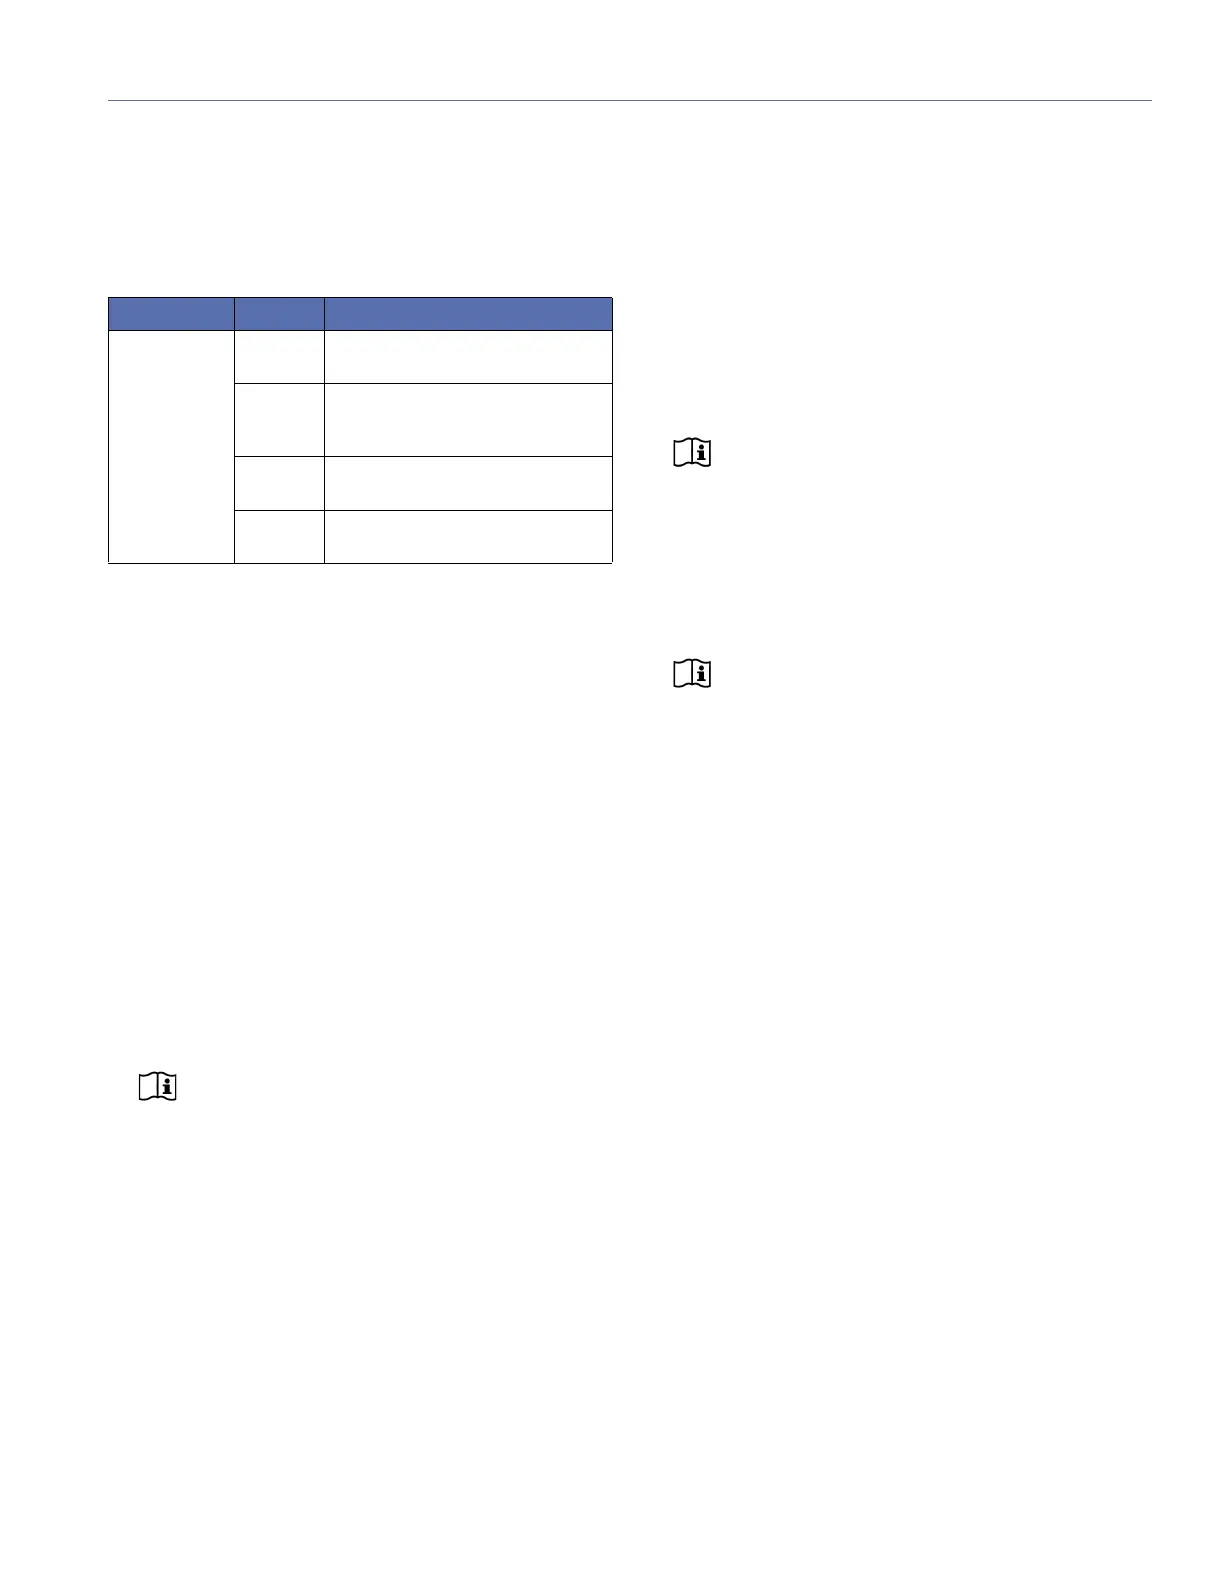
Table 1: MP/HP Amplifier RMS Module
Part Number Series Loudspeakers
40.033.071.01 M-Series M2D-Sub, M3D, M3D-Sub, MICA,
MILO 60, MILO 120
Concert
Series
600-HP, 700-HP, 650-P, DF-4, DS-2P,
DS-4P, MSL-4, MSL-6, MTS-4,
PSM-2, PSW-2, PSW-4, PSW-6,
Industrial
Series
SB-1, SB-2, SB-3F
EXP
Series
Acheron 100, Acheron 80, Acheron LF
 Loading...