Home
Mitsubishi
Sewing Machine
PLK-E1008H
Mitsubishi PLK-E1008H User Manual
5
of 1
of 1 rating
60 pages
Give review
Manual
Specs
To Next Page
To Next Page
To Previous Page
To Previous Page
Loading...
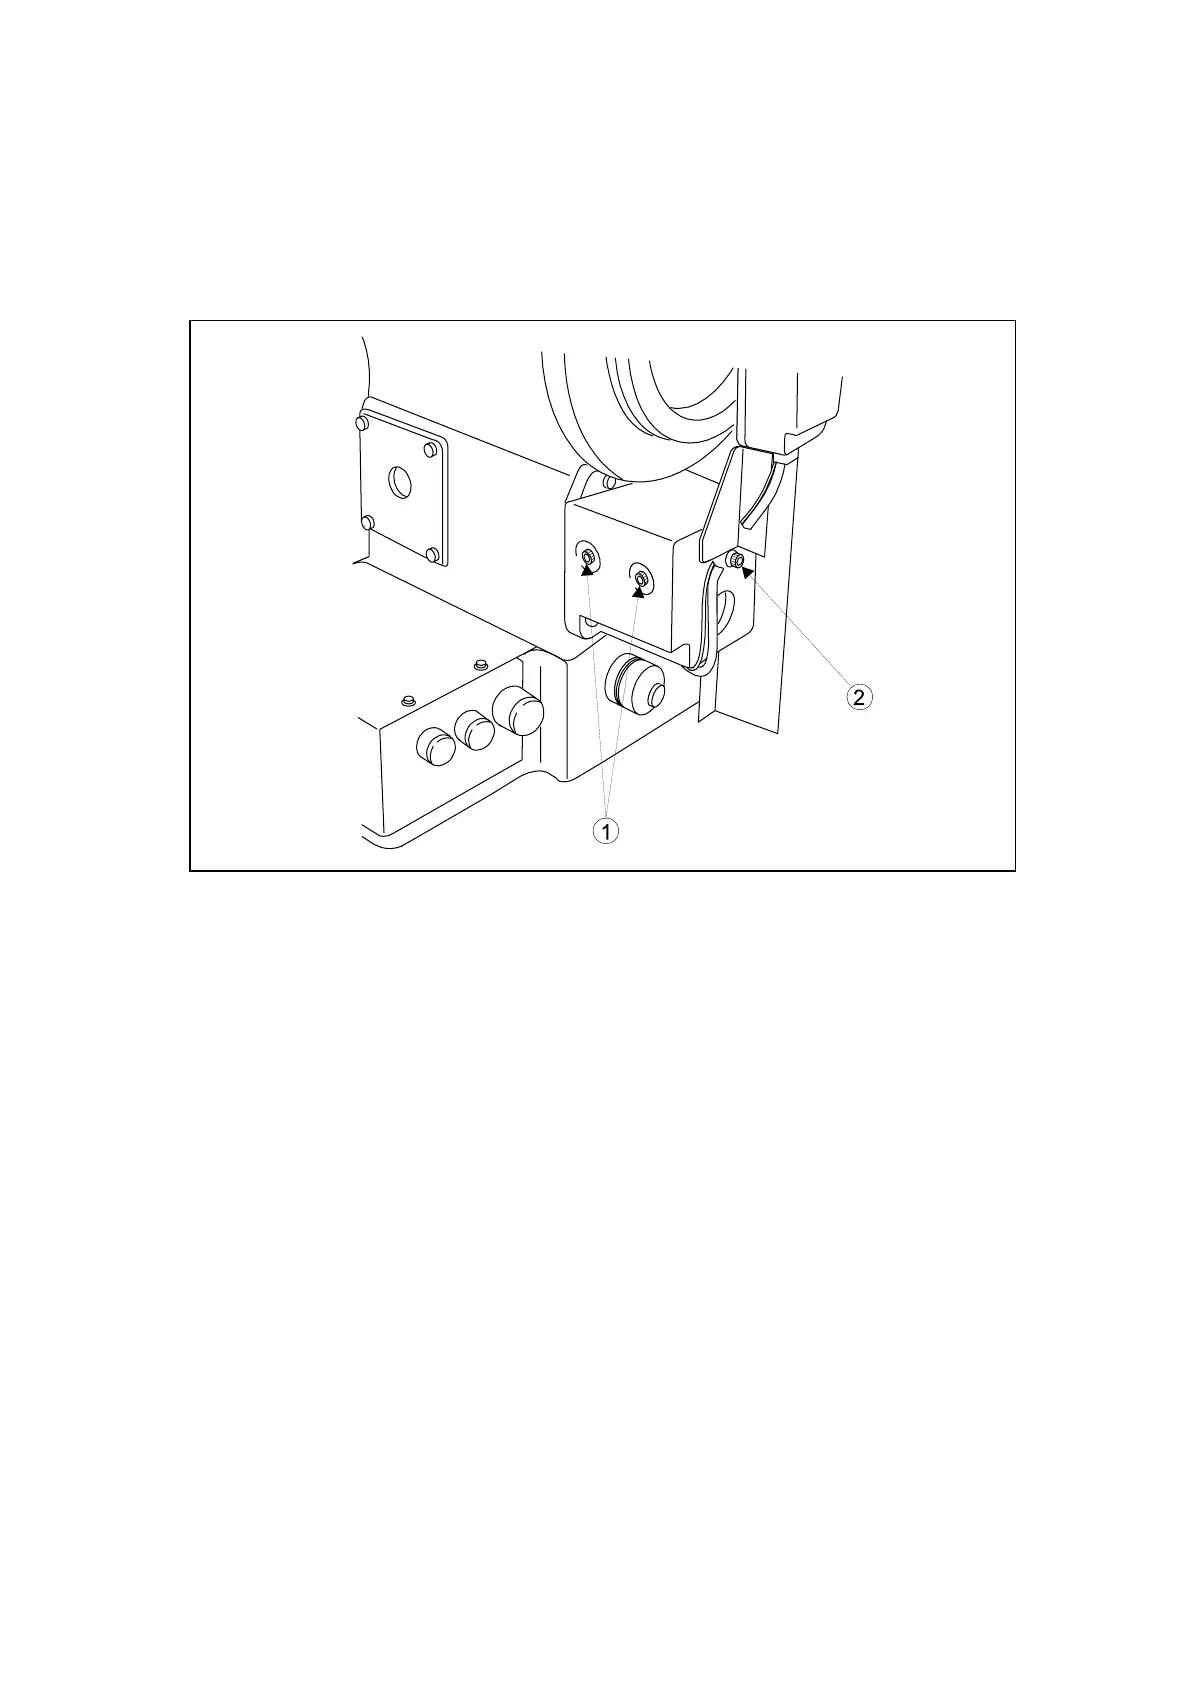
7-17-2. Adjustment of the Y timing belt tension
(1)
Loosen set screws(NO.
) of the brackets. (It’s located machine arm tail)Also loosen set
screw(NO.
) of the bracket.
(2)
If tighten the tension adjust screw (NO.
), the Y timing belt tension will be increased.
(3)
After the adjustment, tighten the set screws(NO.
) securely.
43
47
49
Table of Contents
Default Chapter
4
Table of Contents
4
Structure of the Machine
6
Specification
7
Installation
8
Preparation of the Table
8
Preparation for the Steel Stand
8
Installation of the Motor
8
Installation of the Control Box
8
Connection of the Teaching Panel
8
Installation of the Power Switch
9
Connection of the Foot Switch
10
Installation of the Oil Pan
10
Installation of the Sewing Machine Head
10
Putting Across the V-Belt
11
Connection of the Electric Cables
11
Installation of the Belt Cover
12
Installation of the Thread Stand
13
Connection of the Air Tube
14
Lubrication
15
Proper Operation
16
Loading the System Software to the Control Box
16
Installation of the Needle
16
Threading the Upper Thread
17
Winding the Bobbin Thread
17
Setting the Bobbin
20
Proper Sewing
21
Operation of the Emergency Stop Switch
21
The Teaching Operation
22
Pre-Heating Control
22
The Thermal Cutting Operation
23
The Sewing Operation
24
Adjustment of the Thread Tension
26
Standard Adjustment
27
Adjustment of the Shuttle
27
Adjustment of the Position between the Needle and the Shuttle
27
Adjustment of the Needle Bar Height
28
Adjustment of the Needle-To Shuttle Clearance
29
Adjustment of the Needle-To-Driver Clearance
29
Test Mode Operation
31
Adjustment of the Presser Foot
34
Adjustment of the Driving Shaft Arm(Front) and the Presser Foot
34
Adjustment of the Sensor of the Presser Foot Cylinder
34
Adjustment of the Tension Release
35
Upper Thread Heat Cut Device
36
Setting Thread Puller
36
Setting of the Thickness Detector
37
Setting of the Thread Wiper
37
Adjustment of the Upper Thread Heater
37
Adjustment of Lower Thread Cut Heater
39
Adjustment of the Bobbin Winder
40
Adjustment of the Work Holder Pressure
40
Adjustment of the Thread Take up Spring Tension
41
Adjustment of the Position Detecting Disc
41
Adjustment of the Mechanical Home Position
43
Shifting the Mechanical Home Position to the X Direction
44
Shifting the Mechanical Home Position to the y Direction
45
Fine Adjustment of the Mechanical Home Position in the X, y Direction
45
Adjustment of the X-Y Detector Clearance
46
Adjustment of the X Detector Clearance
46
Adjustment of the y Detector Clearance
46
Adjustment of the X-Y Timing Belt Tension
47
Adjustment of the X Timing Belt Tension
47
Adjustment of the y Timing Belt Tension
48
Bad Sewing Condition & Its Cause and Remedy
49
Appendix
53
Chart of Connecting Wires
53
Wiring between the Power Switch to Relay
54
Trimming Time Chart
57
Anaerobic Adhesive Used Location
59
5
Based on 1 rating
Ask a question
Give review
Questions and Answers:
Need help?
Do you have a question about the Mitsubishi PLK-E1008H and is the answer not in the manual?
Ask a question
Mitsubishi PLK-E1008H Specifications
General
Brand
Mitsubishi
Model
PLK-E1008H
Category
Sewing Machine
Language
English
Related product manuals
Mitsubishi PLK-E1010
52 pages
Mitsubishi PLK-E03BT
52 pages
Mitsubishi PLK-E0504
52 pages
Mitsubishi PLK-E2010R
53 pages
Mitsubishi PLK-E Series
213 pages
Mitsubishi PLK-B03BT
42 pages
Mitsubishi LU2-430
33 pages
Mitsubishi LS2-210
22 pages
Mitsubishi LS2-190
32 pages
Mitsubishi LT2-250
30 pages
Mitsubishi LT2-2230
32 pages
Mitsubishi LS2-1180
17 pages
 Loading...


