EasyManua.ls Logo

Nikon COOLSHOT 8080 I VR User Manual

Nikon COOLSHOT 8080 I VR
41 pages
To Next Page IconTo Next Page
To Previous Page IconTo Previous Page
Page #26 background imageLoading...
Page #26 background image
50 51
En
Fr
Es
Pt
En
Fr
Es
Pt
1. Type de pile
Pile au lithium 3V CR2 x1
2. Insérer/Remplacer la pile
2-1. Ouvrez le couvercle du logement de la pile
Tournez le couvercle du compartiment de la pile dans le sens inverse des aiguilles d'une montre et retirez-
le. Il peut être difficile à ouvrir à cause du joint d'étanchéité.
2-2. Insérez la pile/Remplacez la pile usagée par une pile neuve
Insérez une nouvelle pile et orientez-la selon le sens indiqué dans le compartiment. Le pôle [+] doit être
positionné vers l'intérieur du compartiment. Si la pile n'est pas positionnée correctement, le télémètre laser
Nikon ne fonctionnera pas. Pour remplacer la pile, sortez d'abord la pile usagée. Puis, insérez la nouvelle.
2-3. Fermez le couvercle du logement de la pile
Tournez le couvercle du compartiment de la pile dans le sens des aiguilles d'une montre pour la visser dans
le boîtier. Il peut être difficile à fermer à cause du joint d'étanchéité, mais continuez à le tourner jusqu'au
bout. Vérifiez que le compartiment est bien fermé.
3. Indicateur de niveau de charge de la pile
*La marque d'état de la pile indique la nécessité de remplacer la pile sur l'écran interne.
Achage Description
Ne s’ache que pendant 2 secondes après la mise
sous tension.
Charge susante pour le fonctionnement.
Ne s’ache que pendant 2 secondes après la mise
sous tension.
Le niveau de charge de la pile devient faible.
Préparez-vous a remplacer la pile.
S’ache en continu.
Le niveau de charge de la pile est faible.
La pile doit être remplacée.
Clignote. S’arrête automatiquement après avoir
clignoté 3 fois.
La pile est usée.
Veuillez remplacer la pile.
Insérer/Remplacer la pile
[Première étape]
Description du fonctionnement
[Configuration du mode]
Pression prolongée sur le bouton MODE
(1,5 secondes ou plus)
Modier les unités d'achage de la
distance (F1)
Pression courte sur le bouton PWR (moins de 1,5
secondes) change les unités.
Pression courte sur le bouton MODE
(moins de 1,5 secondes)
*Une période d'inactivité d'au moins 8 secondes ramène l'appareil à l'écran de veille quel que soit le mode aché.
Veille
mYD
Uniquement pour le COOLSHOT 80i VR
Mode golf:
Distance de réglage de la pente (distance horizontale ± hauteur)
et distance réelle
Mode distance horizontale et hauteur
Mode distance réelle
et hauteur
Sans
objet
Mode distance
réelle
Modier le mode d'achage de la mesure (F2)
Pression prolongée sur le bouton MODE
(1,5 secondes ou plus)
Pression prolongée sur le bouton MODE
(1,5 secondes ou plus)
Pression courte sur le bouton PWR (moins de 1,5
secondes) change les unités.

Table of Contents

Question and Answer IconNeed help?

Do you have a question about the Nikon COOLSHOT 8080 I VR and is the answer not in the manual?

Nikon COOLSHOT 8080 I VR Specifications

General IconGeneral
BrandNikon
ModelCOOLSHOT 8080 I VR
CategoryCamcorder
LanguageEnglish

Summary

Introduction

About the Manual

Details manual reproduction, liability for errors, and product appearance changes.

Radio Interference Controls

Explains FCC compliance and digital device regulations for radio interference.

Measurement Results

States the rangefinder is basic and results are not official evidence.

Cautions Before Use

Laser Safety Precautions

Guidelines for safe use of the invisible laser beam to protect eyes.

General Safety Warnings

Covers risks of death/serious injury from improper use.

General Cautions

Covers risks of potential injury or material loss from improper use.

Battery Safety Precautions

Battery Handling and Storage

Covers risks of battery rupture, short-circuiting, water, flame, and disassembly.

Battery Disposal and First Aid

Advice on battery disposal and first aid for contact with damaged battery liquid.

Monocular Safety Precautions

Optical Safety

Warning against looking at light or laser beams through optics.

Usage and Handling Safety

Covers safe usage while walking, carrying, and placement.

Getting to Know the Laser Rangefinder

Key Features

Lists primary functionalities and capabilities of the rangefinder.

Nomenclature and Composition

Identifies and illustrates the parts and accessories of the device.

Facilitating Measurement Conditions

Conditions that help achieve accurate measurements.

Inaccurate Measurement Conditions

Scenarios where measurement accuracy may be compromised.

Internal Display Overview

Display Elements

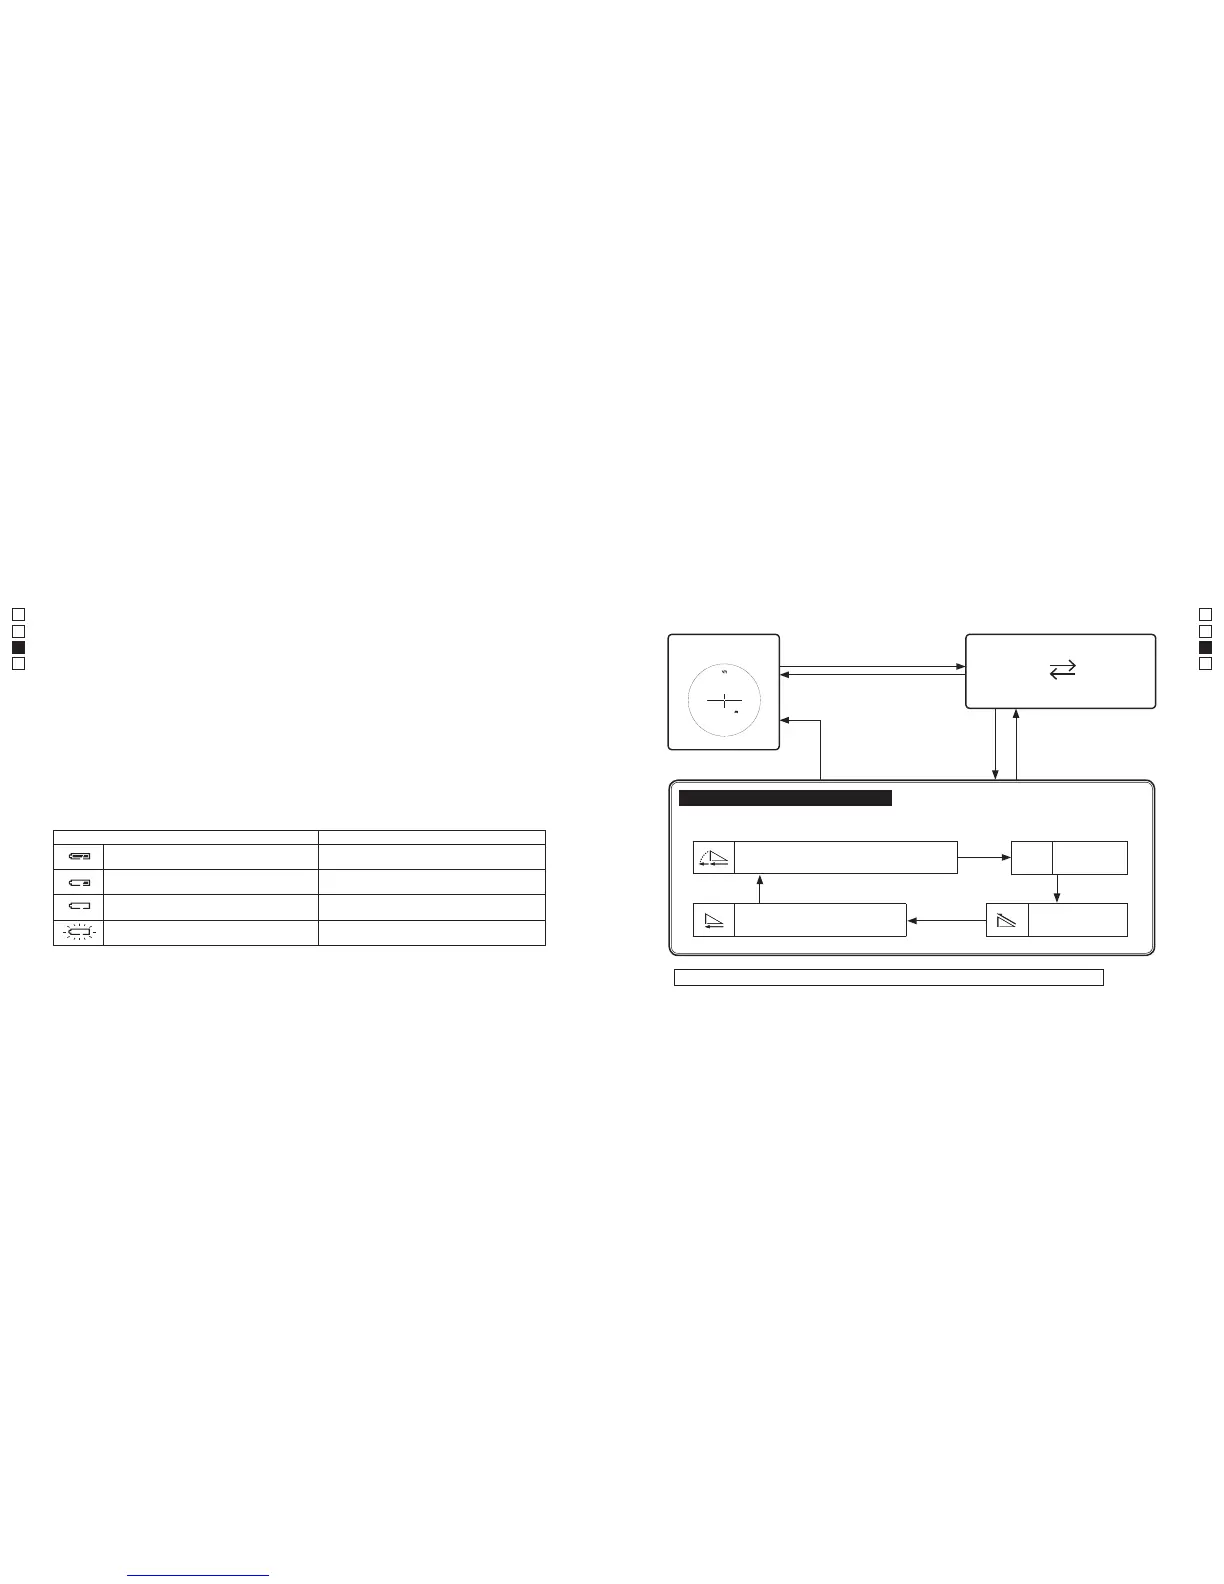
Covers VR indication, laser mark, measurement modes, battery, target mark, units, and distance.

Measurement Status Indicators

Details symbols for measurement success/failure and dust on display.

Functions

VR (Vibration Reduction) Function

Explains the activation and deactivation of the VR function.

First Target Priority Algorithm

Describes how the algorithm displays the closest subject's distance.

First Target Priority Detection Sign

Explains the sign indicating detection of the closest subject.

First Step

Inserting/Replacing Battery

Step-by-step guide for battery insertion and replacement.

Battery Level Indicator

Explains the symbols indicating battery condition.

Mode Settings

Operation Overview

Visual guide to operating the device from standby.

Changing Distance Display Unit (F1)

Instructions to switch between meters and yards.

Changing Measurement Display Mode (F2)

Instructions to change measurement display modes for COOLSHOT 80i VR.

Changing Distance Display Unit (m/YD) (F1)

Accessing Unit Settings

How to access the F1 setting menu.

Switching Units

How to switch between meters and yards.

Confirming Settings

How to exit the setting mode.

Changing Measurement Display Mode (F2)

Accessing Mode Settings

Steps to enter the F2 setting menu for COOLSHOT 80i VR.

Switching Display Modes

How to switch between Golf, Horizontal/Height, and Actual distance modes.

Mode Descriptions

Explains what is displayed in each measurement mode.

Measurement

Pre-measurement Cautions

Reminders about mode settings and laser radiation safety.

Diopter Adjustment

Guide to adjust the eyepiece for a clear internal display.

Performing a Measurement

Power On and Aiming

Steps to power on and aim at the target.

Initiating Measurement

Pressing the PWR button starts the measurement process.

Measurement Types

Single Measurement

Pressing PWR button once starts measurement and displays results.

Continuous Measurement

Press and hold PWR for continuous readings; tips for stable targeting.

Technical Specifications

General Specifications

Covers model, measurement range, display, optical system, and operating conditions.

Laser and Compliance Data

Details laser classification, wavelength, output, beam divergence, and compliance standards.

Environmental and Battery Information

Explains waterproofing, usage notes, and battery life.

Troubleshooting and Repair

Device Not Turning On

Solutions for the device not powering on.

Measurement Failures

Solutions for measurement failures or inaccuracies.

Anomalous Measurement Results

Solutions for unexpected measurement outcomes.

VR Function Status

How to confirm VR function activation and its inability to be turned off.

Normal Operation Sounds

Explains normal motor sounds associated with VR activation.

Error Display and Repair

Indicates failure display '[E]' and advice to contact dealer for repair.

Related product manuals