4. Brake adjustment & bleeding
All brakes wear with time and temperature variations can sometimes lead to the necessity
to adjust the brakes. Most braking systems on Optima bicycles come with a separate
manufacturer’s information package containing a complete instruction manual. Please refer
to these manuals to set up and adjust your brakes.
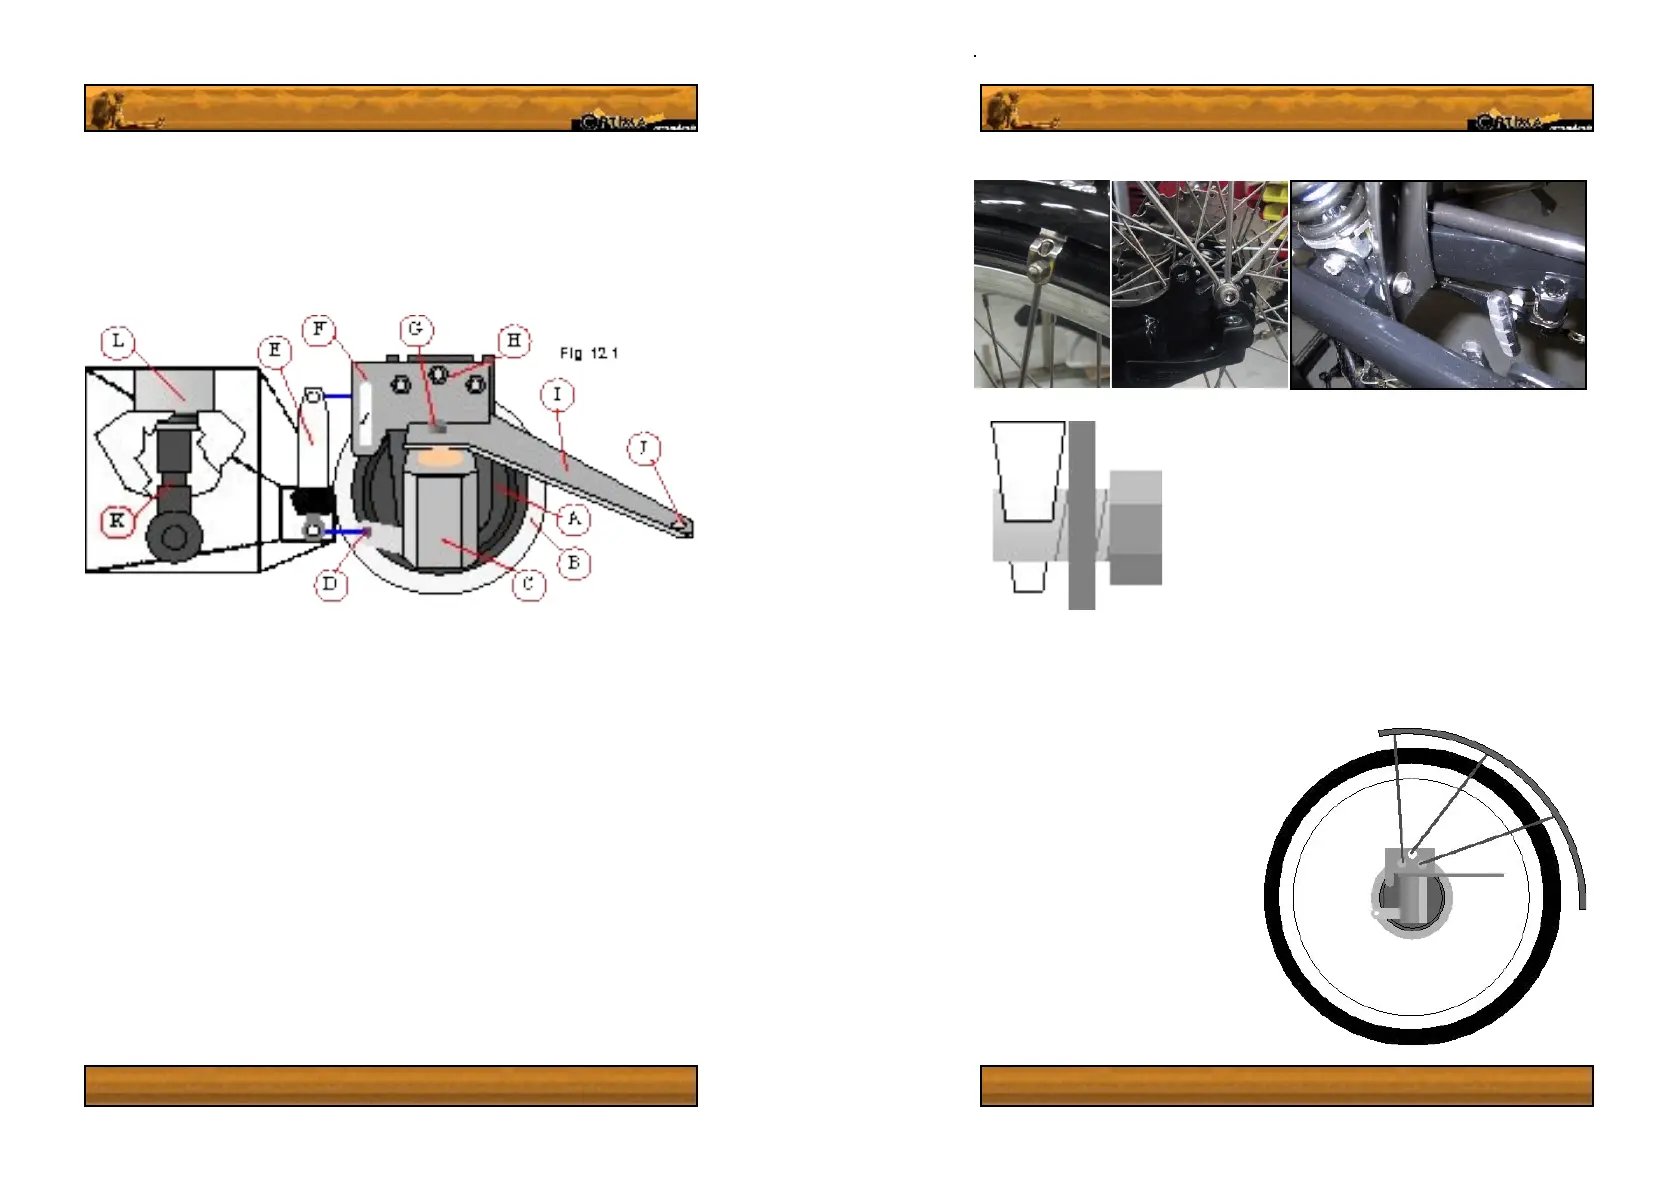
‘Rider’ hub brakes
There are three main ways of adjusting the brakes: by the bolts holding the slave piston, by
the adjustment on the slave piston and via a small Allen key on the brake lever.
To make any major adjustments to the brakes on the two front wheels, move the upper xing
bolt on the brake slave unit (E, g. 12.1) up or down on the adjustment holes on the braking
torque arm (F). If the brakes are only slightly out of adjustment, you can make small adjustments
by pulling the rubber boot on the under side of the slave cylinder down off the ridge on the
cylinder body. This will reveal a notched surface on the slave piston (K, g 12.1) which can be
adjusted with a 8mm spanner. Turn it clockwise whilst looking down the body of the cylinder
to the piston to tighten the brakes and counter clockwise to loosen them.
If at any point you remove the Braking torque and steering arm (I, g. 12.1) you will need to
replace it as follows. First, mount the hub on the bike/wheel xture block (I, g 9.1) making
sure that the inner hub spacer (F, 9.1) and the hub inner shell (E, 9.1 and A, 12.1) are well
centered on the bike/wheel xture block. Once you have screwed the hub in reasonably rmly,
Tighten the Steering arm base bolt (G, 12.1) slightly, followed by the braking torque bolts (H,
12.1). Once you have snugged both sets of bolts in, securely fasten the steering arm base
bolt before the braking torque bolts.
Another method of setting up the ‘Rider’ brake, is to adjust the reach of the brake lever. Please
refer to the enclosed Magura info package for information on how to do this.
12
A) Hub inner shell
B) Hub ange
C) Bike / Wheel xture block
D) Brake actuation lever
E) Hydraulic slave unit
F) Slave unit adjustment holes
G) Steering arm base bolt
H) Braking torque bolts
I) Braking torque and Steering arm.
J) Steering linkage fastening point
K) 8mm Brake adjustment socket on slave unit
L) Brake slave unit cylinder
5. Mounting mudguards
If you ordered mudguards with your bicycle, they will be fast and
easy to install.
Remove the wheels from two wheeled bikes and the rear wheel
from the rider to install the mudguards. For the rear wheel, screw
the mudguard to the bicycles rear fork at its base, using the rubber
spacer and bolt provided. (Fig 13.3), placing the spacer between
the mudguard and the frame. Now attach the support rods to the
rear swingarm via bolt holes located at the top of the swingarm,
right above the wheel dropouts. (These are similar to normal bike
rack mount points, but not to be used for racks.) See g 13.2.
Once you have attached these support rods (13.3, b), you will need to attach them to the
mudguard itself. This is done using the headless clamping bolts (a), nuts (d) and holders (c)
supplied. Feed the rod through the eye of the holder, insert the holder into the metal attachment
arm of the mudguard and screw the bolt onto it, clamping the rod in place (g 13.1).
Rider mudguards fasten to the braking
torque arm and steering plate, on the
front and rear bolt, as seen in gure 13.4.
The installation procedure is the similar
to two wheeled bicycles, however you
do not attach the base of the mudguard
to the frame and only x it from one side.
This construction may look weaker than
the double side frame secured method
but the rods are strong enough to hold
the mudguard in place, as long as it is
installed properly.
13
Fig. 13.1 Fig. 13.2
Fig. 13.3
Fig. 13.3
 Loading...