Riding A Recumbent Bicycle
Before you ride
Before you take your beast out on the streets, take a moment on your bike to get used to the
new seating position and point of view that your Optima provides. Remember that in such a low
position, automobile drivers may not see you! For this reason we urge you to please exercise
caution whilst riding in trafc! Do not overtake in corners, this is extremely dangerous. Optima
strongly advises you to consider installing a (kiddy bike) ag on your bike if you ride in trafc
often, as this will increase your visibility to other road users signicantly.
Once you are used to riding in the recumbent position we advise that you use a ‘clipless’ pedal
system. These pedals can take a little while to get used to, but they will allow for much more
comfortable riding and result in less leg fatigue, as it takes more effort to keep your feet on the
pedals of a recumbent than a normal bicycle!
For your convenience and safety please make sure that the Bicycle ts you properly and
that you have followed all instructions for assembly as shown in the chapter ‘Setting up your
Bicycle’ before riding.
Short pre-ride checklist.
Brakes
Pull each brake lever to make sure there is no stickiness and that the brakes are properly
centered and engage the rims or disk properly, without scufng the tires. Check that they can
exert enough pressure to stop the bike. If your brakes are too tight or loose, adjustments should
be made. Please refer to the original manufacturers manuals, enclosed in the information
package and to the troubleshooting section of this manual.
Quick Release Levers
Please ensure that all wheels are securely and properly fastened before stepping on the bike.
Check that the quick release levers are rmly in their closed positions (see gures 6.2 & 6.3).
Failure to do so could result in a serious accident and injury.
Tires and wheels
Ensure that your tires are properly inated and that the wheels run true between your forks and
frame. Gas station pumps inate tires very rapidly, but the pressure gauges may be inaccurate.
We suggest you inate your tires using a hand pump and an appropriate pressure gauge to
read the pressure
7
. Grasp each wheel rmly and try to move it side to side. There should be
no noticeable play. If there is excessive play, ensure you have tightened the hubs before riding,
as this play may cause braking malfunction.
Seat
Ensure that your seat is securely fastened to the frame before mounting your recumbent bicycle.
See section 6, page 14: ‘tting seat and rack’ for more details.
7
Please contact your bicycle dealer for an appropriate pressure gauge or pump.
22
23
Operating the gear changing systems.
Optima bicycles are supplied with three main types of gear shifting systems, Shimano trigger
shifters, SRAM twist shifters and Shimano bar end shifters. Each of these systems has it’s own
merits, and the choice for either comes down to nothing more than personal preference. To shift
twist shifters, twist the grip. To shift Shimano shifters, pull the trigger with your pointer or push
the lever with your thumb. To shift the bar-end levers, bend them forwards and backwards.
The right hand gearshift activator operates the rear derailleur; the left hand operates the front
derailleur. You must be pedalling to operate derailleur gear shifters.
Pushing Shimano thumblevers will generally push the chain to a larger cog and pulling the
trigger will move the chain to a smaller cog. Twisting gripshift grips downwards will generally
move the chain into a larger cog, and forwards back to smaller cogs. Pushing barend shifters
down shifts to larger cogs, pulling them back up goes to smaller ones. Generally the direction
with the most resistance is moving to a larger cog.
Hub gears will work whilst pedaling or whilst standing still, but generally weigh more than
derailleur systems and are easier to maintain. Derailleur shifters are lighter and more easily
serviced, but are more open to the elements than a hub geared system.
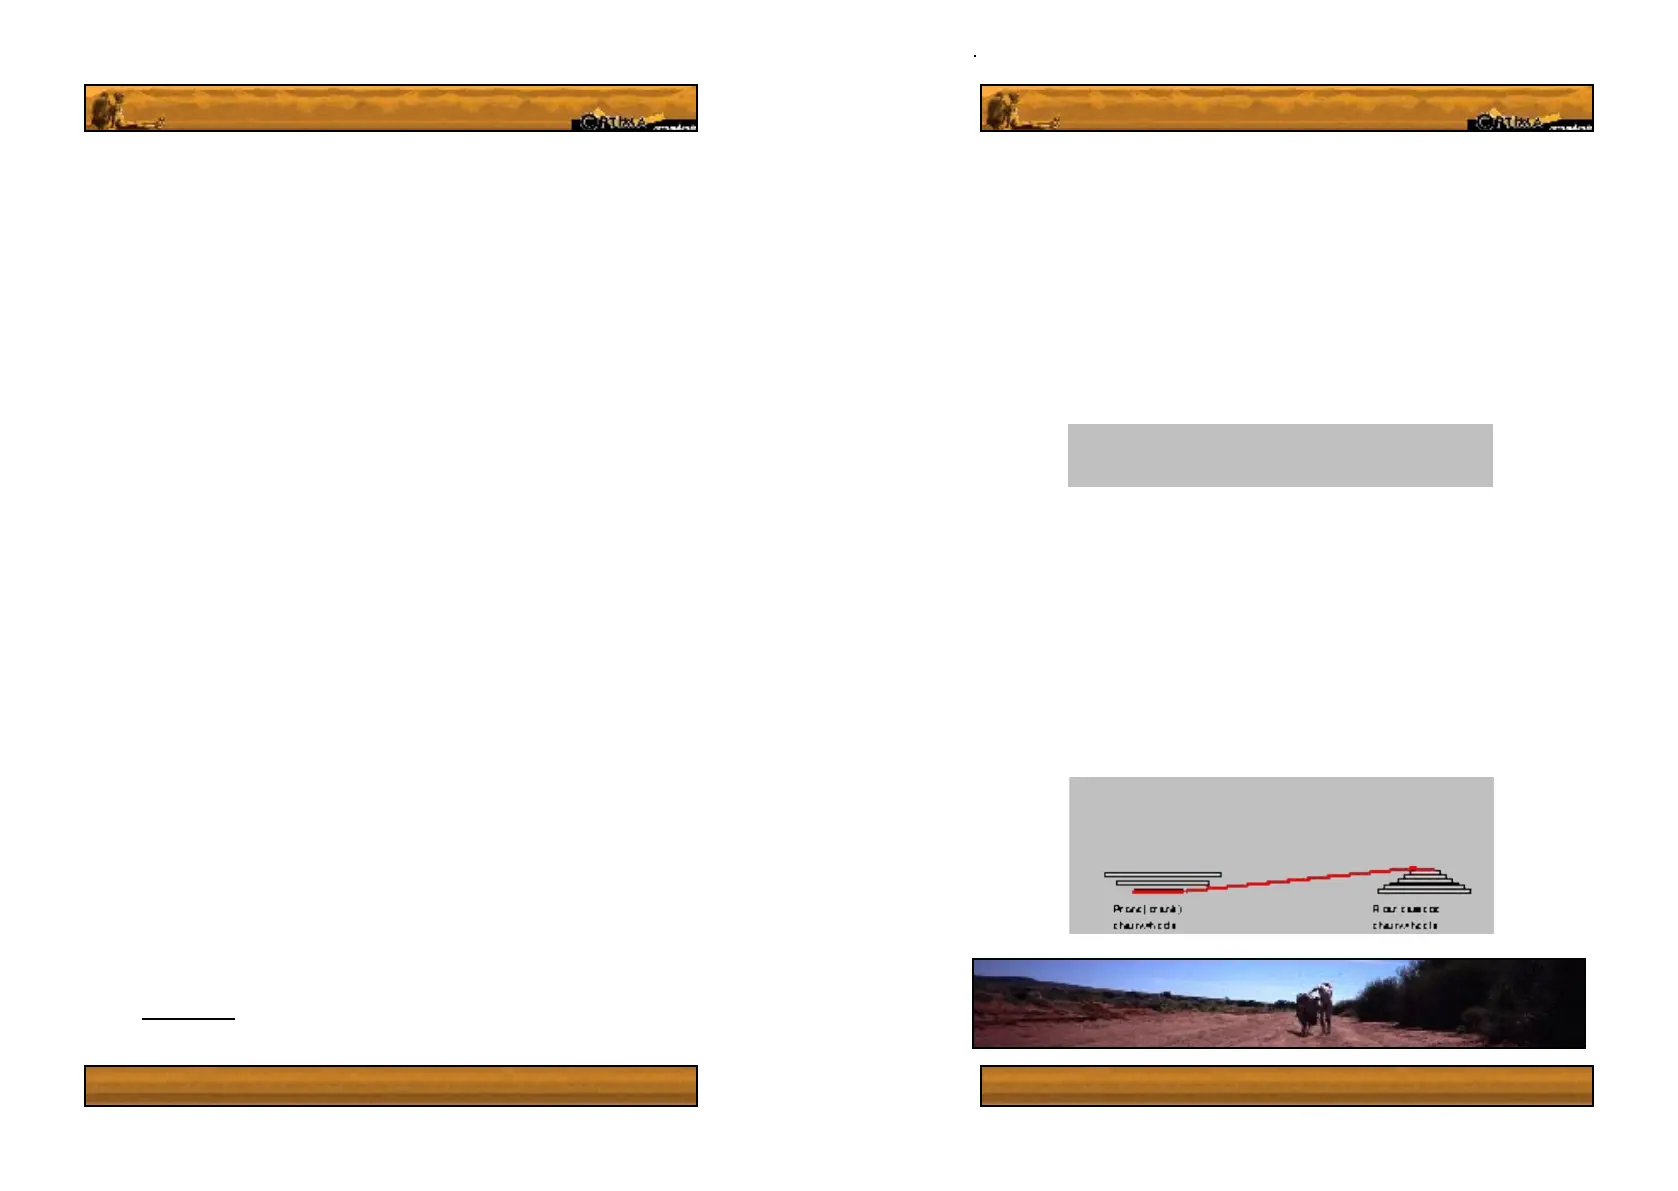
If you want to shift into a harder gear at the front (Left) you will have push the derailleur to a
larger cog. To go to a faster gear in the rear (right), you will need to shift to a smaller cog. Whilst
this is at rst confusing, it will in time become second nature. As far as the position of the chain
on the cog goes; the closer the chain is to the centerline of the bike, the easier the bike is to
pedal and the slower you go. The further out it gets, the harder it is to pedal and the faster you
will go. Regard the front cogs as three speed ranges, with the rear allowing adjustment of this
range. Major speed changes will use the front derailleur. Smaller ones will use the rear.
Moving the chain towards the centerline of the bike is called ‘downshifting’ and moving it away
from the centerline is called ‘upshifting’
Tip: It is best not to put the chain into both small sprockets.
Riding in this gear combination could damage the rear
derailleur and will lead to irritating ‘chain slap’ noise, as
well as increased chances of the chain falling off the front
chainwheels
Caution! Do not shift derailleurs when you are standing still,
or backpedal whilst shifting. This may damage your shifting
system or lead to a fall.
 Loading...