10W HF Linear PA kit assembly 1.00 3
1. Introduction
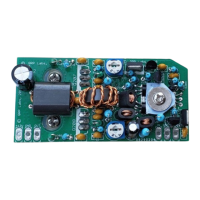
This 10W HF Linear Power Amplifier has the following features:
• 10W output from 2 to 30MHz, using 12V Supply
• Generously-sized heatsink, will not overheat even on continuous 100% duty-cycle modes
• 2-stage amplifier provides 26dB of gain
• Push-pull driver and push-pull finals, for high linearity and low harmonic content
• +/- 1dB gain flatness from 2 to 30MHz
• 4dB down at 4m (50MHz) and 8dB down on 4m (70MHz)
• Standard 50-ohm input and output
• Through-hole plated PCB, all through-hole components (no Surface Mount Devices)
• Standard inexpensive components throughout
• Tested for 1 hour at full-power 10W, 100% continuous duty-cycle with no forced air cooling
• Tested for 15 minutes at 20W, 100% continuous duty-cycle with no forced air cooling
• Tested at 20V supply
• Tested into open load, shorted load and various mismatches
We hope you enjoy building and operating this kit! Please read this assembly manual carefully,
and follow the instructions step by step in the recommended order.
The push-pull driver stage using two BS170’s is as used in the SoftRock transmitter stage.
I am very grateful to Allison KB1GMX for very valuable advice during the design and
development of this amplifier, for beta-testing prototypes, measurements and moral
support!
2. General Assembly guidelines
Assembly of this kit is quite straightforward. But there are quite a lot of components. So please
keep them methodically in trays or some convenient storage boxes. Be careful not to misplace
any. The usual kit-building recommendations apply: work in a well-lit area, with peace and quiet to
concentrate. Some of the semiconductors in the kit are sensitive to static discharge.
Therefore, observe Electrostatic discharge (ESD) precautions. And FOLLOW THE
INSTRUCTIONS!! Don’t try to be a hero and do it without instructions!
A jeweller’s loupe is really useful for inspecting small components and soldered joints. You’ll need
a fine-tipped soldering iron too. It is good to get into the habit of inspecting every joint with the
magnifying glass or jeweller’s loupe (like this one I use),
right after soldering. This way you can easily identify any
dry joints or solder bridges before they become a
problem later on when you are trying to test the project.
Triple check every component value and location
BEFORE soldering the component! It is easy to put
component leads into the wrong holes, so check, check
and check again! It is difficult to de-solder and replace
components, so it is much better to get them correctly
installed the first time. In the event of a mistake, it is
always best to detect and correct any errors as early as
 Loading...