EasyManua.ls Logo

Ricoh GX200 User Manual

Ricoh GX200
266 pages
To Next Page IconTo Next Page
To Previous Page IconTo Previous Page
Page #217 background imageLoading...
Page #217 background image
215
Changing Camera Settings
5
You can shoot still images with the time or date stamped onto the
picture.
The date/time setting on the setup menu is explained here.
1
Display the setup menu.
For the operating procedure, see P.184.
2
Press the " button to select
[Date Settings] and press the
$ button.
3
Press the !"#$ buttons to
set the year, month, date and
time.
You can press and hold the !"
buttons to quickly raise or lower the
setting.
Press the #$ buttons to move to the
next item.
4
In [Format], choose the date
and time format.
5
Check the information on the
screen and then press the
MENU/OK button.
Once you have set the date and time,
the display returns to the setup menu.
6
Press the MENU/OK button.
Note ----------------------------------------------------------------------------------------------
If the battery is removed for more than one week, the date and time settings will be
lost. These settings must be made again.
To retain the date and time settings, load a battery with adequate remaining power for
more than two hours.
Setting the Date and Time
(Date Settings)

Table of Contents

Other manuals for Ricoh GX200

Question and Answer IconNeed help?

Do you have a question about the Ricoh GX200 and is the answer not in the manual?

Ricoh GX200 Specifications

General IconGeneral
Megapixel12.4 MP
Camera typeCompact camera
Sensor typeCCD
Image sensor size1/1.7 \
Maximum image resolution4000 x 3000 pixels
Still image resolution(s)640 x 480, 1280 x 960, 2048 x 1536, 2592 x 1944, 2992 x 2992, 3264 x 2448, 3984 x 2656
Optical zoom3 x
Combined zoom18.9 x
Focal length range5.1 - 15.3 mm
Lens structure (elements/groups)11/7
Digital SLRNo
Built-in flashYes
Aperture range (F-F)2.5 - 4.4
Camera shutter speed1/30 - 1/2000 s
Effective sensor resolution12.1 pixels
Focal length (35mm film equivalent)24 - 72 mm
Internal memory54 MB
Compatible memory cardssd, sdhc
Maximum memory card size16 GB
Motion JPEG frame rate30 fps
Video formats supportedAVI
Maximum video resolution640 x 480 pixels
Display diagonal2.7 \
Display resolution (numeric)460000 pixels
USB version2.0
Product colorBlack
Battery typeDB60
Battery life (CIPA standard)350 shots
Operating temperature (T-T)0 - 40 °C
Auto focusing (AF) modesmulti point auto focus, spot auto focus
Flash modesauto, Flash off, manual, Red-eye reduction, Slow synchronization
Scene modesClose-up (macro), Documents, Portrait, self-portrait, Landscape (scenery)
Image editingresizing, rotating
White balanceauto, Cloudy, custom modes, Fluorescent, Incandescent, manual
Camera playbackmovie, single image
Light meteringCentre-weighted, Spot
Light exposure modesaperture priority AE, manual
Viewfinder typeElectronic
Weight and Dimensions IconWeight and Dimensions
Depth25 mm
Width111.6 mm
Height58 mm
Weight208 g

Summary

Basic Operations

Getting Ready

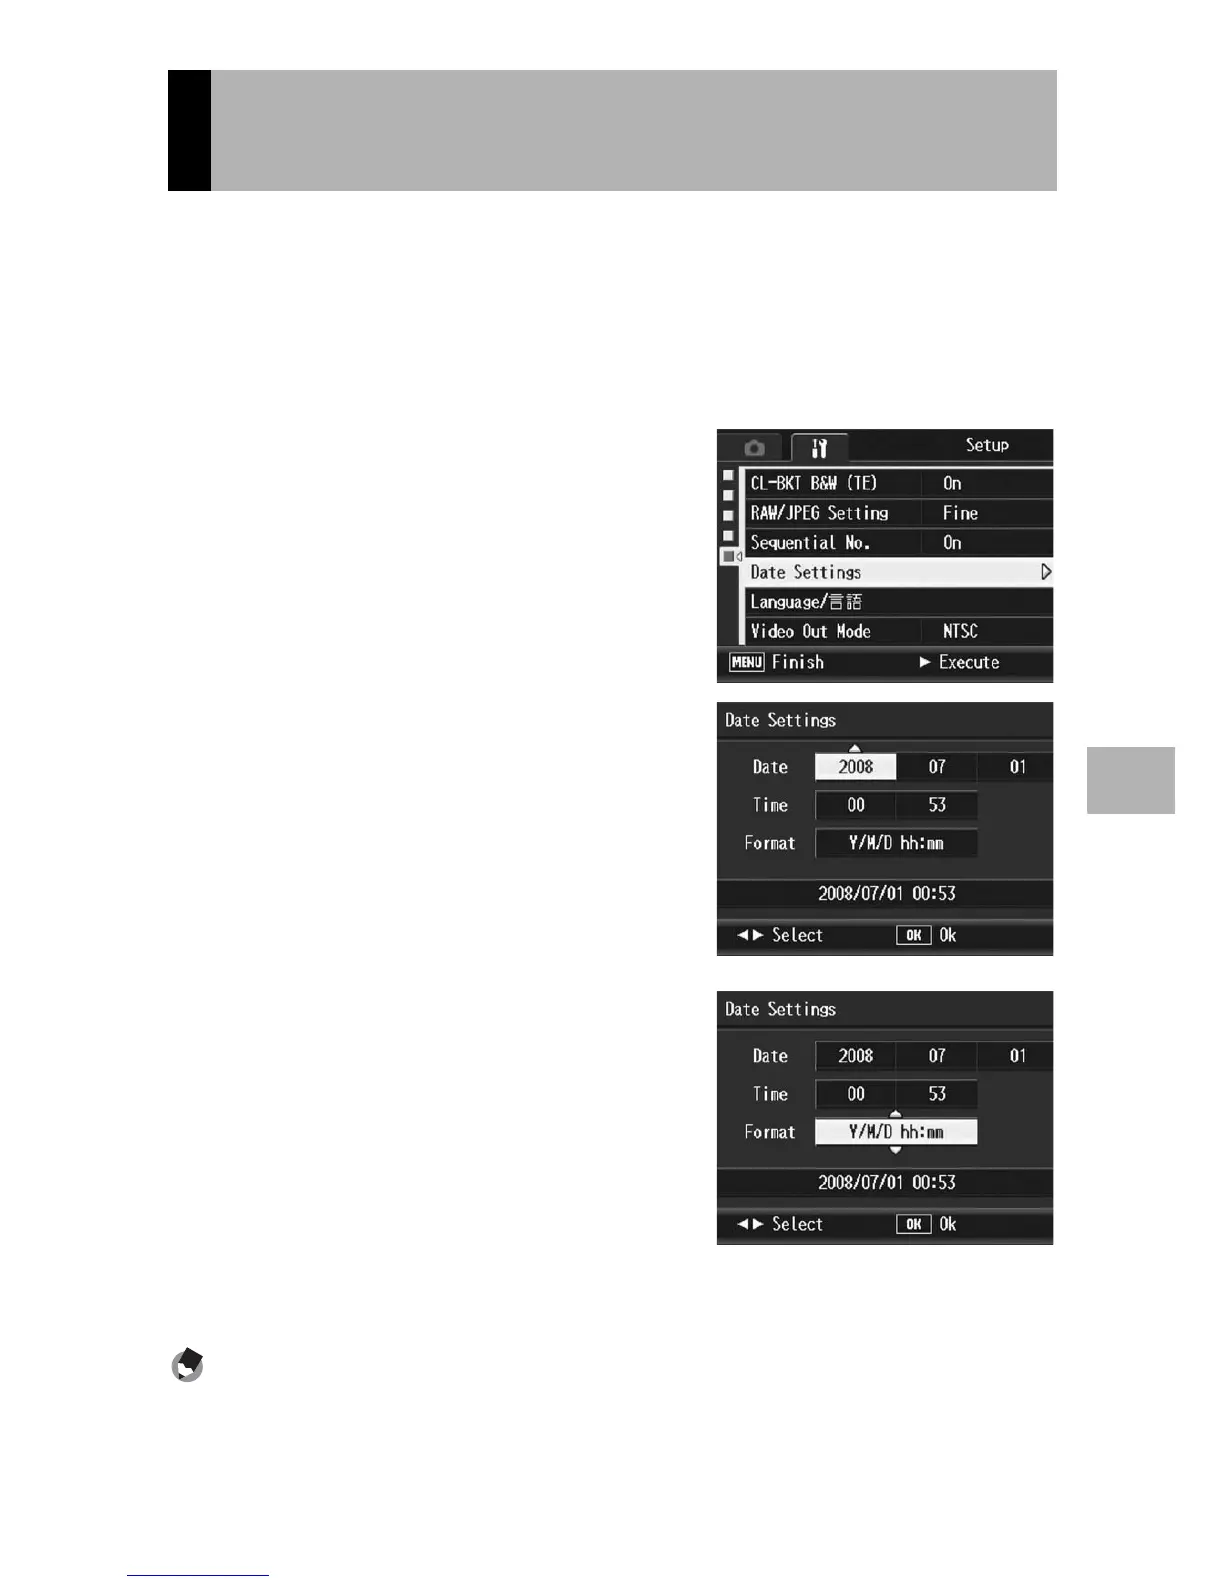
Steps to prepare the camera for shooting, including battery and card insertion.

Basic Shooting

Instructions on how to hold the camera and take pictures.

Advanced Operations

Using the ADJ. Lever

How to assign and use functions with the ADJ. lever.

Shifting the AE and AF Targets

How to shift exposure and focus targets without moving the camera.

Preface

Safety Precautions

For the safe use of your camera, be sure to read the safety precautions thoroughly.

Safety Precautions

Warning Symbols

Symbols indicating danger, warning, or caution. Meanings and examples provided.

Warning

Caution

Key Features

Names of Parts (Front View)

Names of Parts (Rear View)

How to Use the Mode Dial

How to Use the Up-down Dial and ADJ. Lever

Picture Display

Battery Level Indication

Getting Ready

About the Battery

Information about the rechargeable battery and other compatible battery types.

SD Memory Card

Charging the Rechargeable Battery

Loading the Battery and SD Memory Card

Turning the Power On/Off

Basic Shooting

Holding the Camera

Demonstrates the proper way to hold the camera for stable shooting.

Shooting

Using the Zoom Function

Shooting Close-Ups (Macro Shooting)

Using the Flash

Using the Self-Timer

Playing Back Images

Deleting Files

Using the Menu

Choosing Picture Quality Mode/Image Size (Pic Quality/Size)

Movies

Changing the Focusing Mode (Focus)

Manual Focus Shooting (MF)

Changing the Exposure Metering Modes (Exposure Metering)

Shooting with Multi-Shot (Continuous/S-Cont/M-Cont)

Setting the Picture Quality and Color (Image Settings)

Adjusting the Light Intensity of the Flash (Flash Expo. Comp.)

Setting the Flash Amount in Manual Flash Mode (Man. Flash Amount)

Shooting Consecutively with Different Exposures (Auto Bracket)

Shooting Consecutively with Different White Balance (WB-BKT)

Shooting Consecutively with Different Color (CL-BKT: Color Bracket)

Reducing Image Noise (Noise Reduction)

Shooting Pictures Automatically at Set Intervals (Interval)

Using the Camera Shake Correction Function to Prevent Camera Shake (Camera Shake Cor)

Changing the Exposure (Exposure Comp.)

Using Natural and Artificial Lighting (White Balance)

Setting the White Balance Manually (Manual Settings)

Changing the Sensitivity (ISO Setting)

Returning the Shooting Menu Settings to their Defaults (Restore Defaults)

Shooting/Playing Back Movies

Setting the Frame Rate (Frame Rate)

Playing Back Movies

Other Playback Functions

Preventing the Deletion of Files (Protect)

Correcting the Image Brightness and Contrast (Level Compensation)

Connecting the Camera to a Printer

Printing Still Images

Printing Several Still Images

Changing Camera Settings

Preparing the SD Memory Card (Format [Card])

Formatting the Internal Memory (Format [Internal])

Adjusting the brightness of the picture display (LCD Brightness)

Registering Custom Settings (Reg. My Settings)

Changing the ISO Auto-High Setting (ISO Auto-High)

Assigning a Function to the Function Button (Set Fn1/2 Button)

Assigning a Function to the ADJ. Lever (ADJ Lever Set.)

Changing the AF Auxiliary Light Setting (AF Aux. Light)

Changing the Auto Power Off Setting (Auto Power Off)

Changing the RAW Mode JPEG Image Setting (RAW/JPEG Setting)

Setting the Date and Time (Date Settings)

Downloading Images to Your Computer

Downloading Images Using the RICOH Gate La

Downloading Images Without Using RICOH Gate La

For Macintosh

Appendices

Troubleshooting

Provides solutions for common camera and software problems.

Error Messages

Lists error messages and their corresponding causes and actions.

Camera Troubleshooting

Playback/Deleting

Software and Computer Troubleshooting

Specifications

Using the AC Adapter (sold separately)

Using the External Flash

Care and Storage

Related product manuals