www.scheppach.com service@scheppach.com +(49)-08223-4002-99 +(49)-08223-4002-58
24 І 56
Noise and vibration values
The total noise values determined in accordance with
EN 61029.
sound pressure level - no load L
pA
70.2 dB(A)
sound pressure level - load L
pA
73.5 dB(A)
uncertainty K
pA
3 dB(A)
sound power level - no load L
WA
82.7 dB(A)
sound power level - no L
WA
86.3 dB(A)
uncertainty K
WA
3 dB(A)
Wear hearing protection.
The effects of noise can cause a loss of hearing. Total
vibration values (vector sum - three directions) deter-
mined in accordance with EN 61029.
Vibration emission value ah = 1.7 m/s
2
K uncertainty = 1,5 m/s
2
The specied vibration value was established in
accordance with a standardized testing method. It may
change according to how the electric equipment is used
and may exceed the specied value in exceptional
circumstances.
The specied vibration value can be used to compare the
equipment with other electric power tools.
The specied vibration value can be used for initial
assessment of a harmful effect.
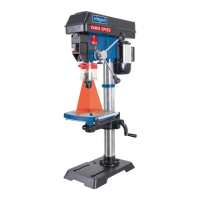
8. Assembly
Column and machine foot, Fig. 3
1. Set the machine foot (1) down on the ground or the
workbench.
2. Place the column (2) on the base plate so that the
holes on the column (2) align with the holes on the
base plate (1).
3. Screw the four hexagonal screws (19) to fasten the
column into the base plate and tighten them using a
hexagon spanner (A).
Removing the rack, Fig.4
In order to install your drill, you must rst remove the
rack (E)
1. Use an Allen key (WAF3) to remove the ring (F) and
pull this off the column (2).
2. Now pull the rack (F) out.
Pre-installing the drilling table holder, Fig.5+6
1. Push the crank holder (20) through the hole in the
drilling table holder (18) from the inside.
2. Put the crank handle (17) on the crank holder and
use the Allen key (3) to secure the crank handle (17).
Installing the drilling table holder, Fig.7+8
1. Insert the rack (E) into the groove on the drilling ta-
ble holder (18).
2. Align the rack (E) centrally in relation to the drilling
table holder (18).
6. Residual risks
The machine has been built according to the state of
the art and the recognised technical safety require-
ments. However, individual residual risks can arise
during operation.
• Health hazard due to electrical power, with the use of
improper electrical connection cables.
• Furthermore, despite all precautions having been met,
some non-obvious residual risks may still remain.
• Residual risks can be minimised if the „safety instruc-
tions“ and the „Proper use“ are observed along with
the whole of the operating instructions.
• Do not load the machine unnecessarily: excessive
pressure when sawing will quickly damage the saw
blade, which results in reduced output of the machine
in the processing and in cut precision.
• When cutting plastic material, please always use
clamps: the parts which should be cut must always
be xed between the clamps.
• Avoid accidental starting of the machine: the oper-
ating button may not be pressed when inserting the
plug in an outlet.
• Use the tool that is recommended in this manual. In
doing so, your saw provides optimal performance.
• Hands may never enter the processing zone when the
machine is in operation. Release the handle button
and switch off the machine prior to any operations.
• Prior to any adjustment, maintenance or service work
disconnect the mains power plug!
7. Technical Data
Nominal input voltage 230-240V~ 50Hz
Power rating 550W
Motor speed 1450min
-1
Output speed (innitely adju-
stable)
440 - 2580 min
-1
Drill chuck mount B16
Spindle taper MT2
Drill chuck 1 - 16mm
Dimensions of drill table 240 x 240mm
Angle adjustment of table 45° - 0° - 45°
Drill depth 80mm
Pillar diameter 65mm
Height 713mm
Weight 38.5kg
Laser class 2
Wavelength of laser 650mm
Laser output 1mW
 Loading...