23
GB
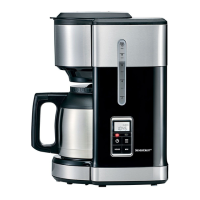
4. Place a paper filter (size 1x4) with fold-
ed sides in the filter holder|11. When it
is folded, the paper filter fits better in
the filter holder|11 and the seams are
prevented from tearing.
5. Place coffee grounds into the filter. For
medium-strength coffee, put one coffee
spoon (around 7 – 8|g) of coffee pow-
der per cup into the filter. Use ground
coffee powder for filter coffee. If you
grind the coffee yourself, grind it on a
medium fineness level.
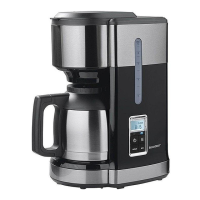
6. Close the lid|1 of the coffee machine|6.
7. It is very important to screw the
lid|9 on the thermal jug|8.
The lid|9 is closed by turning it clock-
wise.
8. Place the thermal jug|8 in the
coffee machine|6.
9. Press |18. The red LED|19 lights up
and the brewing process will start after
a short time.
10.The red LED|19 goes off approx.
5 – 6 minutes after the end of the brew-
ing process.
11.Figure B: take the thermal jug|8 by the
handle out of the coffee machine|6,
open the lid|9 slightly (by turning anti-
clockwise) and pour out the coffee.
12.Figure C: close the lid|9 again (by
turning clockwise) to keep the coffee
hot.
NOTE: the brewing process can be stopped
by pressing the button |18. Press the but-
ton |18 repeatedly until all LEDs have
gone off.
7.4 Starting with the timer
Enter the desired time if the timer shall start
the coffee machine at a certain time.
NOTE: the timer cannot be set if a brewing
process has already started (i.e. if the red
LED|19 is lit).
The timer can be set up to 24 hours in ad-
vance.
1. Connect the coffee machine|6 with the
mains plug|7 to a wall socket.
2. Fill the coffee machine as usual with cof-
fee powder and water.
3. Close the lid|1 of the coffee machine|6.
4. It is very important to screw the
lid|9 on the thermal jug|8.
The lid|9 is closed by turning it clock-
wise.
5. Place the thermal jug|8 in the coffee
machine|6.
6. Press the button
|15 repeatedly until
TIMER appears at the top in the dis-
play|13.
7. Press HOUR|17 in order to set the
hours. Keep the button pressed to run
through the options quickly.
8. Press MIN|16 in order to set the min-
utes. Keep the button pressed to run
through the options quickly.
9. Press |18 twice. The white LED|14
lights up. This indicates that the timer is
active.
10.At the time that has been set, the brew-
ing process will start automatically and
the red LED|19 will light up.
11.The red LED|19 goes off approx.
5 – 6 minutes after the end of the brew-
ing process.
NOTE: you can stop the timer by pressing
the |18 button. Press |18 once while
the white LED|14 is lit. All LEDs are off.
 Loading...