25
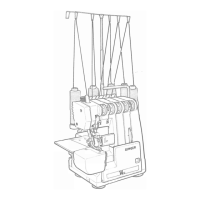
C. Thread the machine with your left
hand while rmly gripping the thread
with your right hand in the following
order as illustrated.
* Guide the thread through thread
guides (1 & 2), and then pull it
down along the groove (3).
* Guide the thread into the thread
guide (4).
* Pass the thread through the eye of
the needle (5) from front to back.
(See following page for instructions
on operation of the Automatic
Needle Threader.)
IMPORTANT:
To verify that the machine is threaded
properly in the tension discs, do this
simple check:
1.) With the presser foot raised, pull
the thread towards the back of
the machine. You should detect
only a slight resistance and little
or no deection of the needle.
2.) Now lower the presser foot
and again pull the thread
towards the the back of the
machine. This time you should
detect a considerable amount
of resistance and much more
deflection of the needle. If you
do not detect the resistance you
have mis-threaded the machine
and need to re-thread it.
THREADING THE TOP
THREAD
A. Raise the presser foot lifter. Always
be sure to raise the presser foot lifter
before threading the top thread. (If
the presser foot lifter is not raised,
correct thread tension cannot be
obtained.)
B. Turn the hand wheel counter
clockwise until the needle is in its
highest position.
TRÆ OVERTRÅDEN
A. Hev trykkfotløfter. Pass alltid på at
du hever trykkfotløfteren før du trær
overtråden. (Hvis trykkfotløfteren
ikke er hevet, oppnås ikke korrekt
trådspenning. )
B. Drei håndhjulet mot deg til nålen er i
sin høyeste posisjon og tråføreren blir
synlig.
YLÄLANGAN
LANGOITTAMINEN
A. Nosta paininjalka. Tämä on tärkeä
vaihe ennen ylälangan pujottamista,
sillä muutoin langankireys ei mene
oikein. (Jos paininjalan nostinta ei
nosteta, oikeaa langankireyttä ei saa
aikaan.)
B. Käännä käsipyörää itseäsi kohti,
kunnes neula on ylimmillään ja
langannostin näkyy.
C. Træ maskinen med din venstre hånd
mens du holder tråden fast med din
høyre hånd i rekkefølge som vist.
* Før tråden gjennom trådlederne
(1 & 2), og dra den deretter nedover
langs sporet (3).
* Før tråden inn i trådføreren (4).
* Træ tråden gjennom nåløyet (5)
forfra og bakover. (Se neste side for
instruksjoner om hvordan du bruker
den automatiske nålitræderen.)
VIKTIG:
For å stadfeste at maskinen er trædd
skikkelig i trådspennings-skivene,
gjør denne enkle testen:
1.) Med foten hevet , trekk tråden
under foten bakover Du bør
kjenne en svak motstand og liten
eller ingen bøying av nålen.
2.) Senk nå foten og trekk igjen
tråden under foten bakover.
Denne gangen bør du kjenne
betydelig motstand og mer
bøyning av nålen.
Dersom du ikke merker motstand,
har du trædd maskinen feil og
må gjøre det på nytt.
C. Langoita kone seuraavasti
vasemmalla kädellä samalla kun pidät
lujasti langasta oikealla kädellä.
* Vie lanka ohjainten (1 & 2) kautta ja
sitten alas uraa (3).
* Ve lanka ohjaimeen (4).
* Pujota lanka neulansilmään edestä
taaksepäin. (Katso seuraavalta
sivulta automaattisen langoittimen
käyttöohje.)
TÄRKEÄÄ:
Varmistaaksesi, että kone on oikein
langoitettu kiristyslevyjen välissä, tee
seuraava testi:
1.) Kun paininjalka on ylhäällä, vedä
lankaa taaksepäin. Langan pitää
purkautua helposti eikä neula
saa taipua.
2.) Laske paininjalka ja vedä jälleen
lankaa taakse. Nyt langan pitää
olla kireällä ja neulan taipua.
Jos näin ei käy, ei langoitus ole
oikein. Langoita uudelleen.

 Loading...