EasyManuals Logo

Singer Heavy Duty 4452 User Manual

Singer Heavy Duty 4452
76 pages
To Next Page IconTo Next Page
To Previous Page IconTo Previous Page
Page #55 background imageLoading...
Page #55 background image
48
1
2
A B
GB
Sewing on buttons
Install the darning plate. (A)
Change presser foot to button sewing foot. (B) Select
zigzag stitch.
Position the work under the foot. Place the button on the
marked position, lower the foot. Adjust stitch width to "0"
and sew a few securing stitches. Set the stitch width to
number "3" - "5". Turn the handwheel to check that the
needle goes cleanly into the left and right holes of the
button (adjust the stitch width according to the button), and
slowly sew on the button with about 10 stitches. Adjust the
stitch width to "0" and sew a few securing stitches (1).
If a shank is required, place a darning needle on top of the
button and sew (2). For buttons with 4 holes, sew through
the front two holes first (1), push the work forward and then
sew through the back two holes as described (2).
5
0
1
2
3
4
5
0
1
2
3
4
0
1
2
3
L R

Questions and Answers:

Question and Answer IconNeed help?

Do you have a question about the Singer Heavy Duty 4452 and is the answer not in the manual?
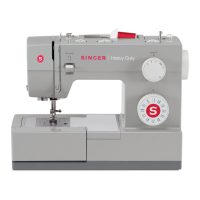
Singer Heavy Duty 4452 Specifications

General IconGeneral
Built-In Stitches32
Stitch Width6mm
Stitch Length4mm
Presser Foot LifterExtra high
Drop FeedYes
Needle ThreaderAutomatic
Bobbin TypeClass 15 transparent
Motor60% stronger motor
TypeMechanical
FrameMetal
Presser FeetAll-Purpose Foot, Zipper Foot, Buttonhole Foot, Button Sewing Foot
Warranty25-year limited
Sewing Speed1100 stitches per minute
Buttonhole Styles1-Step
Included AccessoriesNeedles, Seam Ripper/Lint Brush, Screwdriver, Spool Pin Felt, Auxiliary Spool Pin
Weight14.6 lbs
Dimensions15.5 x 6.25 x 12 inches

Related product manuals