EasyManua.ls Logo

Sony DSR-400L User Manual

Sony DSR-400L
140 pages
To Next Page IconTo Next Page
To Previous Page IconTo Previous Page
Page #47 background imageLoading...
Page #47 background image
47
Recording
Chapter 4 Recording and Playback
8
If required, switch on the center marker and/or safety
zone in the viewfinder image.
For details, see “Setting the marker display” on page
100.
Also, press the ZEBRA button to display zebra pattern
in the viewfinder.
9
If necessary, adjust the white balance and black
balance
(page 50).
10
If necessary, adjust the iris and gain.
For details about the adjustment of iris, see “Iris ring”
on page 19, “Instant automatic iris adjustment
button” on page 19, and “Adjusting the iris” on page
55.
For details about the adjustment of gain, see “GAIN
switch” on page 11, and “Setting gain values for the
GAIN switch positions” on page 103.
11
Turn the focusing ring so that the subject is sharply in
focus.
12
Setup the VTR section according to your shooting
objects, then start recording by pressing the REC
button.
During recording, the REC/TALLY indicator(s) in
the viewfinder light(s), and “REC” appears on the
viewfinder screen.
You can use the AUDIO LEVEL knob on the front
of the camcorder to manually adjust the channel 1
audio level. To do this, you must first set up the VTR
section to enable manual adjustment of the audio
recording level
(page 57).
13
To pause recording, press the REC button again.
Recording
Usable cassettes
It is recommended to use the DVCAM cassettes listed
below for this camcorder.
The “*” in each model name is actually “ME” (indicating
that a cassette memory is contained), or “N” (indicating
that no cassette memory is contained).
The numbers in the model names show maximum
recording/playback time (minutes) for each model. For
example, the maximum recording/playback time of the
PDV-184* is 184 minutes.
If you insert an incorrect type of cassette, it will be
automatically ejected.
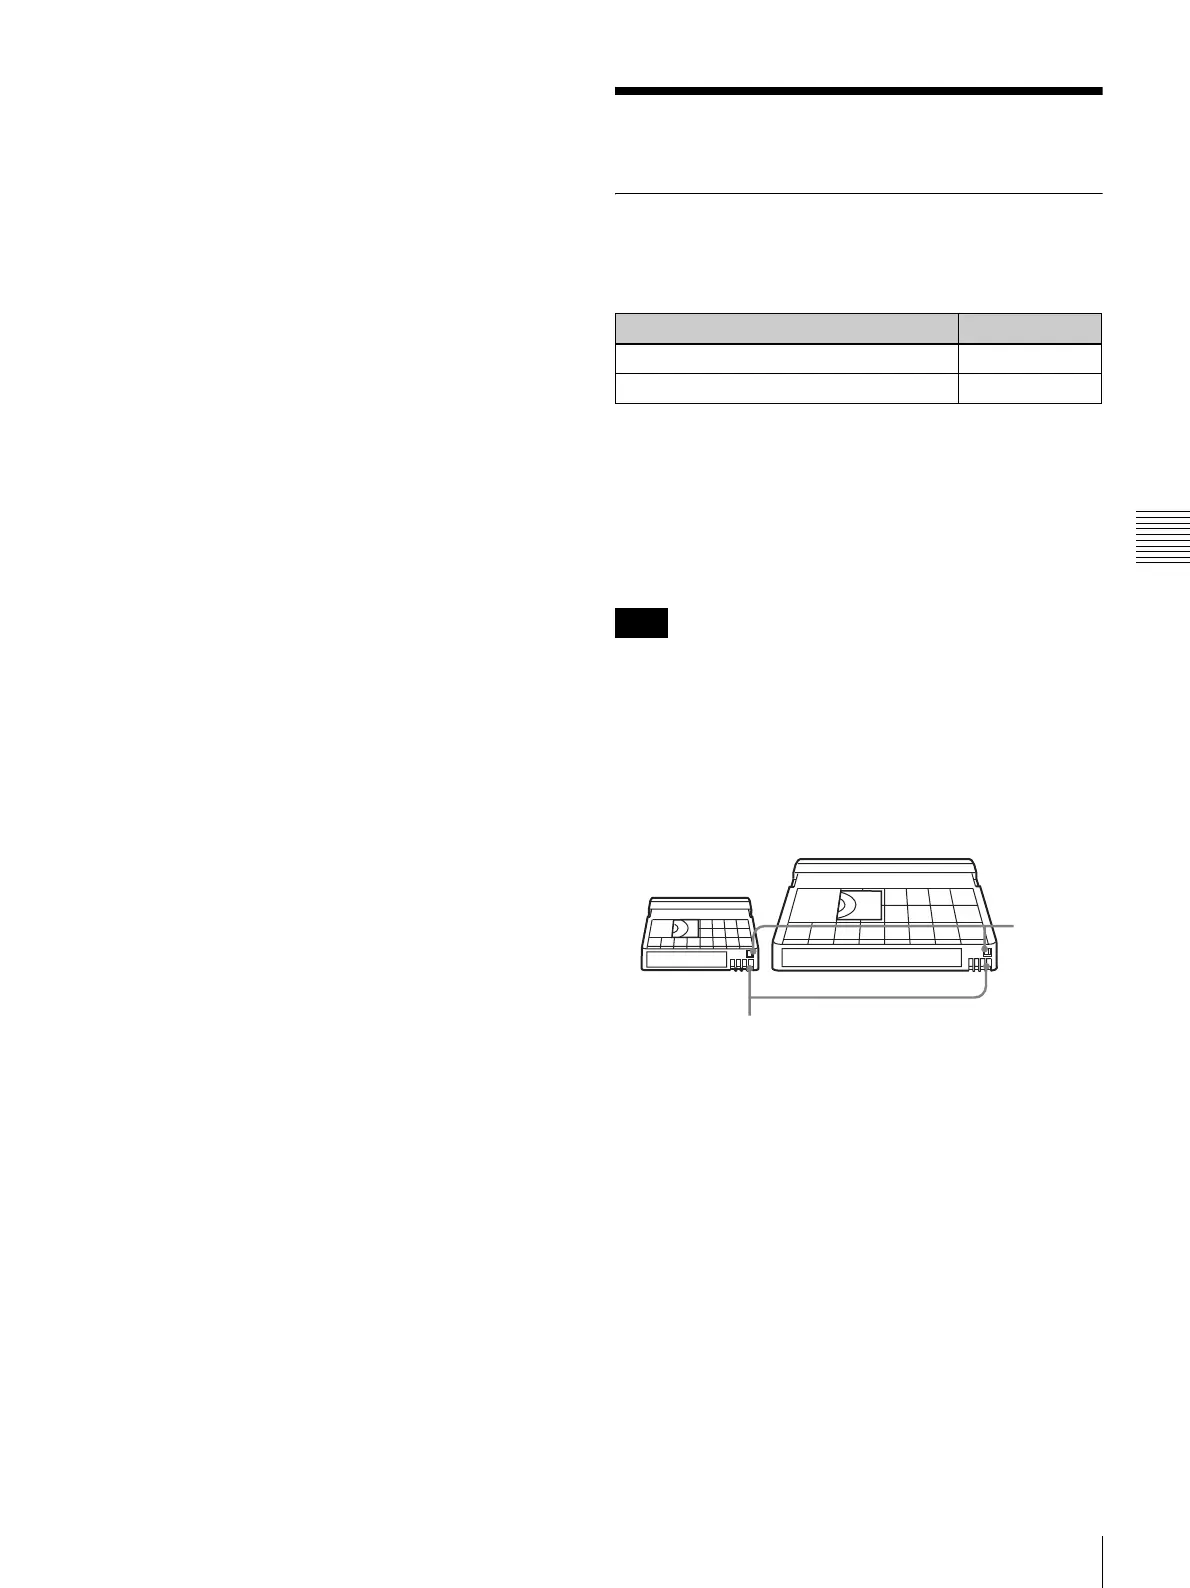
DVCAM cassettes
The following figure illustrates the DVCAM cassettes’
appearance.
Notes on using cassettes
Before storing the cassette, rewind the tape to the
beginning and be sure to put the cassette in its storage
case, preferably on end instead of flat on its side. The
storage case of a DVCAM cassette is specially designed
to ensure a long-period storage of the tape. Storing a
cassette in any other condition (not rewound, out of its
case, etc.) may cause the video and audio contents to
become damaged over time.
If the cassette memory connector (contact point)
becomes dirty, connection problems may occur and
cause a loss of functions. Remove away any dust or dirt
from this area before using the cassette.
If the cassette is dropped on the floor or otherwise
receives a hard impact, the tape may become slackened
Model name Size
PDV-184*/124*/94*/64*/34* Standard size
PDVM-40*/32*/22*/12* Mini size
Note
Standard size
Mini size
REC/SAVE
switch
Cassette memory

Table of Contents

Questions and Answers:

Sony DSR-400L Specifications

General IconGeneral
BrandSony
ModelDSR-400L
CategoryCamcorder
LanguageEnglish

Summary

Chapter 1 Overview

Product Configurations

Details the different DSR-400/450WS series models and their configurations.

Features

Highlights key features of the DVCAM camcorders.

Location and Function of Parts

Identifies and explains the various buttons, connectors, and components of the camcorder.

Using the CD-ROM Manual

Provides instructions for installing and using the provided CD-ROM manual.

Chapter 2 Preparation

Attaching and Replacing the Lithium Battery

Step-by-step guide for installing and replacing the camcorder's internal lithium battery.

Preparing the Lens

Instructions for mounting and adjusting the camcorder lens, including flange focal length.

Preparing a Power Supply

Details on attaching battery packs and using AC adaptors for camcorder power.

Adjusting the Viewfinder

Guides on fitting, adjusting focus, brightness, contrast, and position of the viewfinder.

Using the Shoulder Strap

Instructions on how to attach and use the camcorder's shoulder strap for portability.

Fitting to a Tripod

Describes how to attach the camcorder to a tripod using the provided adaptor.

Using a Video Light

Information on connecting and using an external video light with the camcorder.

Preparing Audio Input System

Covers connecting microphones, including supplied, external, and wireless systems.

Connecting the Remote Control Unit

Explains how to connect and use an optional remote control unit for camcorder operation.

Chapter 3 Connections

Connecting a Monitor

Illustrates how to connect a video monitor to the camcorder's output connectors.

Using an i.LINK Connection

Details connections using i.LINK for digital data transfer, including settings and backup.

Other Connections

Covers connecting multiple camcorders for synchronization and using external sync signals.

Chapter 4 Recording and Playback

Inserting a Cassette

Step-by-step instructions for inserting standard and mini-size DVCAM/DV cassettes.

Basic Procedure for Shooting

Outlines the fundamental steps required to begin shooting with the camcorder.

Recording Settings and Cassette Compatibility

Covers recording operations, usable cassettes, compatibility, and format selection.

Image Quality Adjustments

Details adjustments for black/white balance, electronic shutter, iris, and audio levels for optimal image and sound.

Special Shooting Cases and Editing

Provides settings for special shooting scenarios and covers back space editing and time-lapse recording.

Advanced Recording and Playback

Details analog composite signal recording and techniques for playing/checking recorded content.

Chapter 5 Menu Displays and Detailed Settings

Menu Organization and Operation

Outlines the structure and organization of the camcorder's menu system.

Basic menu operations

Explains how to navigate, select items, and change settings within the camcorder's menus.

USER Menu Management and Status Display Settings

Covers resetting USER menus, customizing displays, and marker settings for viewfinder/LCD.

Shot Data Recording and Settings

Details recording shot data on color bars and setting the shot ID for identification.

Adjustments and Settings via Menus

Details various menu-driven adjustments for gain, output signals, color temperature, and time settings.

Chapter 6 Saving and Loading the User Setting Data

Saving and Loading User Files

Covers saving and loading camcorder settings as user files onto a Memory Stick.

Saving USER menu data to the “Memory Stick”

Step-by-step instructions for saving custom USER menu settings to a Memory Stick.

Loading saved data from a “Memory Stick”

Guide on loading previously saved user files from a Memory Stick back into the camcorder.

Saving and Loading Scene Files

Instructions for saving and loading scene files, which store specific shooting settings.

Resetting Camcorder Settings and Memory Stick Operations

Explains resetting settings to standard and managing Memory Stick files for scenes and other data.

Chapter 7 Appendix

Important Notes on Operation

Provides crucial information on safe operation, storage, and handling of the camcorder.

Maintenance Procedures

Covers essential maintenance tasks like cleaning video heads and using the auto-check function.

Connectivity and Storage Media Information

Explains i.LINK connectivity, Memory Stick types, and related precautions for data transfer and storage.

Warnings, Errors, and Troubleshooting

Lists operation warnings, error codes, and a troubleshooting guide to resolve common issues.

Specifications and Related Products

Lists camcorder technical specifications, microphone details, connector information, and optional accessories.

Glossary

Defines technical terms and abbreviations used throughout the manual for better understanding.

Related product manuals