EasyManua.ls Logo

Sony DSR-400L User Manual

Sony DSR-400L
140 pages
To Next Page IconTo Next Page
To Previous Page IconTo Previous Page
Page #48 background imageLoading...
Page #48 background image
48
Recording
Chapter 4 Recording and Playback
and may not record and or play back correctly. For
instructions on removing tape slack, see next page.
Follow the instructions in “Inserting a Cassette” on
page 45 to insert a cassette, or the camcorder may be
damaged.
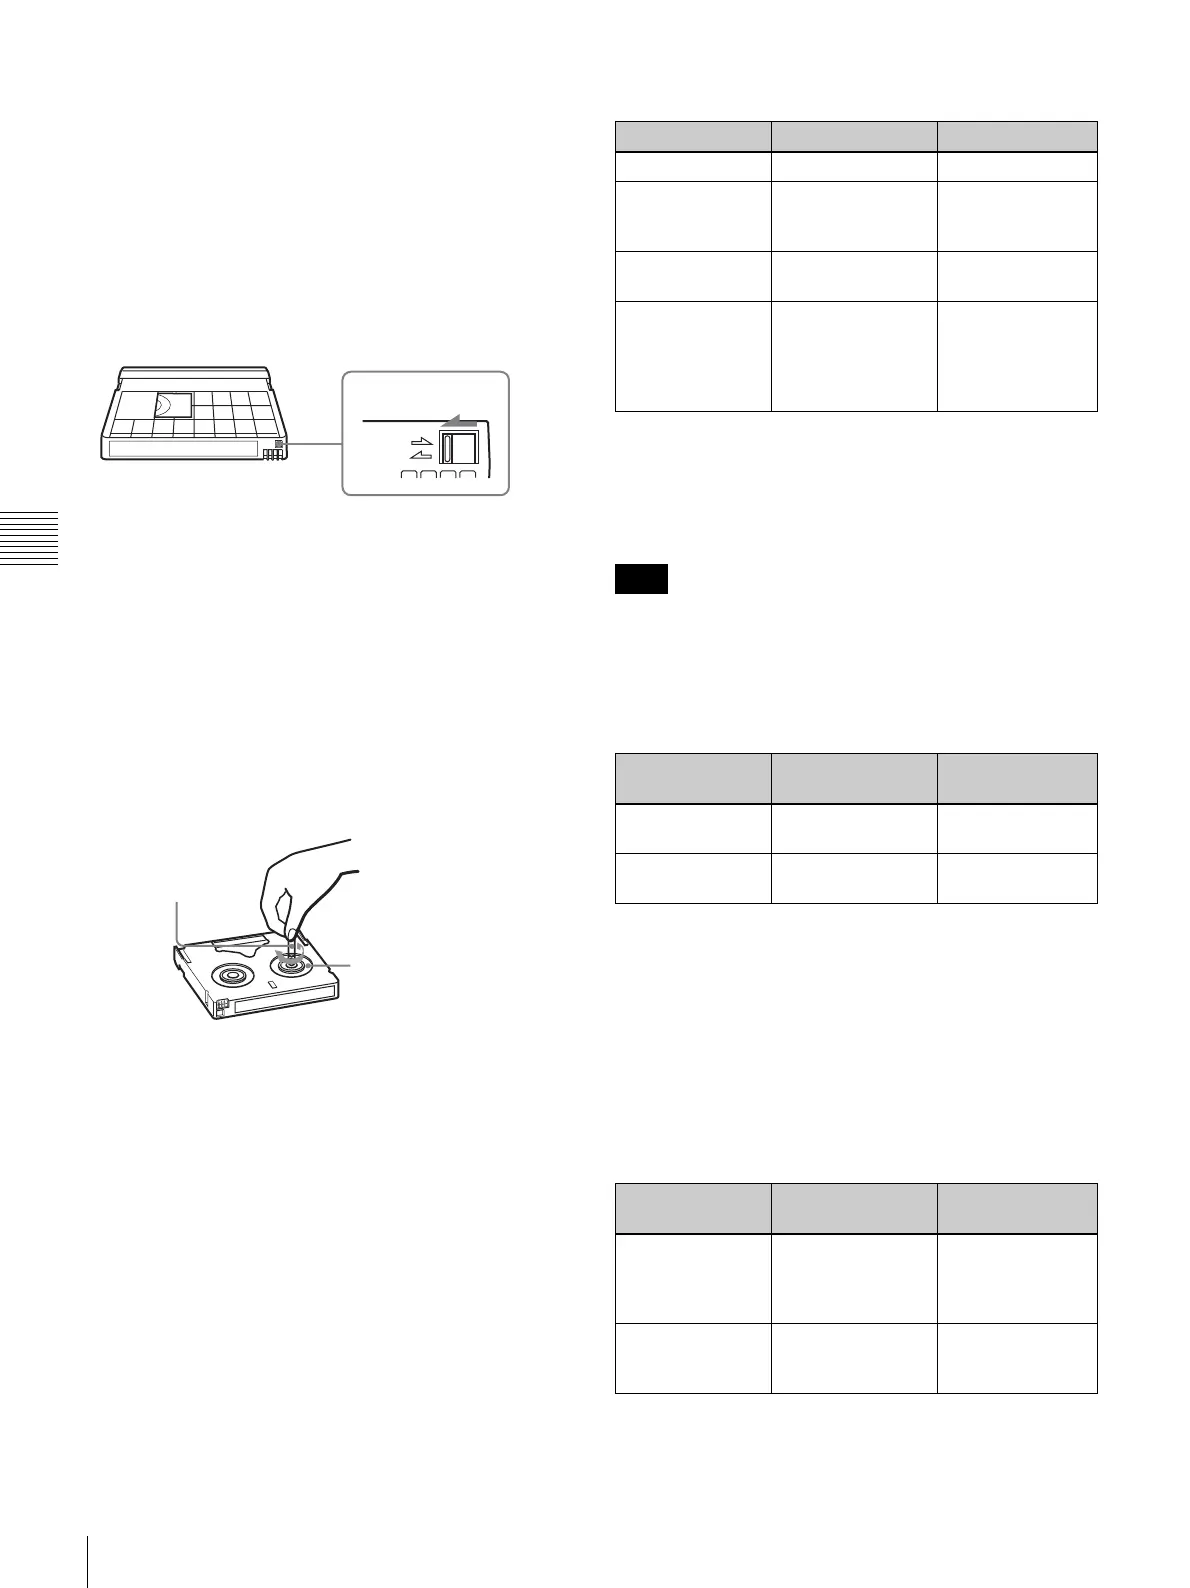
To prevent accidental erasure
Set the REC/SAVE switch to SAVE to prevent accidental
erasure of recorded contents.
If you insert a cassette into the camcorder when the REC/
SAVE switch is set to SAVE, the camcorder will not
record when you press the REC button.
To enable recording
Set the REC/SAVE switch back to REC.
To check the tape for slack
Turn the reel gently with a paper clip, etc., in the direction
shown by the arrow. If the reel does not move, there is no
slack. Insert the cassette into the cassette holder, and after
about 15 seconds take it out.
Compatibility of DVCAM and DV formats
This camcorder can also use the consumer DV format in
addition to the DVCAM format (only SP mode is available
for DV format, you cannot record/play in LP mode of the
DV format). Here explained are the differences,
compatibility, and limitations on editing about DVCAM
and DV formats.
Differences between DVCAM and DV formats
* There are two modes for audio recording, lock mode and unlock mode. In
lock mode, the sampling frequencies of audio and video are synchronized.
In unlock mode, which consumer DV format adopts, the two sampling
frequencies are independent. Therefore, lock mode is more effective than
unlock mode in digital processing and smooth transition during audio
editing.
Audio with sampling frequency 16 bit: 32 kHz and 44.1
kHz cannot be recorded on this camcorder.
Compatibility on cassettes
The recording format of picture is defined according to
recorder’s format as described below.
Though DV cassettes can be used for recording in
DVCAM format, we recommend you to use DVCAM
cassettes to get the most out of high reliability of
DVCAM format.
When you record using DV cassettes in DVCAM
format, the recording time of DV cassettes is
2/3 shorter
than that indicated on the DV cassettes.
Compatibility on playback
Some tapes cannot be played back on DVCAM or DV
video equipment.
REC
SAVE
REC/SAVE switch
Set to SAVE.
Paper clip, etc.
Reel
Item DVCAM DV
Track pitch 15 µm 10 µm
Audio sampling
frequency
12 bit: 32 kHz
16 bit: 48 kHz
12 bit: 32 kHz
16 bit: 32 kHz,
44.1 kHz, 48 kHz
Audio recording
mode*
Lock mode Unlock mode
Time code Drop frame system
or
Non-drop frame
system (SMPTE
time code)
Drop frame
system (or Non-
drop frame system
when recording in
DV format)
Note
Recorder’s
format
Cassette that is
used
Recording
format
DVCAM DVCAM tape
DV tape
DVCAM
DV DVCAM tape
DV tape
DV
Tape On DV video
equipment
On DVCAM video
equipment
DV-formatted Can be played
back.
Can be played
back only when
recorded in SP
mode.
DVCAM-
formatted
Some equipment
may be able to play
back.
Can be played
back.

Table of Contents

Questions and Answers:

Sony DSR-400L Specifications

General IconGeneral
BrandSony
ModelDSR-400L
CategoryCamcorder
LanguageEnglish

Summary

Chapter 1 Overview

Product Configurations

Details the different DSR-400/450WS series models and their configurations.

Features

Highlights key features of the DVCAM camcorders.

Location and Function of Parts

Identifies and explains the various buttons, connectors, and components of the camcorder.

Using the CD-ROM Manual

Provides instructions for installing and using the provided CD-ROM manual.

Chapter 2 Preparation

Attaching and Replacing the Lithium Battery

Step-by-step guide for installing and replacing the camcorder's internal lithium battery.

Preparing the Lens

Instructions for mounting and adjusting the camcorder lens, including flange focal length.

Preparing a Power Supply

Details on attaching battery packs and using AC adaptors for camcorder power.

Adjusting the Viewfinder

Guides on fitting, adjusting focus, brightness, contrast, and position of the viewfinder.

Using the Shoulder Strap

Instructions on how to attach and use the camcorder's shoulder strap for portability.

Fitting to a Tripod

Describes how to attach the camcorder to a tripod using the provided adaptor.

Using a Video Light

Information on connecting and using an external video light with the camcorder.

Preparing Audio Input System

Covers connecting microphones, including supplied, external, and wireless systems.

Connecting the Remote Control Unit

Explains how to connect and use an optional remote control unit for camcorder operation.

Chapter 3 Connections

Connecting a Monitor

Illustrates how to connect a video monitor to the camcorder's output connectors.

Using an i.LINK Connection

Details connections using i.LINK for digital data transfer, including settings and backup.

Other Connections

Covers connecting multiple camcorders for synchronization and using external sync signals.

Chapter 4 Recording and Playback

Inserting a Cassette

Step-by-step instructions for inserting standard and mini-size DVCAM/DV cassettes.

Basic Procedure for Shooting

Outlines the fundamental steps required to begin shooting with the camcorder.

Recording Settings and Cassette Compatibility

Covers recording operations, usable cassettes, compatibility, and format selection.

Image Quality Adjustments

Details adjustments for black/white balance, electronic shutter, iris, and audio levels for optimal image and sound.

Special Shooting Cases and Editing

Provides settings for special shooting scenarios and covers back space editing and time-lapse recording.

Advanced Recording and Playback

Details analog composite signal recording and techniques for playing/checking recorded content.

Chapter 5 Menu Displays and Detailed Settings

Menu Organization and Operation

Outlines the structure and organization of the camcorder's menu system.

Basic menu operations

Explains how to navigate, select items, and change settings within the camcorder's menus.

USER Menu Management and Status Display Settings

Covers resetting USER menus, customizing displays, and marker settings for viewfinder/LCD.

Shot Data Recording and Settings

Details recording shot data on color bars and setting the shot ID for identification.

Adjustments and Settings via Menus

Details various menu-driven adjustments for gain, output signals, color temperature, and time settings.

Chapter 6 Saving and Loading the User Setting Data

Saving and Loading User Files

Covers saving and loading camcorder settings as user files onto a Memory Stick.

Saving USER menu data to the “Memory Stick”

Step-by-step instructions for saving custom USER menu settings to a Memory Stick.

Loading saved data from a “Memory Stick”

Guide on loading previously saved user files from a Memory Stick back into the camcorder.

Saving and Loading Scene Files

Instructions for saving and loading scene files, which store specific shooting settings.

Resetting Camcorder Settings and Memory Stick Operations

Explains resetting settings to standard and managing Memory Stick files for scenes and other data.

Chapter 7 Appendix

Important Notes on Operation

Provides crucial information on safe operation, storage, and handling of the camcorder.

Maintenance Procedures

Covers essential maintenance tasks like cleaning video heads and using the auto-check function.

Connectivity and Storage Media Information

Explains i.LINK connectivity, Memory Stick types, and related precautions for data transfer and storage.

Warnings, Errors, and Troubleshooting

Lists operation warnings, error codes, and a troubleshooting guide to resolve common issues.

Specifications and Related Products

Lists camcorder technical specifications, microphone details, connector information, and optional accessories.

Glossary

Defines technical terms and abbreviations used throughout the manual for better understanding.

Related product manuals