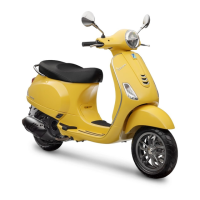
Inspecting the crankshaft alignment
To install the crankshaft on the support and to
measure the misalignment in the 4 points indicated
in figure.
- Check that the crankshaft cone, the tab seat, the
oil seal capacity, the toothed gear and the threa-
ded tangs are in good working order.
- In case of failures, replace the crankshaft.
The big end bushings cannot be replaced. For the
same reason, the connecting rod may not be re-
placed and, when cleaning the crankshaft, be very
careful that no impurities get in through the shaft's
lubrication holes.
In order to prevent damaging the connecting rod
bushings, do not attempt cleaning the lubrication
duct with compressed air.
- Make sure that the 2 caps on the crankpin are
properly fitted.
- A wrong installation of a cap can seriously affect
the bushing lubrication pressure.
N.B.
THE MAIN BEARINGS ARE NOT GRINDABLE
Specific tooling
020074Y Support base for checking crankshaft
alignment
Characteristic
Off-line maximum admitted
A = 0.15 mm
B = 0.01 mm
C = 0.01 mm
D = 0.10 mm
Engine Vespa LX 125 - 150 i.e.
ENG - 132
 Loading...