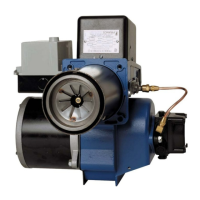
Figure 5: HS Gauge, Position 1
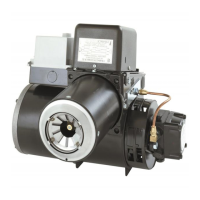
2. To check the spacing between the electrode tips,
rotate the gauge 90° and place the gauge against the
burner nozzle as shown in Figure 6.
Figure 6: HS Gauge, Position 2
3. To adjust the spacing of the electrodes, slightly loosen
the electrode clamping screw and move the
electrodes to their correct position.
GUN ASSEMBLY INSTALLATION
1. Slide the assembly into the air tube; do not force it.
The gun assembly must be lifted and guided through
the air cone at the end of the tube. Start with the end
of the oil pipe at the 12 o’clock position, slide the gun
forward until the Flamelock™ is located in the air
cone, then rotate it counterclockwise and position the
side cover between the guide rails.
2. Pull the side bracket firmly back against the stop
bracket.
3. Reinstall and tighten the adjustment screw.
4. Reconnect the oil line fitting.
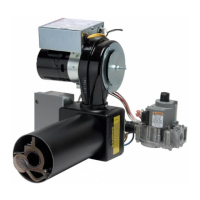
5. Close the transformer/cover so that the springs
contact the buss bars (Figure 7) and secure with the
two mounting screws.
Figure 7: Transformer Springs
Contacting Buss Bar
Care should be taken when
closing the transformer not to
pinch the lead wires between the housing and cover
plate.
5
 Loading...