RM1x SEQUENCE REMIXER 49
PATTERN MODE
2. Recording
Although the RM1x comes equipped with many preset phrases,
it also allows you to record your own user phrases. You use
the Phrase Recording submode to make these recordings.
The RM1x offers two general recording methods: realtime
recording and step recording.
With realtime recording, the RM1x operates as a tape recorder,
recording the performance data as it is played. This allows
you to catch all the nuances of an actual performance.
With step recording, you input the phrase one note at a time,
almost as if you were writing the notes down on a music sheet.
This allows you to create complex phrases without having to
play them in real time at the keyboard.
Preparing to Record
1 Go to the VOICE submode and assign the voice(s)
you want to use to the track(s) you intend to record,
as described on page 63.
2 Return to the PATTERN mode.
Although you can record in either the main PATTERN
or PATCH mode, you will need to start from the PAT-
TERN mode in order to select the style to be recorded
and the recording mode
(REPLACE, OVERDUB, STEP,
or GRID — described separately below).
3 Use display knob 1 to select the style you want to
record to
(only user styles — U01 … U50 — are recordable).
4 Use the Length parameter to specify the length of
the phrase you intend to record, and the time signa-
ture parameter to select the desired time signature.
These changes can only be made for “empty” pat-
terns (patterns can be cleared by using the Clear
Pattern job — page 98).
5 Press REC e to engage the record standby mode.
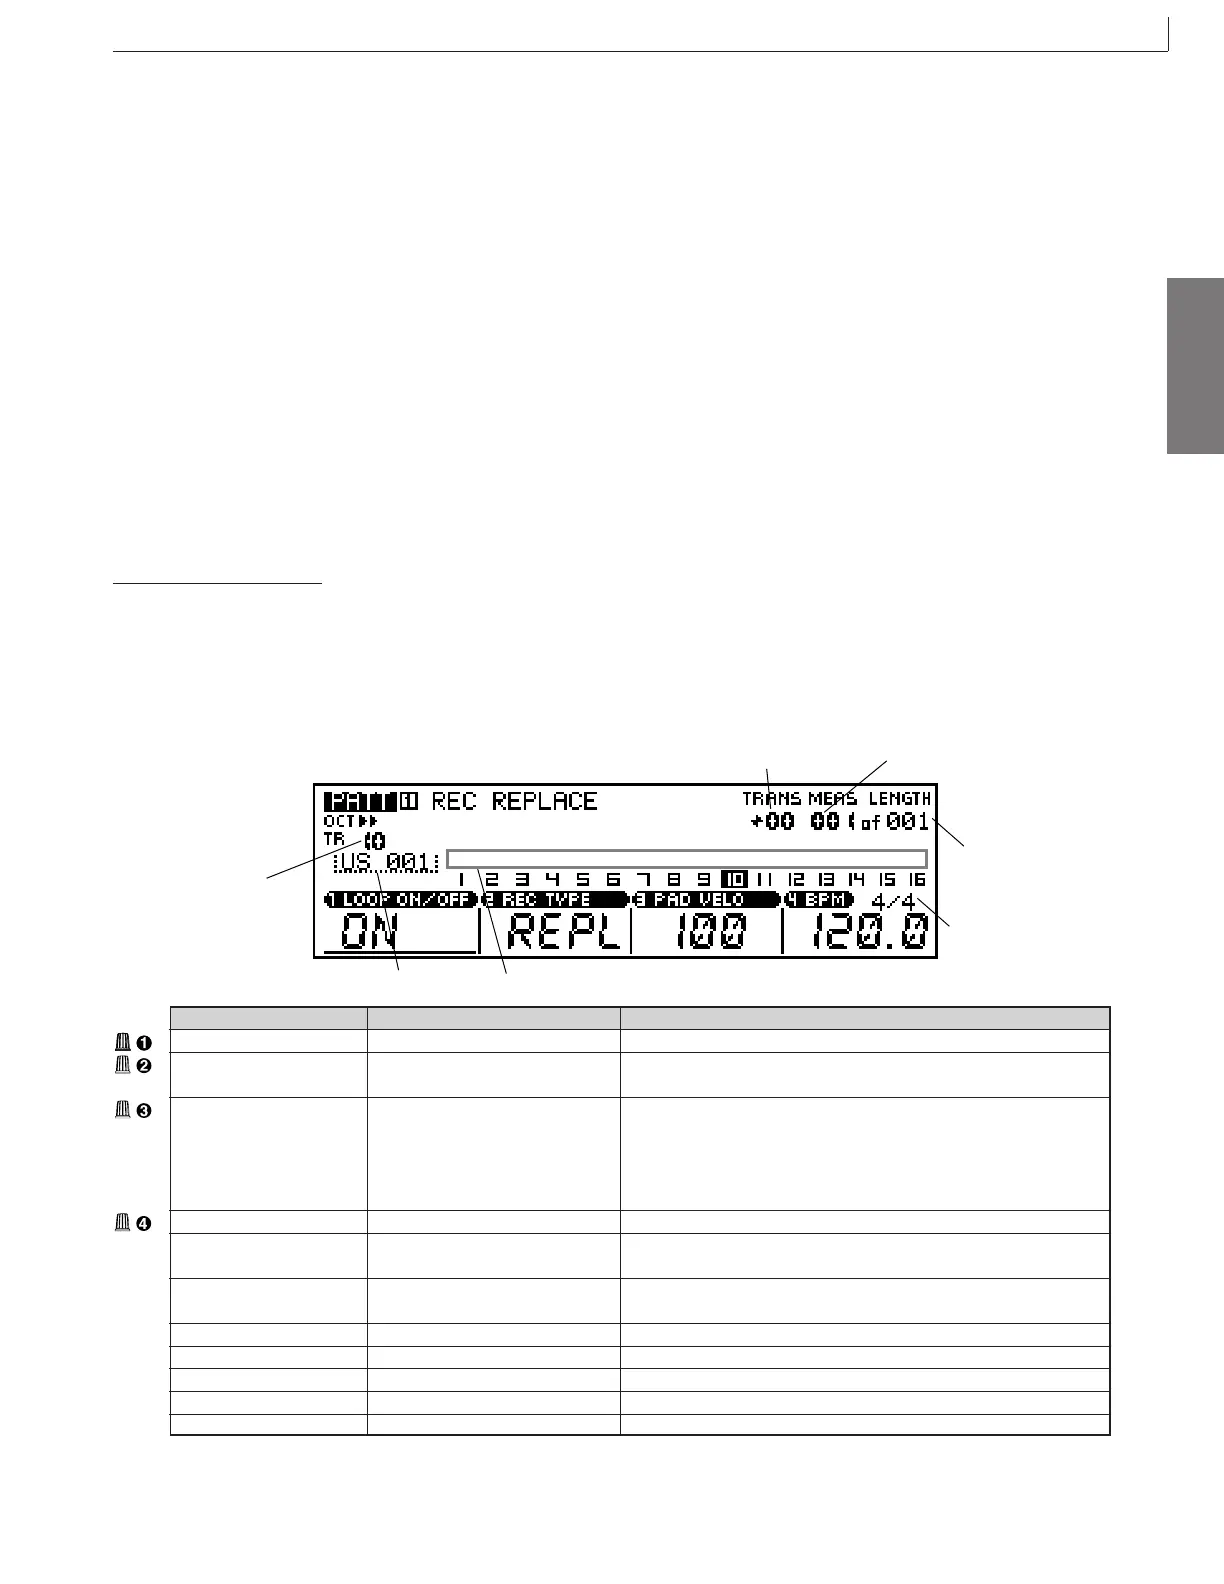
The red REC e button indicator will light and the
PATTERN mode display will appear as shown below.
6
Use display knob 2 to select the record mode you in-
tend to use (“REPL” = REPLACE, “OVER” = OVERDUB,
“STEP” = STEP, and “GRID” = GRID). At this point you
can also use display knob 1 to determine whether the
pattern will loop or not during recording.
Time signature
Track number
Track status
Transpose
Measure
Length
Phrase name
Parameter Values Function
Loop on/off ON, OFF Determines whether or not the pattern will loop during recording.
Recording type
Replace (Realtime) Overdub (Realtime)
Selects the recording method.
Step (Step) Grid (Step)
Keypad velocity 001 ... 127, RND1 ... 4 Specifies the note velocity value for the RM1x keyboard. Higher
values produce louder sound. There are also four “random velocity”
settings which produce different degrees of random velocity varia-
tion. “RND1” produces the smallest variation and “RND4” produces
the greatest variation.
BPM 25 ... 300 Sets tempo for pattern playback.
Track number 01 ... 16 Shows the current selected section. Section selection can be ac-
complished by the keyboard method described on page 27.
Transpose -36 ... +36
Shows the current transpose value. Transposition can be accomplished
via this parameter, or by the keyboard method described on page 27.
Measure Sets recording start location; or shows current recording location.
Length Sets phrase length, in measures.
Time Signature
1/16 ... 16/16; 1/8 ... 16/8; 1/4 ... 8/4
Sets the pattern’s time signature.
Track status The highlighted track number indicates the currently selected track.
Phrase name Indicates the currently selected phrase.
2. Recording
* For information about how to change values, refer to the Basic Operation (page26).
 Loading...