EasyManuals Logo

Brother ql-560 User Manual

Brother ql-560
81 pages
To Next Page IconTo Next Page
To Previous Page IconTo Previous Page
Page #12 background imageLoading...
Page #12 background image
Getting started
10
Your QL-560 comes with a paper
guide that collects strips of printed
labels that have not been cut off
from the machine.
Attach the paper guide to the front of
the QL-560 as shown in the figure.
Remove the paper guide when printing
more than 10 labels continuously and
cutting each label automatically.
Connect the AC power cord to the QL-560 and then
plug the power supply cord into a standard electrical
socket.
Check that the electrical socket is 220 ~ 240 V before inserting
the plug.
Remove the power supply cord from the electrical socket after
you have finished using the QL-560.
Do not pull the cord when removing it from the electrical
socket. The wire in the cord may become damaged.
3 Installing the paper guide
Paper guide
4
Connecting to the power supply

Table of Contents

Questions and Answers:

Question and Answer IconNeed help?

Do you have a question about the Brother ql-560 and is the answer not in the manual?
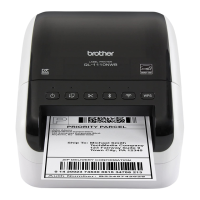
Brother ql-560 Specifications

General IconGeneral
Print TechnologyDirect Thermal
Print Resolution300 dpi
CutterAutomatic
InterfaceUSB
Operating System CompatibilityWindows, Mac
Power SupplyAC Adapter
Max Print Width62 mm
Max Label Width62 mm
Max Label Length3 ft
Print Speed50 mm/s
Compatible Label TypesDie-cut labels, Continuous tapes

Related product manuals