30
Step 2 Using the handles on both sides of the module, with two hands, gently insert the Cisco ESP5 or -ESP10 into the top
chassis slot.
Note Handle the Cisco ESP5 and ESP10 by the carrier edges only; never touch the printed circuit board components or
connector pins.
Step 3 Once the board is seated, tighten the captive screws.
Step 4 Place the Cisco ESP5 or Cisco ESP10 on an antistatic surface with its printed circuit board components facing upward
or in a static shielding bag.
You have completed the procedure for replacing the Cisco ESP5 or ESP10.
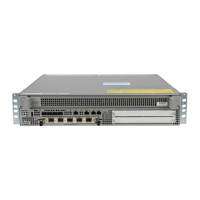
Replace the Shared Port Adapters
The shared port adapters (SPAs) on the embedded Cisco ASR1000-SIP10 in the Cisco ASR 1002 Router support online insertion
and removal (OIR); but the embedded Cisco ASR1000-SIP10 does not support OIR and is not field-upgradeable.
Note Cabling information is included with the specific shared port adapter documentation.
Step 1 Attach an ESD wrist strap between you and an unpainted chassis surface.
Caution Removing a shared port adapter while traffic is flowing through the ports can cause system disruption.
Step 2 Shut down the interface so that there is no traffic running through the shared port adapter when it is removed. For
example, to shut down the interface "FastEthernet0/1/0" on the 8-Port Fast Ethernet Shared Port Adapter (SPA-8X1FE-TX-V2),
perform these steps:
a. At the Router# prompt, type
configure terminal and press Enter. The global configuration mode prompt Router(config)# appears.
b. At the Router(config)# prompt, type:
interface FastEthernet0/1/0 and press Enter. The interface configuration mode prompt Router(config-if)# appears.
c. At the Router(config-if)# prompt, type:
shutdown and press Enter. This disables the interface FastEthernet0/1/0.
d. At the Router(config-if)# prompt, type:
end and press Enter. The privileged EXEC mode prompt Router# appears.
Step 3 Disconnect all cables from the shared port adapter.
Step 4 Remove the shared port adapter from the chassis subslot. Grasp the handle and pull the shared port adapter or blank
panel from the router.
Step 5 Locate the shared port adapter slot guides inside the Cisco ASR 1002 Router.
Caution The shared port adapter must slide into the slot guides under the chassis lid. Do not allow the shared port adapter
components to come in contact with the system board or the shared port adapter could be damaged.
Step 6 Carefully slide the shared port adapter into the shared port adapter slot until it is firmly seated and then securely
tightened the captive screws. When installed, the shared port adapter input/output panel should be flush with the face
of the router.
Step 7 Reconnect any cables and place the cables through the cable-management brackets.
Step 8 If the shared port adapter fails to come up, reseat or reinsert the shared port adapter; do not use excessive force.

 Loading...