I.B. 17555C
Effective November 1999
Page 14
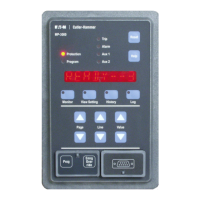
Short Delay Setting LED
This LED is bi-colored and operates like the time over-
current setting LED.
Short Delay Time LED
The short delay time LED, when lit is green, and operates
like the inverse time overcurrent time LED.
Instantaneous LED
This LED is bi-colored and operates like the inverse time
overcurrent setting LED.
Phase LED
The phase LED is bi-colored. The LED will blink green
when the phase inverse time overcurrent setting, inverse
time multiplier, short delay setting, short delay time, and
instantaneous setpoints are displayed in the Settings/Test
Time/Trip Cause window while in the program mode.
When these setpoints are viewed in the normal operating
mode, this LED will be continuous green.
The LED will blink red, along with the time overcurrent
setting LED whenever the phase load current exceeds
the inverse time overcurrent pickup setpoint.
The LED will be continuous red, whenever a trip is initi-
ated by the phase inverse time overcurrent, short delay,
or instantaneous protective functions.
Ground LED
The ground LED is also bi-colored (green/red). The
ground LED operates exactly like the phase LED for all
ground associated functions.
Amp Demand LED
This LED will be continuous green when an ampere
demand current is being viewed in the RMS Amperes
window.
I
A
, I
B
, I
C
, I
G
LEDs
The specific phase or ground current LEDs will be contin-
uous green when that phase or ground current is being
displayed in the RMS Amperes window. When the Amp
Demand LED is also lit, the displayed current is the
Ampere Demand Current.
Program LED
This LED is continuous green when the relay is in the
program mode.
Test LED
This LED is continuous green when the relay is in the test
mode.
Display Windows: Two windows are used to display all
of the relay’s data, setpoints and messages. One window
is located in the upper portion of the relay’s faceplate and
is labeled RMS Amperes. A second window is located in
the lower portion of the faceplate adjacent to the program
and test LEDs. It is labeled Settings/Test Time/Trip
Cause.
RMS Amperes Window
This window has a five digit numeric display. It is used to
show:
1. Present phase or ground currents
2. Largest phase or ground demand currents since last
reset
3. Fault current (displayed after a trip until a reset action
is initiated)
4. Phase and ground current transformer CT setting
(when “View Settings” pushbutton is used with the
relay in the normal operating mode)
Settings/Test Time/Trip Cause Window
This window is a four character Trip Cause Window
alphanumeric display used to show the value of the set-
points, the test time, or the cause of trip.
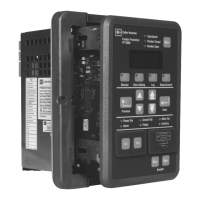
2-2.2 REAR ACCESS PANEL
WARNING
THE BACK OF DIGITRIP 3000, WHEN ENERGIZED,
OFFERS EXPOSURE TO LIVE PARTS WHERE THE
HAZARD OF A FATAL ELECTRIC SHOCK IS
PRESENT. ALWAYS DISCONNECT SOURCE AND
CONTROL POWER SUPPLY BEFORE TOUCHING
ANYTHING ON THE REAR OF THE DIGITRIP 3000.
FAILURE TO DO SO COULD RESULT IN INJURY OR
DEATH.
The rear access panel of Digitrip 3000 is normally acces-
sible from the rear of an open panel door (Figure 2-1). All
wiring connections to the Digitrip 3000 Protective Relay
are made at the chassis’ rear. For the sake of uniform
identification, the frame of reference when discussing the
rear access panel is facing the back of the relay. The DIP
switches, for example, are located on the upper left of the
rear panel (Figure 1-3). Become familiar with the func-
tions and connections involved, especially the following:
DIP Switches: A set of ten DIP switches are located in
the upper left portion of the rear panel. Refer to Table 5.1
for DIP switch positions. Their basic functions are as fol-
lows:
 Loading...