EasyManua.ls Logo

GE B90 User Manual

GE B90
510 pages
To Next Page IconTo Next Page
To Previous Page IconTo Previous Page
Page #387 background imageLoading...
Page #387 background image
CHAPTER 5: SETTINGS INPUTS/OUTPUTS
B90 LOW IMPEDANCE BUS DIFFERENTIAL SYSTEM – INSTRUCTION MANUAL 5-195
5
Program the Latching Outputs by making the following changes in the SETTINGS  INPUTS/OUTPUTS  CONTACT
OUTPUTS CONTACT OUTPUT H1a
menu (assuming an H4L module):
OUTPUT H1a OPERATE: “PUSHBUTTON 1 ON
OUTPUT H1a RESET: “PUSHBUTTON 2 ON
Program the pushbuttons by making the following changes in the PRODUCT SETUP  USER-PROGRAMMABLE PUSHBUTTONS
 USER PUSHBUTTON 1
and USER PUSHBUTTON 2 menus:
PUSHBUTTON 1 FUNCTION: “Self-reset”
PUSHBTN 1 DROP-OUT TIME: “0.00 s”
PUSHBUTTON 2 FUNCTION: “Self-reset”
PUSHBTN 2 DROP-OUT TIME: “0.00 s”
Application example 2
A relay, having two latching contacts H1a and H1c, is to be programmed. The H1a contact is to be a Type-a contact, while
the H1c contact is to be a Type-b contact (Type-a means closed after exercising the operate input; Type-b means closed
after exercising the reset input). The relay is to be controlled from virtual outputs: VO1 to operate and VO2 to reset.
Program the Latching Outputs by making the following changes in the
SETTINGS  INPUTS/OUTPUTS  CONTACT
OUTPUTS CONTACT OUTPUT H1a
and CONTACT OUTPUT H1c menus (assuming an H4L module):
OUTPUT H1a OPERATE: “VO1
OUTPUT H1a RESET: “VO2
OUTPUT H1c OPERATE: “VO2
OUTPUT H1c RESET: “VO1
Since the two physical contacts in this example are mechanically separated and have individual control inputs, they do not
operate at exactly the same time. A discrepancy in the range of a fraction of a maximum operating time can occur.
Therefore, a pair of contacts programmed to be a multi-contact relay do not guarantee any specific sequence of operation
(such as make before break). If required, the sequence of operation must be programmed explicitly by delaying some of the
control inputs as shown in the next application example.
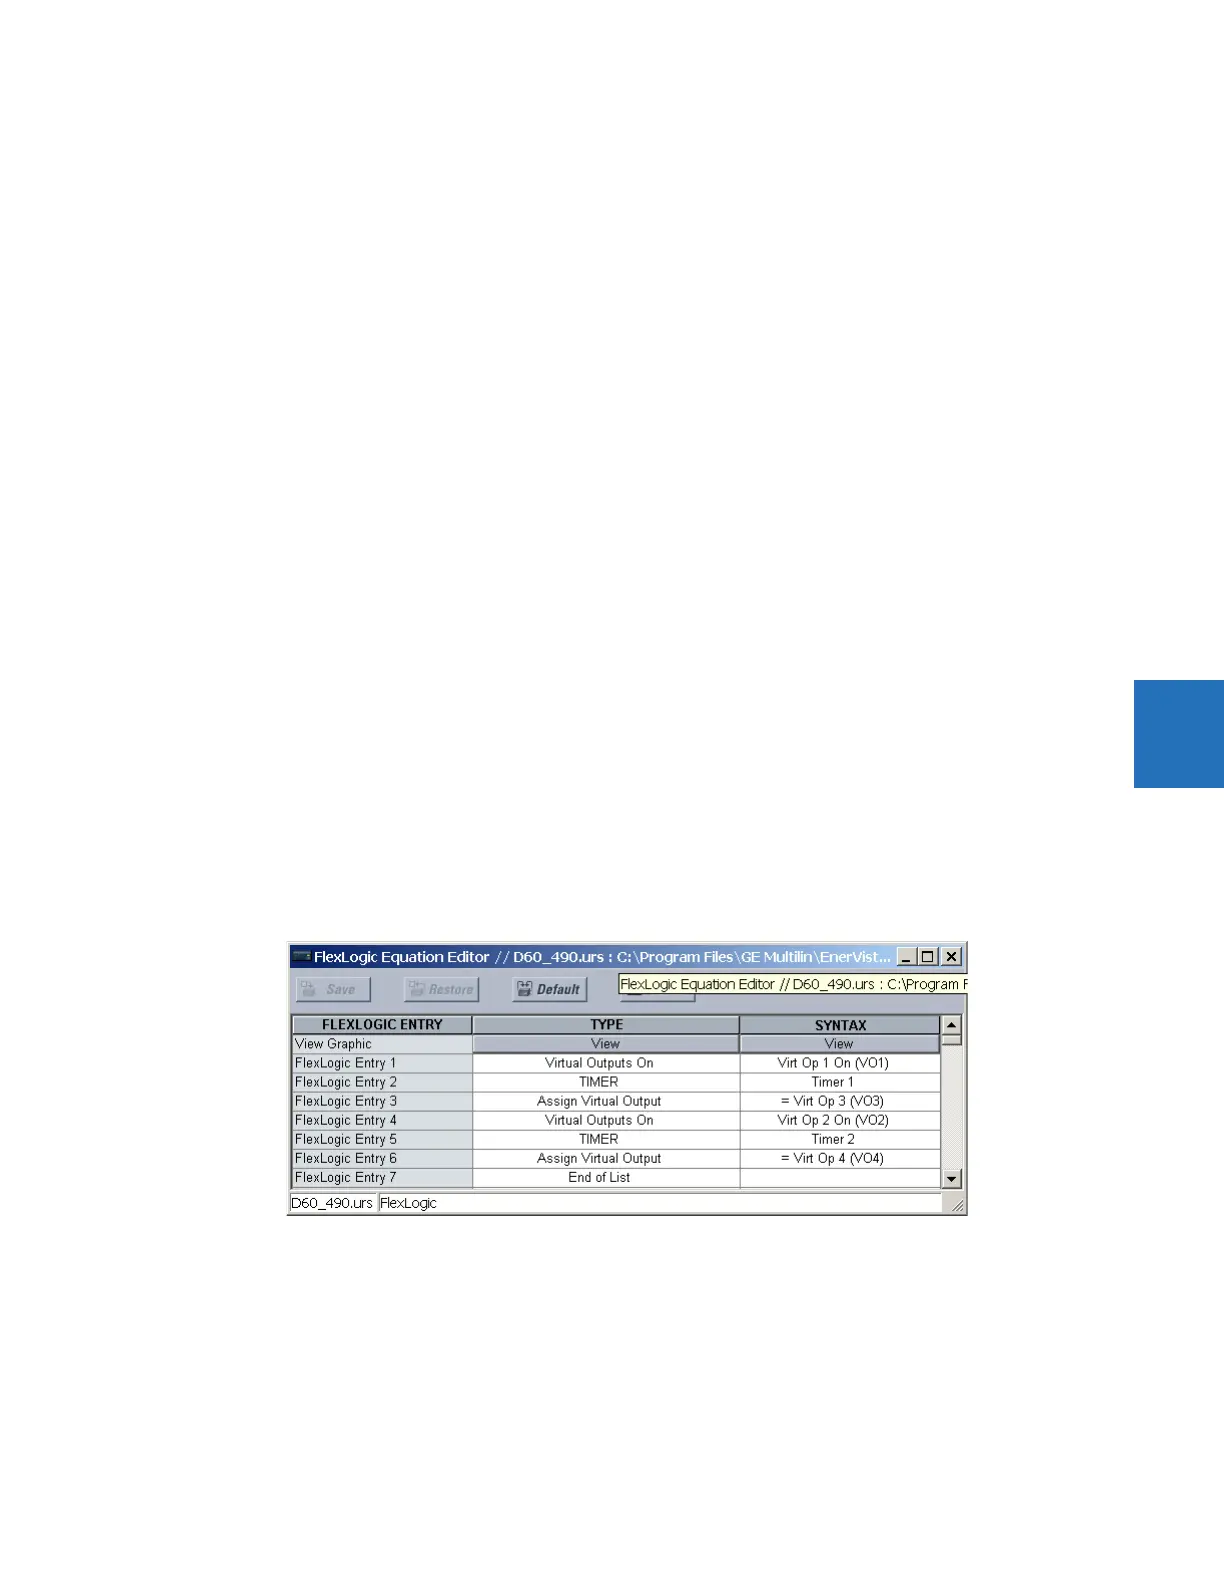
Application example 3
A make before break functionality must be added to the preceding example. An overlap of 20 ms is required to implement
this functionality.
Write the following FlexLogic equation (EnerVista example shown).
Set both timers (Timer 1 and Timer 2) to 20 ms pickup and 0 ms dropout.
Program the Latching Outputs by making the following changes in the
SETTINGS  INPUTS/OUTPUTS  CONTACT
OUTPUTS CONTACT OUTPUT H1a
and CONTACT OUTPUT H1c menus (assuming an H4L module):
OUTPUT H1a OPERATE: “VO1
OUTPUT H1a RESET: “VO4
OUTPUT H1c OPERATE: “VO2
OUTPUT H1c RESET: “VO3

Table of Contents

Question and Answer IconNeed help?

Do you have a question about the GE B90 and is the answer not in the manual?

GE B90 Specifications

General IconGeneral
BrandGE
ModelB90
CategoryRelays
LanguageEnglish

Summary

1 Introduction

1.1 Safety symbols and definitions

Defines safety symbols and provides general cautions and warnings for safe operation, installation, and maintenance of the device.

2 Product description

2.1 Product description

Overview of the B90 Low Impedance Bus Differential System, its architecture, and protection/supervisory functions.

2.2 Security

Details password security, EnerVista security, and CyberSentry security features for device access control.

2.5 Specifications

Lists detailed technical specifications for the B90 relay's protection elements, inputs, outputs, and communications.

2.5.1 Protection elements

Details operating times and parameters for various protection elements like Bus Differential, CT Trouble, and Time Overcurrent.

2.5.10 CyberSentry security

Details CyberSentry security features, including software options and user roles.

3 Installation

3.1 Unpack and inspect

Procedure for unpacking and inspecting the relay package contents and checking for physical damage.

3.3 Wiring

Outlines wiring procedures, including typical diagrams and dielectric strength requirements.

3.6 Install software

Provides instructions for installing the EnerVista UR Setup software, including system requirements.

3.7 Add device to software

Guides on adding devices to the EnerVista software, covering serial, Ethernet, modem, and automatic discovery methods.

3.8 Connect to the B90

Explains methods for connecting to the B90 relay via RS232 port, RS485 port, Ethernet port, or LAN.

3.9 Set up CyberSentry and change default password

Procedure for setting up CyberSentry security and changing the default Administrator password.

4 Interfaces

4.1 EnerVista software interface

Overview of the EnerVista UR Setup software, its features, and how to use it for configuration, monitoring, and troubleshooting.

4.1.8 Secure and lock FlexLogic equations

Explains how to secure parts or all of a FlexLogic equation using the settings template feature for locking.

4.2.7 Change settings

Provides instructions on how to change numerical and alphanumeric settings via the front panel keypad.

4.2.8 View actual values

Describes how to view phasor diagrams and metered data on the front panel, including status indicators and metering pages.

4.4 FlexLogic design using Engineer

Details the integration of EnerVista Viewpoint Engineer software for creating and modifying FlexLogic diagrams.

4.4.1 Design logic

Explains the process of creating FlexLogic with block diagrams, including adding existing equations and creating new logic.

5 Settings

5.1 Settings menu

Outlines the main settings menu structure, including Product Setup, System Setup, FlexLogic, Grouped Elements, Control Elements, and Inputs/Outputs.

5.3 Product setup

Covers product-specific settings, including B90 function, security features, display properties, and graphical front panel configuration.

5.3.1 B90 function

Configures the B90 master switch to enable specific relay elements, affecting availability of protection and logic functions.

5.3.2 Security

Details password security, EnerVista security management, and CyberSentry advanced security features.

5.3.6 Communications

Configures communication protocols including Serial Ports, Network, Modbus, DNP, IEC 60870-5-104, IEC 61850, and Web Server.

5.4 System setup

Configures AC inputs (current and voltage), power system parameters, FlexCurves, and bus configurations.

5.4.4 Bus

Configures bus differential settings for up to six zones, including CT orientation and status for each bus zone.

5.5 FlexLogic

Provides tools for creating and modifying FlexLogic logic, including operands, gates, timers, and latches.

5.6.3 Bus differential

Configures settings for bus differential protection, including pickup, slopes, breakpoints, and saturation detection.

5.6.4 Breaker failure (ANSI 50BF)

Configures settings for the Breaker Failure protection element, including current supervision, timers, and trip logic.

5.8 Inputs/outputs

Configures digital inputs, virtual inputs, contact outputs, virtual outputs, resetting, direct inputs, and direct outputs.

5.9 Testing

Provides facilities for testing contact inputs/outputs, communication functions, and phasor measurement unit.

7 Commands and targets

7.2.2 Relay self-tests

Describes the relay's self-test diagnostic checks, including major and minor self-test error messages.

8 Application of settings

8.3 Biased characteristic breakpoints

Details how to find CT linear operation limits to set biased differential characteristic breakpoints (LOW SLOPE, HIGH SLOPE).

8.4 Slopes and high set threshold

Explains how to set the higher slope and threshold for unbiased differential operation, analyzing external faults.

8.5 Bus differential settings

Provides calculated settings for bus differential protection based on previous analysis of fault currents and CT characteristics.

9 Theory of operation

9.2 Dynamic bus replica

Explains the dynamic bus replica mechanism, CT ratio matching, and provides an example of its application.

9.3 Differential principle

Describes the biased differential operating characteristic, including pickup, slopes, breakpoints, and differential/restraining currents.

9.3.1 Biased differential characteristic

Details the dual-slope, dual-breakpoint operating characteristic of the B90 bus differential element.

9.5 Saturation detector

Explains the CT saturation detection mechanism, which uses the differential characteristic for proper operation.

10 Maintenance

10.2 General maintenance

Outlines general maintenance practices for the B90 relay, including in-service, out-of-service, and unscheduled maintenance.

10.7 Back up and restore settings

Describes procedures for backing up in-service settings to a file and restoring them to the original or a replacement relay.

Appendix C: Command line interface

Related product manuals