NX-8 Control
13
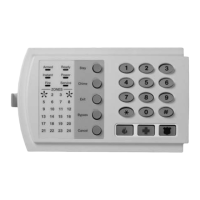
FEATURE SELECTION DATA: Feature selection data will display the current condition (on or off) of eight features
associated with the programming location and segment selected. Pressing a button on the touchpad (1 thru 8) that
corresponds to the "feature number" within a segment, will toggle (on/off) that feature. Pressing any numeric key
between [1] and [8] for selection of a feature, will make the corresponding LED illuminate (feature ON). Press the
number again, and the LED will extinguish (feature OFF). You will see that numerous features can be selected from
within one segment. For instance, if all eight features of a segment are desired, pressing [1]-[2]-[3]-[4]-[5]-[6]-[7]-[8] will
turn on LED's 1 thru 8 as you press the keys, indicating that those features are enabled.
LCD Keypad Users Note: The
numbers of the enabled features will be displayed. However, the features not enabled will display a hyphen (-).
After the
desired setting of features is selected for this segment, press the [r] key. This will enter the data and automatically
advance to the next segment of the location. When you are in the last segment of a location and press the [r] to enter
the data, you will exit that location. This will now turn the "Ready" LED off and the "Armed" LED on. As before, you
are now ready to enter another programming location.
LOADING FACTORY DEFAULTS
To load the factory defaults, enter the program mode using the procedure on page 13, then type [9]-[1]-[0]-[#]. The
keypad will beep 3 times indicating that the loading is in progress. The loading takes about 6 seconds.
ENROLLING MODULES AND KEYPADS
For supervision purposes, the NX-8 has the ability to automatically find and store in its memory, the presence of all
keypads, zone expanders, wireless receivers, and any other module connected to the data terminal. This allows these
modules to be supervised by the control panel. To enroll the modules, enter the Program Mode of the NX-8 control
panel as described on page 13. When the Program Mode is exited, the NX-8 control will automatically enroll the
devices. The enrolling process takes about 12 seconds, during which time the "Service" LED will illuminate. User
codes will not be accepted during the enrolling process. If a speaker is attached to the NX-8, it will click at this time. If
a siren or bell is attached to the NX-8, it will sound for about 1 second. Once a module is enrolled, if it is not detected
by the control, the "Service" LED will illuminate.
L QUICK START INSTALLATION
For most routine installations, the "Quick Start" option will allow for enabling a majority of the options available with the
NX-8, when communicating in Contact ID or SIA formats and without partitioning. The "Quick Start" locations can be
identified by the L symbol.
CONTROL PANEL PROGRAMMING LOCATIONS
L LOCATION 0 - PHONE NUMBER 1 (20 segments, numerical data)
The first telephone number is programmed in location 0. A "14" indicates the end of the phone number. Delays of four
seconds can be programmed at any point in the phone number by programming a "13" in the appropriate segment. If
tone dialing is desired, program a "15" in the segment where tone dialing should begin. If the entire number should be
tone dialing, program a "15" in the first segment. Program an A11" for a Ar@, and a A12" for a A#@.
Caution: A call-waiting
cancel on a non- call waiting line will prevent successful connection to the central station.
L LOCATION 1 - ACCOUNT CODE FOR THE PHONE #1 (6 segments, numerical data)
The account code sent when Phone #1 is dialed is programmed in location 1. Program a A10" in the segment
immediately after the last digit of the account code. If the account code is 6 digits long, program all 6 segments.
L LOCATION 2 - COMMUNICATOR FORMAT FOR PHONE #1 (1 segment, numerical data)
Location 2 contains the communicator format used to transmit to the receiver connected to Phone #1. Consult the
instructions for your central station receiver to determine which format is compatible. Select a format from the list on
the following page. If you require a format other than those listed, review the override options described in location 18,
to build the appropriate format. A "15" must be programmed in location 2 in addition to the entries in location 18 in
order to create a special format. If this location contains a "0", the built-in communicator will be disabled, and the NX-
8 will function as a local only control.
L LOCATION 3 - DIAL ATTEMPTS/BACKUP CONTROL FOR PHONE # 1 (2 segments, numerical data)
Segment 1- Dial attempts: Location 3, Segment 1 is used to enter the number of dial attempts ( 1 to 15 Attempts) the
communicator will make to Phone #1 before ending the notification process. Factory default is "8" and the
communicator will make eight (8) attempts to the first number.
 Loading...