 Loading...
Do you have a question about the Gigabyte GA-MA785GT-UD3H and is the answer not in the manual?
| Number of memory slots | 4 |
|---|---|
| Maximum internal memory | 16 GB |
| Processor socket | Socket AM3 |
| Processor manufacturer | AMD |
| USB 2.0 connectors | 3 |
| Power fan connector | Yes |
| Number of SATA connectors | 6 |
| Number of Parallel ATA connectors | 1 |
| Controller interface type | SATA |
| Controller 2nd interface type | IDE |
| eSATA ports quantity | 0 |
| USB 2.0 ports quantity | USB 2.0 ports have a data transmission speed of 480 Mbps, and are backwards compatible with USB 1.1 ports. You can connect all kinds of peripheral devices to them. |
| Motherboard chipset | AMD 785G |
| Audio output channels | 7.1 channels |
| Motherboard form factor | ATX |
| Compatible operating systems | Windows Vista/ XP |
| RAID levels | 0, 1, 1+0, JBOD |
| LAN controller | Realtek RTL8111C |
| Networking features | Gigabit Ethernet |
| Depth | 229 mm |
|---|---|
| Width | 305 mm |
Lists all items included in the motherboard package.
Lists optional accessories available for purchase with the motherboard.
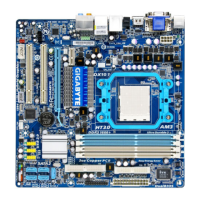
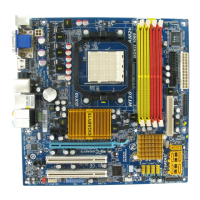
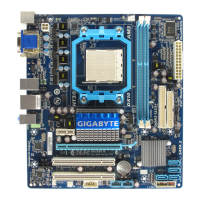
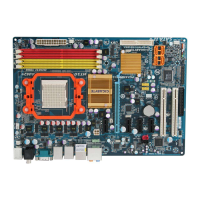
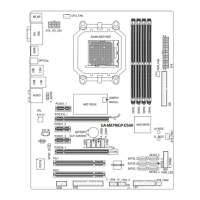
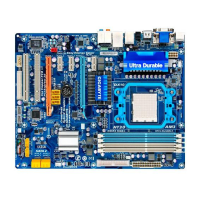
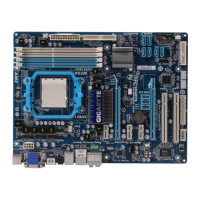
Visual guide to the physical components and connectors on the motherboard.
Illustrates the system architecture and component interconnections.
Essential safety and handling guidelines before installing hardware components.
Detailed technical specifications of the motherboard and its components.
Detailed procedure for correctly seating the CPU in its socket.
Instructions for mounting the CPU cooler and connecting its fan.
Guide on how to install memory modules into the motherboard.
Explains how to configure memory for dual-channel performance.
Step-by-step instructions for inserting memory modules into DIMM slots.
Procedure for installing expansion cards into PCI or PCIe slots.
Guide to configuring the system for ATI Hybrid CrossFireX technology.
Description of all ports and connectors located on the motherboard's rear panel.
Details on internal headers and connectors for system components.
Screens displayed during the system's initial boot-up process.
Overview of the BIOS Setup program's main interface and navigation.
Advanced settings for CPU, memory, and voltage tuning.
Basic system settings like date, time, and IDE/SATA configuration.
Configuration for boot order, system passwords, and other advanced features.
Settings for onboard devices such as LAN, Audio, USB, and IDE/SATA controllers.
Options for configuring system power states and wake-up events.
Settings for Plug and Play and PCI resource allocation.
Monitoring of system temperatures, voltages, and fan speeds.
Restores the BIOS to the safest, most stable default settings.
Restores the BIOS to the optimal default settings for performance.
Enables setting passwords for BIOS access and system startup.
Saves current BIOS settings and exits the setup utility.
Exits the BIOS setup utility without saving any changes.
Step-by-step guide for installing essential motherboard chipset drivers.
Information about bundled Gigabyte utilities and free software.
Access to application guides and motherboard manuals.
Contact information for Gigabyte support and branches.
Displays basic system information about the installed hardware.
Links to Gigabyte's website for downloading the latest BIOS, drivers, and software.
Utility for quick system data backup and restoration.
Tools for updating the motherboard's BIOS firmware.
Software for fine-tuning system settings, overclocking, and fan control.
Technology for optimizing power consumption and saving energy.
Tool for easy data sharing between computers on a network.
Utility for backing up and restoring system data using Volume Shadow Copy.
Steps for installing and configuring SATA hard drives.
Instructions for creating a bootable disk with SATA RAID/AHCI drivers.
Guide to installing the operating system with SATA RAID/AHCI drivers.
Process for restoring data to a hard drive from other drives in a RAID array.
Setup for motherboard audio jacks, including speaker and microphone configuration.
Instructions for connecting and configuring digital S/PDIF audio devices.
Enabling advanced audio effects using Dolby Home Theater technology.
Steps to set up and configure microphone input for recording.
Basic guide on how to record and play audio using the Sound Recorder.
Section for resolving common system startup and operational issues.
Legal notices and environmental compliance information for the product.
Information on how to submit technical or sales inquiries via the online service system.