CONTENTS
2
SET-UP WARNINGS
- Do not overtighten the screws on the power supply connector.
- The fitting and handling of these devices must be carried out by .authorised personnel
- Before connecting the device to the mains, check the connections between the door panel, power supply unit, distributors
monitors and audio terminals.
- Always disconnect the power supply before installing or making modifications to the devices.
- ).Use the Golmar cable (2x1mmRAP-2150
- Always follow the instructions contained in this manual.
- The wiring must run at least .40cm away from any other wiring
............................................................................................................................................ 8.Fitting the embedding box
Set-up warnings............................................................................................................................................................ 2...
Safety precautions........................................................................................................................................................ .3. .
System operation........................................................................................................................................................... 3..
Introduction.....................................................................................................................................................................2
Contents.........................................................................................................................................................................2.
Characteristics............................................................................................................................................................... 3..
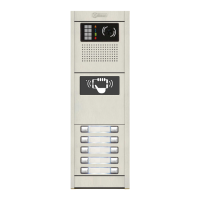
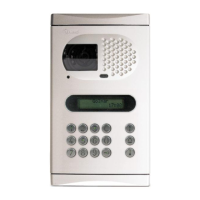
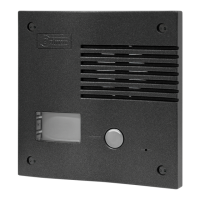
Description of the Nexa Modular door panel.....................................................................................................................
........................................................................................................................................ 4.
Description of the door panel
EL632 G2 module ..... .. .................................................. 5+ SE / EL642 G2+ sound ..................... ..... . ...Description of the
................................................................................................................. . 6. .Description of the EL610D button modules
.....................................................................................................................................7Positioning the embedding box
..............................................................................................................................................7Preparing the cable entry
..................................................................................................................................8.Mounting the electronic modules
.................................................................................................................. .9.Fastening the frame to the embedding box
................................................................................................................12-13Configuring single button module codes .
(only audio installation up to 128 terminals apartments)............................................. 14-15Configuring the button code .
............................................................................................................. 1Configuring double button module codes .. 6-19
................................................................................................................2 - 3Configuring single button module codes . 0 2
......................................................................... 5.2
Description of the vocal synthesis (audible signals on the door panel)
................................................................................10Connecting the buttons to the RAP-610D short connection cable
Description of the visual signals on the door panel.......................................................................................................25
tion of the tones mode ............................................................................... 5Descrip ) 2.audible signals on the door panel
video module .............................................Description of the P1 and P2 external buttonscall ( ).. ................................ 25.
.......................................................................................................Description of the LED lights (low light conditions) 24
Description connector to digital converter CD-NEXA/G2+ / connection illumination EL3002 module...........................26
(video installation up to 32 monitors/ apartments)............................................................10Configuring the button code
or tones mode......................................................................................................27Selecting vocal synthesis language
................................................................................................................... 11Configuring double button module codes ..
To change the call code P1 and P2 push button module .......................................... .........(sound ) / final adjustments . 28..
............................................................................... 24.Audio level jumper description (vocal synthesis and tones mode)
...................................................................................................................................... 4Description of the DIP switch .2
and ............................. .......................................... ............ .29
Closing the frame nserting the button identification labelsI
.................................................... -30 32Mounting the door panel/double door panel modules and closing the door panel
................................................................................................... 9Connecting the buttons to the short connection cable .
Installing the lock release installation ...................................................................................................................... .......32
Installing the power supply unit (FA-G2 )... .........................................................................................+ ......................... 33..
Cleaning the door panel................................................................................................................................................58.
Installation riser types..............................................................................................................................................53-57.
Con e ................................................................................................................................58n ction of an external camera.
Wiring diagrams...................................................................................................................................................... -.34 52
Not s............................................................................................................................................................................59e
Co ...................................................................................................................................................60mpliance............... .
2
INTRODUCTION
First and foremost we would like to thank you for purchasing this product.
Our commitment to achieving the satisfaction of customers like you is manifested through our ISO-9001 certification
and the manufacture of products like the one you have just purchased.
Its advanced technology and strict quality control will ensure that customers and users enjoy the numerous features
that this device offers. To get the most out of them and ensure proper operation from day one, we recommend that you
read this instruction manual.
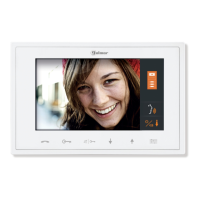
NEXA MODULAR G2+ AUDIO AND VIDEO DOOR ENTRY SYSTEM - BUILDING
 Loading...