Start-up Procedure System Overview
HPFF8(E)/HPFF8CM(E) NAC Expander — P/N 53499:B4 10/1/2018 9
• Selectable strobe synchronization for NACs compatible with System Sensor, Cooper Wheelock, Faraday, Amseco, and Gentex
notification appliances
• Selectable pass-through (slave) or filtered input
– Pass-through (slave) input of steady, coded audible, and synchronized strobe signals to NAC outputs
– Filtered for full-wave-rectified polarity-reversing inputs or reducing spurious noise to generate steady-on NAC outputs
• Silenceable with two independent alarm inputs or by passed-through synchronization protocol
• Split Alarm mode allows a combination of coded signals outputs and Selectable Silence on NAC pairs
• Selectable silence with two independent alarm inputs and the HPFF programmed in Split Alarm mode
• End-of-line resistor compare:
– Attach a single reference resistor to match value of the NAC end-of-line resistor (ELR)
– Provides use of a wide range of ELR resistors’ values: 1.9K ohms to 25K ohms
– Eases retrofit installations by matching existing ELR value without having to locate in the field (ELRs must be UL Listed)
• NAC Trouble memory:
– Individual NAC Trouble LEDs blink if past troubles occurred
– Aids installer or repair personnel to find the location of past troubles
• Fixed, clamp-style terminal blocks to accommodate 12AWG (3.31 mm
2
) to 22 AWG (0.326 mm
2
) wire
• Separate Trouble and AC Fail Form-C relay contacts
• Initiating device input signal is interrupted for Trouble indication at device or FACP.
• Optional two-hour delay:
– In opening of Trouble contacts upon AC loss (AC Fail contact always transfers immediately upon AC loss)
– In interruption of initiating device input signal for Trouble indication at device or FACP
– UL 864 9th Edition requires 1-3 hour delay, therefore always programming for the two-hour delay is recommended
• Auxiliary output:
– Continuous 24 VDC output (even in alarm): 2.0 A
– Resettable fuse (PTC) limited
• Mounting locations on the Control circuit board for optional addressable relay and control modules
1.3 Start-up Procedure
1. Configure the power supply jumpers as described in Section 1.4, “Jumpers”, on page 9.
2. Install the power supply as described in Section 2, “Installation”, on page 13.
3. Program the power supply as described in Section 3, “Programming Options”, on page 28.
4. Wire the power supply circuits, referring to the options described in Section 4, “Trouble Supervision”, on page 31 and the
application examples in Section 5, “Applications”, on page 35.
5. Connect the primary source wiring while observing the following:
• HPFF8 and HPFF8CM: make certain the primary source is 120 VAC, 60 Hz, 3.6 A.
• HPFF8E and HPFF8CME: make certain the primary source is 240 VAC, 50 Hz, 2.1 A.
• Run a pair of wires (with earth ground conductor) from the protected premises’ main breaker box to TB1 on the internal 24 VDC
power supply circuit board.
• For power supplies: use 14 AWG (2.089 mm
2
) wire with 600 V insulation.
• Connect ground of the protected premise to ground stud of the enclosure using a ring terminal and keps nuts supplied in the
hardware kit. Refer to Figure 2.19 on page 27 for proper earth ground connections.
6. Apply power to the power supply using the following procedure:
– Apply AC power by turning on the AC mains circuit breaker connected to the power supply.
– Connect a properly charged battery to the TB1 on the unit’s internal Control circuit board.
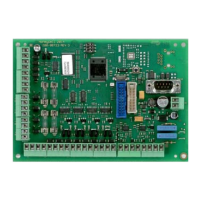
1.4 Jumpers
The HPFF power supplies are comprised internally of two basic components: a 24 VDC power supply and a Control circuit board. The
HPFF8 models have an installed 8.0 A power supply. Jumpers are located on the control circuit board; see Figure 1.1, “Control Circuit
Board”.
WARNING: DISCONNECT POWER
MAKE CERTAIN THAT THE AC CIRCUIT BREAKER IS OFF BEFORE MAKING ANY WIRING CONNECTIONS
BETWEEN THE CIRCUIT BREAKER AND THE POWER SUPPLY.
 Loading...