PSE Series Instruction Manual — P/N LS10227-000NF-E:B 3/29/2021 27
Output Circuit Control DIP Switch Settings Programming Options
Master Mode - Selective Silence
Selective Silence allows the silencing of the sounder portion of a horn/strobe combination device without turning off the strobe. Selec-
tive Silence is only supported while in Master mode setting for Amseco, Gentex, System Sensor, and Wheelock. Refer to Table 3.13 to
select the desired Master mode, Selective Silence sync type.
Only Command Inputs #1 and #2 are used to control the Selective Silence operation. (Command Input #3 on PSE-10 does not support
Selective Silence.) Input #1 is for activating the horn/strobe devices, while Input 2 only controls sounding of the horns. Input #1 must be
active for Input #2 to have any effect on NAC outputs set for Selective Silence. The list below provides additional detail.
• If only Command Input #1 is active, only the strobes will be activated .
• If both Command Input #1 and #2 are active, strobes and horns will be activated.
• If only Command Input #2 is active, NAC outputs will not be activated.
• If neither Command Input #1 nor #2 is active, NAC outputs will not be activated.
Command Input #1 - Normal/Sync Mode of Operation
For Normal Mode of operation, see previous section.
Sync Mode is an available option for the Slave Synchronization operating mode (see previous section). Sync Mode differs from the
Slave Synchronization Normal Mode of operation because it requires an additional “trigger” signal to activate the output(s). Once the
trigger signal is active, the corresponding output(s), as selected by the Output DIP Switch settings, will follow any synchronization sig-
nal provided to Input #1.
• Input #1 is dedicated as the follower input for any synchronization signal received into this input. Do not apply the
trigger signal to
this input.
• Input #2 is used for the trigger input for either the 6 amp or 10 amp models. Do not apply the synchronization signal to this input.
• Input #3 can also be used for the trigger input, but is only available on the 10 amp model. Do not apply the synchronization signal
to this input.
• Use only one input (Input #2 or #3) at any one time for the trigger input.
• A trigger signal between 9-32VDC is required for proper operation.
• Set the Global DIP switch, S1 position 3, to the OFF position. See below:
Set DIP switch positions 1 and 2 according to which input circuit, #2 or #3, is used as the trigger input as shown below.
DIP switch positions 4, 5, and 6 should be set to Slave Mode as shown below:
ON ON ON OFF Master mode - CO Temporal (Temporal 4)
OFF OFF OFF
ON Master mode - Amseco/Potter
OFF
ON OFF ON Master mode - Gentex
OFF OFF
ON ON Master mode - System Sensor
OFF
ON ON ON Master mode - Wheelock
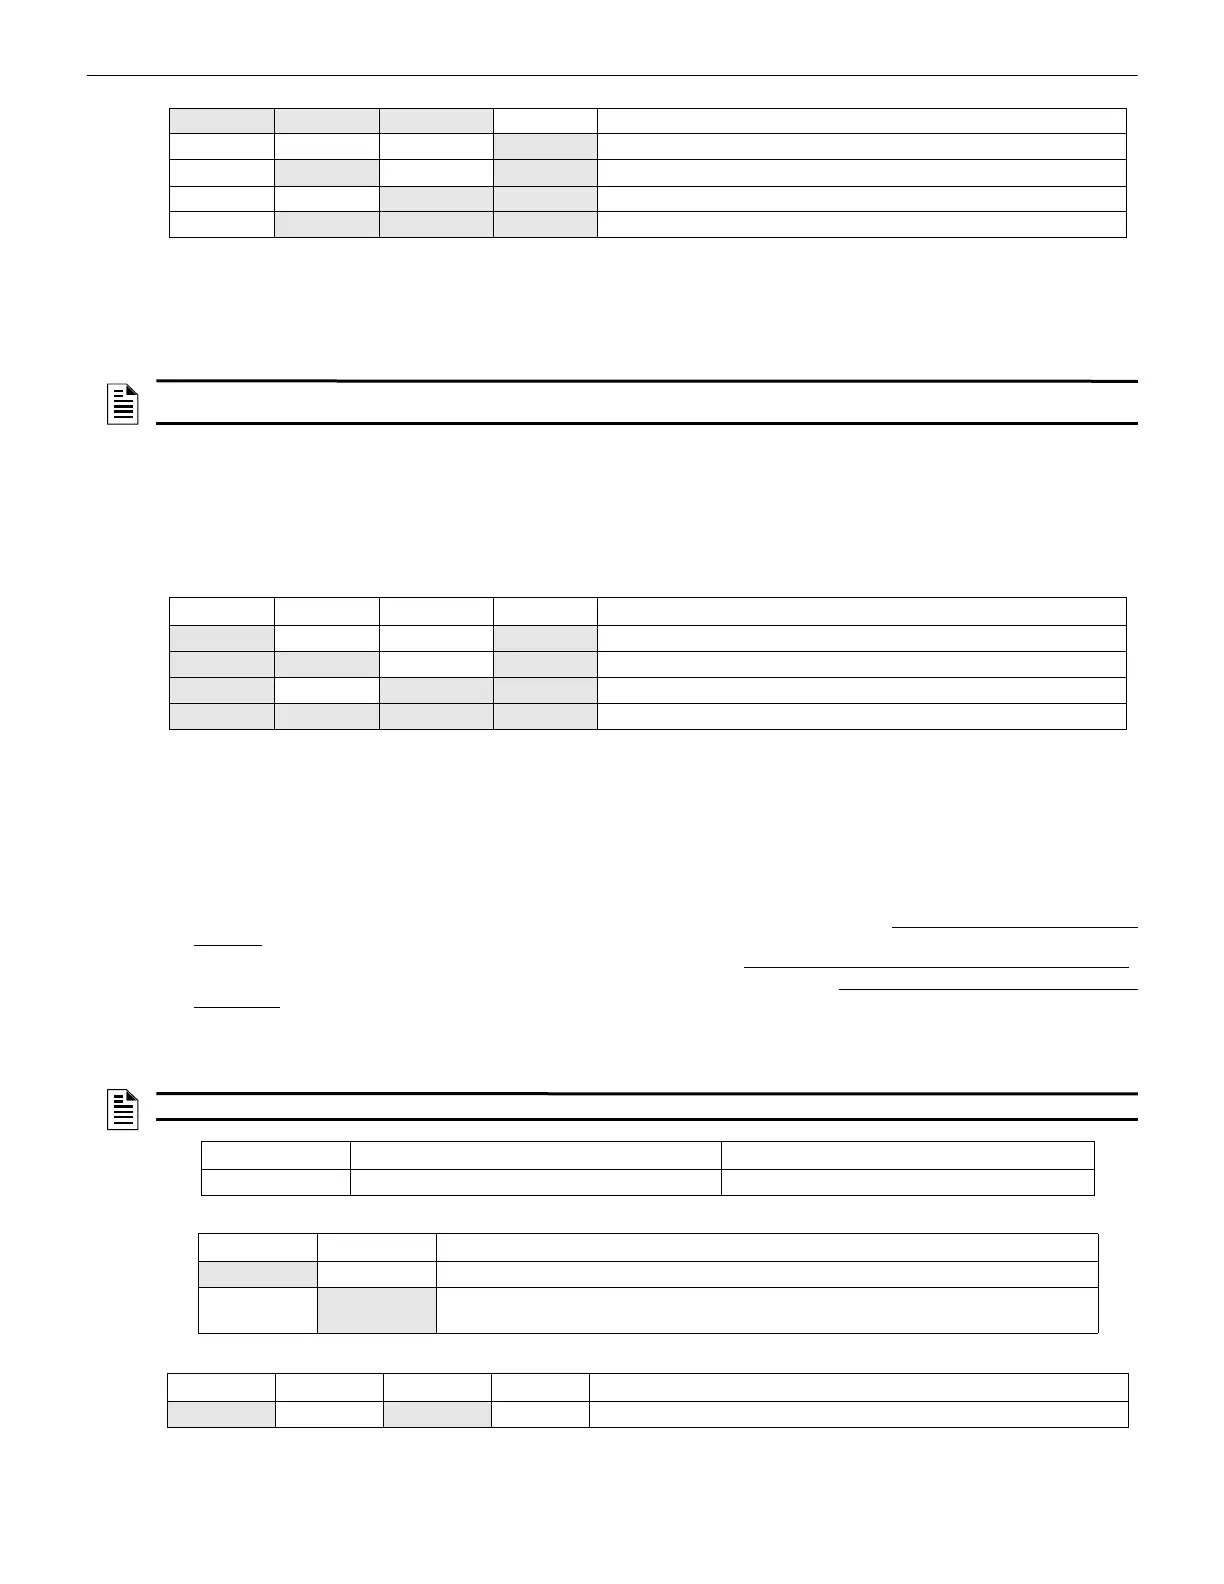
Table 3.12 Sync Mode - Master/Slave Settings
NOTE: Do not apply synchronization signals to Command Input #1 and 2. Only trigger signals are allowed (i.e. constant 9-32 VDC).
Synchronization signal is internally generated by the system when in Master mode.
Position 3 Position 4 Position 5 Position 6 Synchronization Type
ON OFF OFF ON Master mode, Selective Silence - Amseco/Potter
ON ON OFF ON Master mode, Selective Silence - Gentex
ON OFF ON ON Master mode, Selective Silence - System Sensor
ON ON ON ON Master mode, Selective Silence - Wheelock
Table 3.13 Master Mode - Selective Silence Settings
NOTE: If Input #1 signal is lost while Input #2 (or Input #3, if available) trigger is active, output circuits will deactivate.
S1 DIP Switch OFF ON
3 Command Input #1 configured for Sync input Command Input #1 configured as normal
Position 1 Position 2 Trigger Input Assignment For Sync Mode Operation
ON OFF NAC will activate when Input #2 activates
OFF
ON NAC will activate when Input #3 activates (Input #3 is only available on the PSE-10 model. If
selected on PSE-6, this setting will default to input #2.)
Position 3 Position 4 Position 5 Position 6 Synchronization Type for Sync Mode Operation
ON OFF ON OFF Slave mode (NAC follower) - NAC outputs track Command Input Circuits
Table 3.14 Sync Mode Settings
 Loading...