21
21
Swim Spa
will revert back to display the current water
temperature.
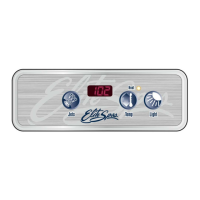
Pressing the TIME button at any time during
the above programming sequence will save
the values entered up to that point and exit
the programming sequence.
To set the Swim Spa for continuous ltration,
set the start and end times of the rst lter
cycle to the exact same time.
Clean-Up Cycle
After periods of heavy use, you can manually
start a cleanup cycle by turning JETS 1 on in
low speed. The pump will operate for 2 hours
and then automatically turn o . The heater will
also operate during this period if the controls
are set in the Standard mode.
NOTE: Activating the low speed of
Pump 1 for a clean up cycle will initiate
ltration, but not ozone production, unless
the Swim Spa enters a timed lter cycle
during the 2 hour period.
Inversion Feature
The Swim Spa Series Control includes an
Inversion feature that makes it easy to read the
LCD from inside or outside the Swim Spa. To
invert the LCD display, you will need to locate the
general location to the right of the LIGHT button.
First touch the UP or DOWN button, followed by
the position located next to the LIGHT button.
Repeat the sequence to reverse the inversion
process.
at least four hours per day is recommended to
properly clean and maintain the water.
To initiate the programming sequence to
change lter cycles, press TIME, PROG, PROG,
and PROG within 3 seconds. You should now
see the ‘PROGRAM’, ‘FILTER 1’, and ‘START
TIME’ icons on the LCD display window.
The hour digit(s) will be ashing on the LCD
window. Press the UP or DOWN button to
advance the hours up or down to choose the
Filter 1 start hour. Enter the hour by pressing
the PROG button. The minute digits will now
be ashing on the LCD window. Press the UP
or DOWN button to advance the minutes up
or down, in 5 minute increments, to choose
the Filter 1 start time. Enter the minutes by
pressing the PROG button.
You should now see the ‘PROGRAM’, ‘FILTER 1’,
and ‘END TIME’ icons on the LCD display
window. Adjust the hours and minutes for the
end time of the rst lter cycle as described
above. After pressing the PROG button to
enter the end time of the rst lter cycle, you
should now see the ‘PROGRAM’, ‘FILTER 2’,
and ‘START TIME’ icons on the LCD display
window. Adjust the hours and minutes for
the start time of the second lter cycle as
described above.
After pressing the PROG button to enter the
start time of the second lter cycle, you should
now see the ‘PROGRAM’, ‘FILTER 2’
and ‘END TIME’ icons on the LCD display
window. Adjust the hours and minutes for
the start time of the second lter cycle as
described above. After pressing the PROG
button to enter the end time of the second
lter cycle, the new ltration times will be
saved into the system and the LCD window
 Loading...