33
33
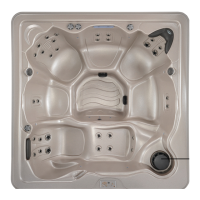
Swim Spa
NOTE: Prior to re lling the Swim Spa,
drain all antifreeze from Swim Spa and
hoses using the instructions for Draining
Your Swim Spa (Pg. 31). Carefully
monitor chemicals until all antifreeze
residue has been eliminated.
3. The lter should be drained, and the
cartridge removed and cleaned.
4. Check to see that there is no water in the
heater element chamber.
5. Clean your Swim Spa as directed in the
following two sections on this page.
6. Cover your Swim Spa with a water-
shedding, impenetrable cover.
7. For further information on blowing out
the plumbing lines and winterising
procedures, contact your local dealer.
Swim Spa Cabinet Care
The Swim Spa series cabinets are made of
Duramaax™, a high quality alternative to wood
that is virtually maintenance free, requiring
no staining, sealing, or waxing.
To clean the Swim Spa cabinet, rinse dirt and
dust regularly with clear water. To remove
stubborn dirt, grime, and mild discoloration,
wash with a mild detergent and warm water.
Swim Spa Surface Care and Cleaning
Your Swim Spa shell surface is made of acrylic.
A minimum amount of care and cleaning will
keep it looking new for years.
Use a spa cleaner for residue and lime buildup
at the water level. It may be necessary to lower
the water level 3-4 inches before cleaning to
avoid polluting the Swim Spa. Cleaner can be
applied to the acrylic surface with a soft cloth
and wiped clean. Use a non-abrasive mild dish
washing detergent such as Ivory®Liquid. Rinse
well and dry with a clean cloth.
NOTE: Do not allow the acrylic surface to
come in contact with products such as
acetone (nail polish remover), nail polish,
dry cleaning solution, lacquer thinners,
gasoline, pine oil, orange oil, citrus based
cleaners, etc.
Remove dust and dry dirt with a soft, damp
cloth. Clean grease, oil, paint and ink stains
with isopropyl (rubbing) alcohol diluted with
water. Avoid using razor blades or other sharp
instruments that might scratch the surface.
Underwater LED Light Cluster
The underwater LED light assemblies are
serviceable from the inside the Swim Spa
cabinet. Remove the side panel and insulation
closest to the light; locate the bracket that
holds the LED assembly. Turn the LED Holder
90 degrees counter-clockwise; remove from
bracket. Pull bulb straight out and replace.
Insert LED holder back into bracket and turn
90 degrees clock-wise to secure.
Never use abrasive cleaners.
Protect Swim Spa nish - always keep cover
on the Swim Spa when not in use.
 Loading...