52 53
En
Fr
Pt
Es
En
Fr
Pt
Es
【
Mesure unique
】
【
Fonction de mesure en continu
】
3. Appuyez
une fois sur le bouton
POWERON/Mesurepour
prendre une mesure unique.
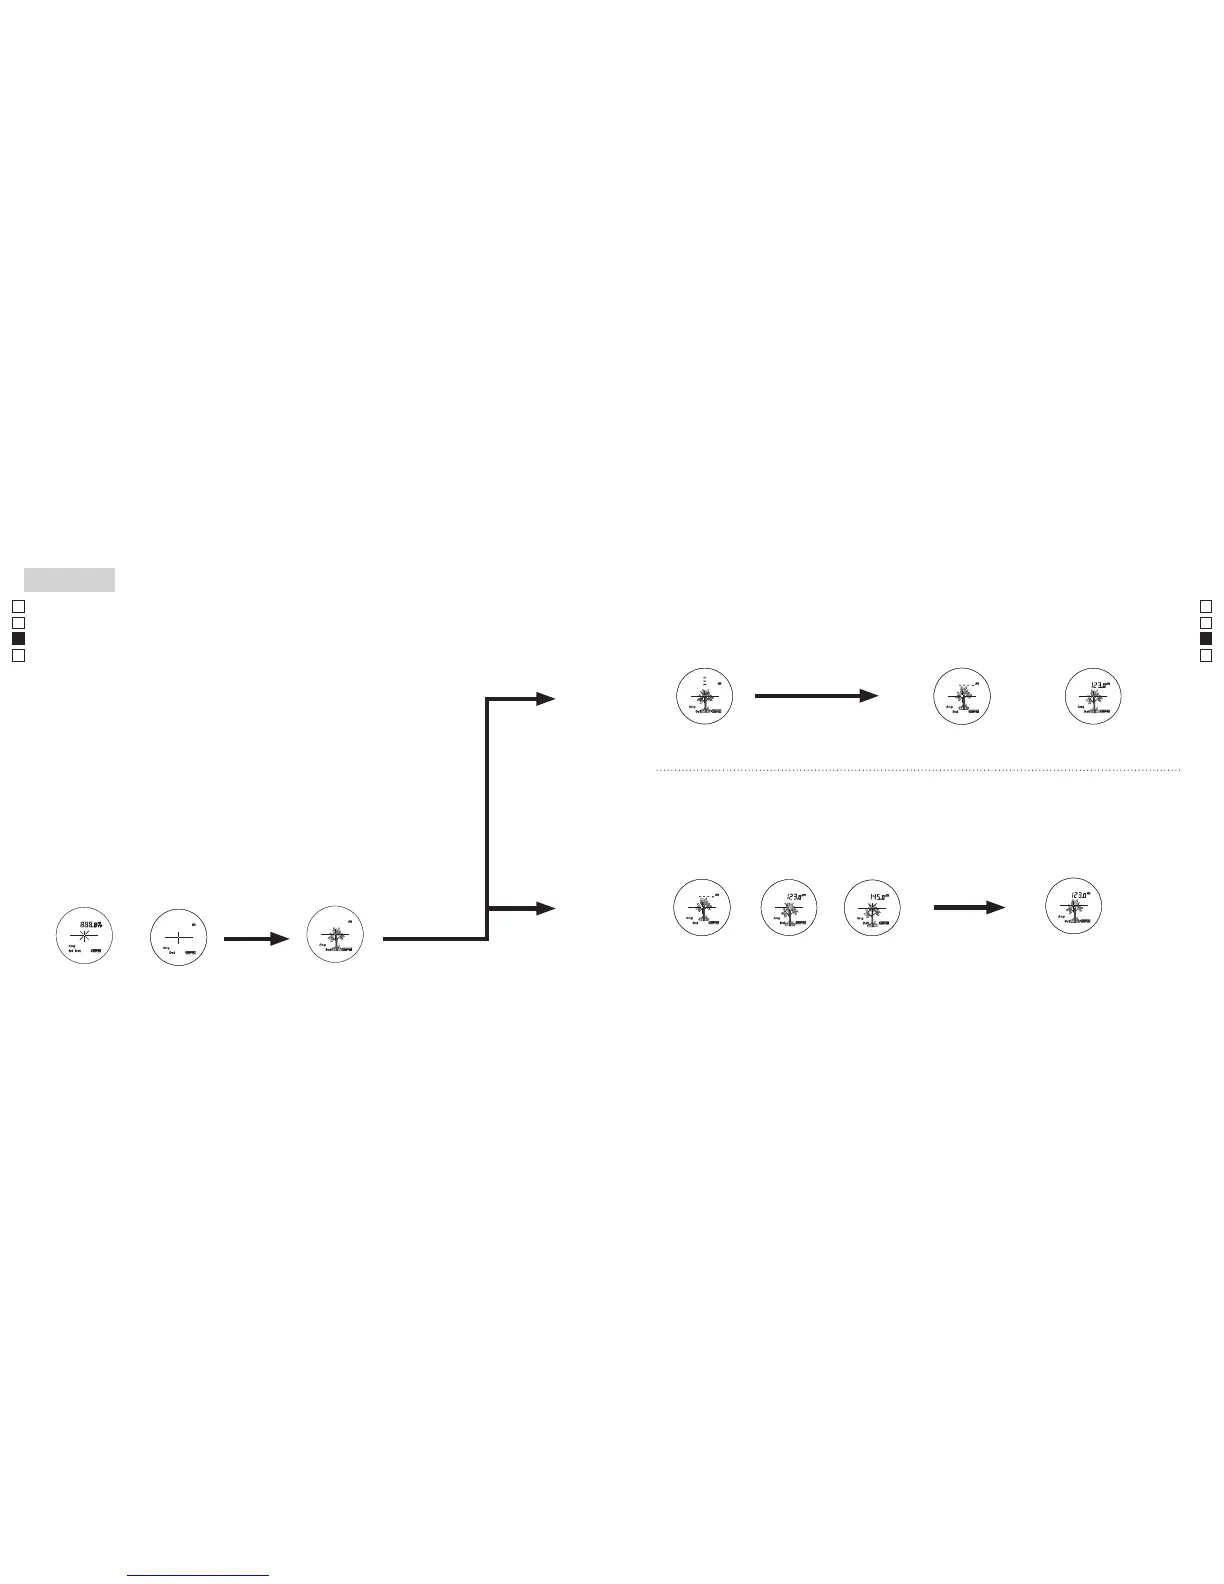
Measurement
1. Press the POWER button for power-on.
(Power turns off 8 seconds after the last
operation.)
Immediately after power-on.
(Initializing)
Stand-by.
3. Press POWER button once to start single measurement.
Measuring.
4. After measurement, “distance” or “fail to measure” indicator are displayed for 8 seconds, then power turns off. If you press the POWER
button during power-on (while the internal display is lit), another single measurement starts.
Failure to measure or
unable to measure distance.
Displays the measured
figure. (Target 1)
Displays the measured
figure. (Target 2)
3. Keep pressing POWER button to start continuous measurement up to 20 seconds. The internal display shows “distance” and
“fail to measure” indicator alternately.
Note: Laser irradiaton mark is blinking during the measurement.
Note: If you stop pressing the button, the continuous measuremen stops
Target focusing.
2. Aim at the target
.
Positionthetargetatthecenterofthereticle
[Single measurement]
Failure to measure or
unable to measure distance.
Upward measurement. Downward measurement.
Displays the measured figure.
[Continuous measurement]
4. After continuous measurement, the measure results are displayed for 8 seconds, then power turns off. If you press the POWER
button during power-on (while the internal display is lit), another measrement starts.
4. Une fois la mesure effectuée, le témoin«distance»ou«échecdelamesure»
s'affiche pendant 8 secondes, puis l'appareil se met hors tension. Si vous
appuyez sur le bouton
POWERON/Mesure
lors du démarrage (pendant que
l'écran interne est éclairé), une autre mesure unique s'initie.
3. Appuyez et maintenez le
boutonPOWERON/Mesurependant
environ 8 secondes pour prendre une mesure continue. L'écran
interneaffichelestémoinsclignotants«échecdelamesure»ou
«distancemesurée».
*
La marque d'irradiation laser clignote pendant la mesure.
*
Quand vous relâchez la pression sur le bouton, la mesure en
continu s'arrête.
«Échec de la mesure»
ou «mesure de distance
impossible».
Affiche les
résultats mesurés
(Cible 1)
Affiche les
résultats mesurés
(Cible 2)
4. Suite à une mesure en continu, les résultats de la mesure finale
(distance mesurée) s'affiche pendant environ 8 secondes, puis
l'appareil s'éteint.
Si vous appuyez sur le bouton
POWERON/Mesure
lors du
démarrage (pendant que l'écran interne est éclairé), une autre
mesure unique s'initie.
Mesure
«Échec de la mesure»
ou «mesure de distance
impossible».
Affiche les résultats mesurés.
Measurement
1. Press the POWER button for power-on.
(Power turns off 8 seconds after the last
operation.)
Immediately after power-on.
(Initializing)
Stand-by.
3. Press POWER button once to start single measurement.
Measuring.
4. After measurement, “distance” or “fail to measure” indicator are displayed for 8 seconds, then power turns off. If you press the POWER
button during power-on (while the internal display is lit), another single measurement starts.
Failure to measure or
unable to measure distance.
Displays the measured
figure. (Target 1)
Displays the measured
figure. (Target 2)
3. Keep pressing POWER button to start continuous measurement up to 20 seconds. The internal display shows “distance” and
“fail to measure” indicator alternately.
Note: Laser irradiaton mark is blinking during the measurement.
Note: If you stop pressing the button, the continuous measuremen stops
Target focusing.
2. Aim at the target
.
Positionthetargetatthecenterofthereticle
[Single measurement]
Failure to measure or
unable to measure distance.
Upward measurement. Downward measurement.
Displays the measured figure.
[Continuous measurement]
4. After continuous measurement, the measure results are displayed for 8 seconds, then power turns off. If you press the POWER
button during power-on (while the internal display is lit), another measrement starts.
Mesure
Attention — L'emploi de commandes, réglages ou procédures autres que ceux
spécifiés dans ce manuel peut entraîner une exposition à des rayonnements dangereux.
1. Préparation
Installez une pile dans le logement prévu à cet effet. (Reportez-vous à la section
«
Remplacement de la pile
»
.)
2. Œilleton en caoutchouc
Cetélémètrepeutêtreutilisépardespersonnesquiportentdeslunettes,oupas.
3. Correction dioptrique
Réglez la correction dioptrique pour obtenir une image nette sur l'écran LCD.
Tournez d'abord la bague de réglage dioptrique dans le sens inverse des aiguilles d'une
montrejusqu'àcequ'ellesoittotalementenbutée.Ensuite,appuyezsurlebouton
POWERON/Mesurepourallumerl'appareil(Vérifiezquel'écraninterneestallumé).Tout
en regardant dans l'oculaire, tournez la bague de réglage dioptrique dans le sens horaire
jusqu'à ce que l'affichage soit net.
Si vous tournez trop la bague, tournez-la dans le sens inverse des aiguilles d'une montre
demanièresignificative,puisréajustez.
Si la correction dioptrique ne correspond pas à votre vue, vous aurez des difficultés à
effectuer la mise au point sur le sujet.
4. Mesure
Avantd'effectuerunemesure,veillezàconfirmerchaqueparamètredumode
(Moded'affichagedemesure/Modeprioritéàlacible/Unitésd'affichagededistance).
*
Veuillez consulter chaque section pour définir chacun des modes.
1. Mettez l'appareil sous tension
(Vérifiez que l'écran interne est allumé)
2. Visez la cible.
Positionnez la cible au
centre du réticule.
Immédiatementaprèslamise
sous tension (Initialisation)
Enveille Cible visée
(Arrêtautomatiqueaprèsenviron
8 secondes de non-utilisation.)