Measurement
1. Press the POWER button for power-on.
(Power turns off 8 seconds after the last
operation.)
Immediately after power-on.
(Initializing)
Stand-by.
3. Press POWER button once to start single measurement.
Measuring.
4. After measurement, “distance” or “fail to measure” indicator are displayed for 8 seconds, then power turns off. If you press the POWER
button during power-on (while the internal display is lit), another single measurement starts.
Failure to measure or
unable to measure distance.
Displays the measured
figure. (Target 1)
Displays the measured
figure. (Target 2)
3. Keep pressing POWER button to start continuous measurement up to 20 seconds. The internal display shows “distance” and
“fail to measure” indicator alternately.
Note: Laser irradiaton mark is blinking during the measurement.
Note: If you stop pressing the button, the continuous measuremen stops
Target focusing.
2. Aim at the target
.
Positionthetargetatthecenterofthereticle
[Single measurement]
Failure to measure or
unable to measure distance.
Upward measurement. Downward measurement.
Displays the measured figure.
[Continuous measurement]
4. After continuous measurement, the measure results are displayed for 8 seconds, then power turns off. If you press the POWER
button during power-on (while the internal display is lit), another measrement starts.
Measurement
Caution — use of controls or adjustments or performance of procedures other than
those specified herein may result in hazardous radiation exposure.
1. Preparing
Install a battery in the battery chamber. (See "Changing Battery")
2. Rubber eyecup
Both eyeglass wearers and non-wearers can use this rangefinder as it is.
3. Diopter adjustment
Adjust diopter to obtain a clear LCD indication in the viewfinder.
First, rotate the diopter adjustment ring counterclockwise until it comes to a complete
stop.Next,pressthePOWERON/Measurementbuttontoturnonthepower
(Confirm the
internal display is on)
.Whilelookingthroughtheeyepiece,rotatethediopteradjustment
ring clockwise until the LCD comes into focus.
If you rotate the ring too much, rotate it counterclockwise substantially then adjust it again.
If the diopter is not adjusted to correspond to your eyesight, you may not be able to
correctly aim at your subject.
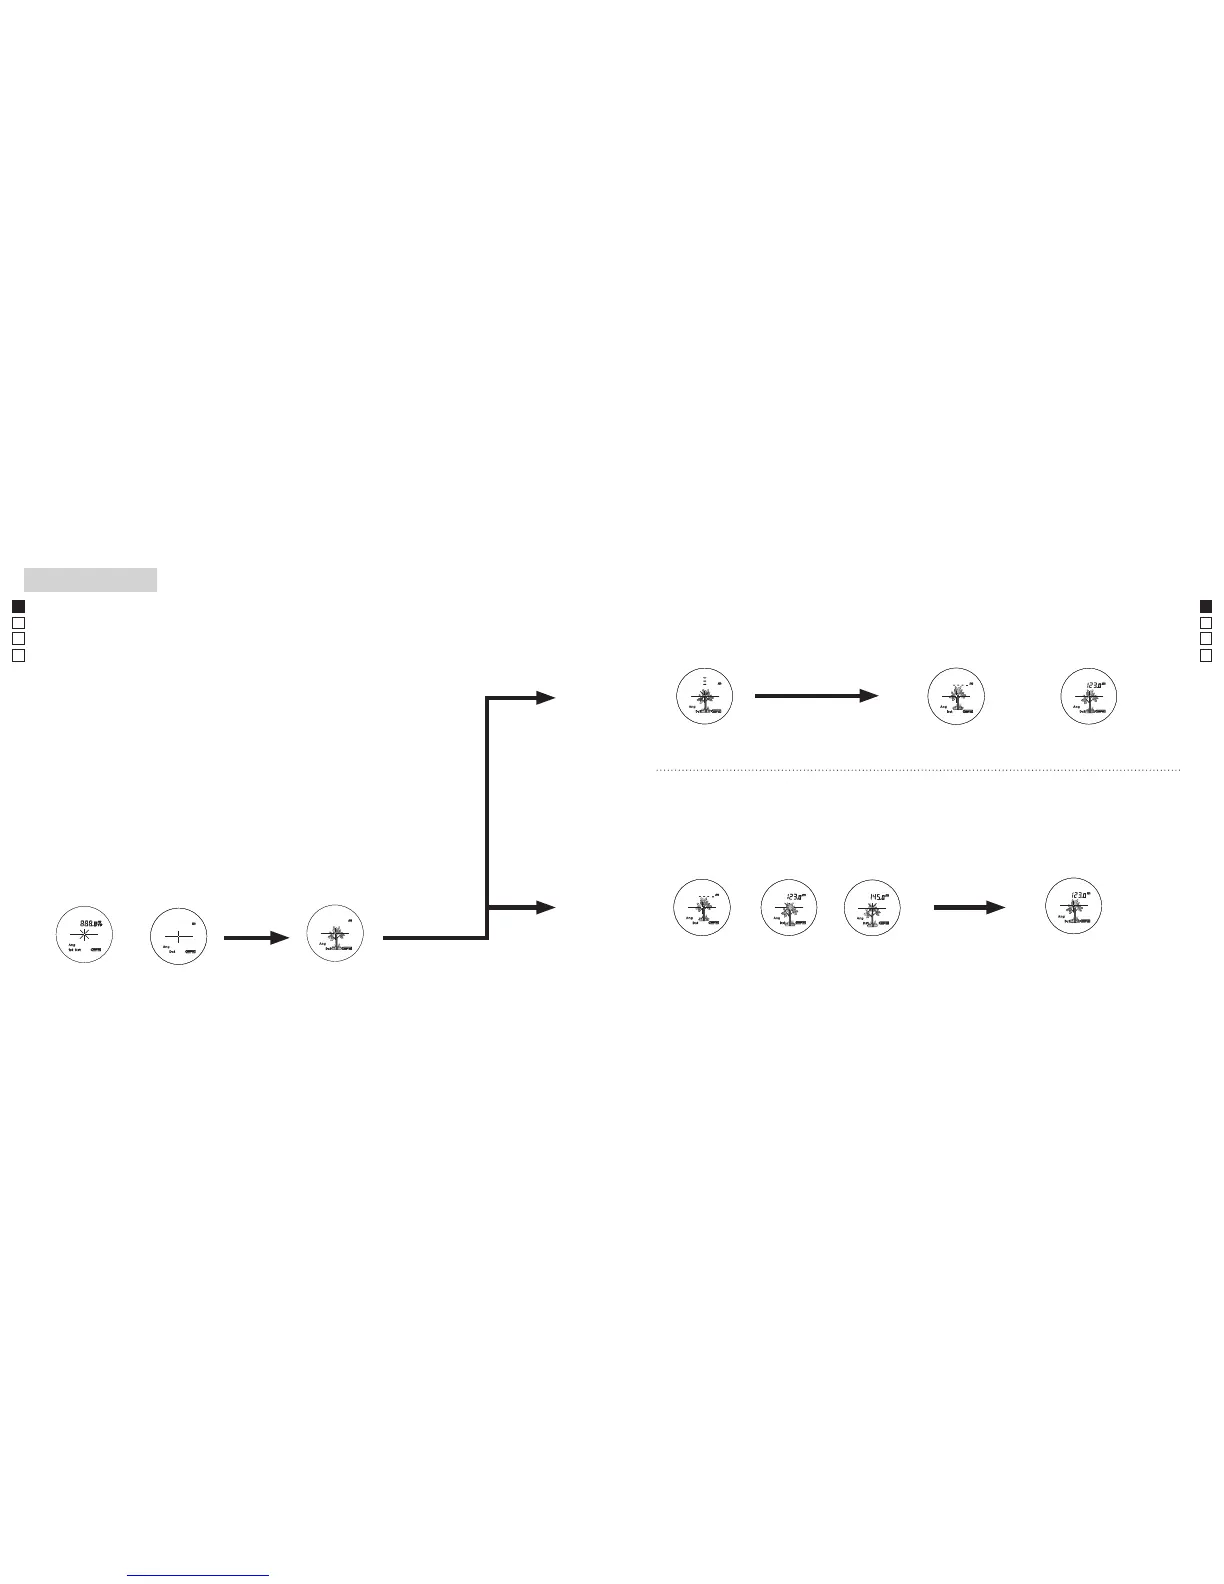
4. Measuring
Beforemeasuring,besuretoconfirmeachmode(Measurementdisplaymode/Target
prioritymode/Distancedisplayunit)setting.
*
Please refer to each section on how to set each mode.
1. Turn on the power (Confirm
the internal display is on).
2. Aim at the target.
Position the target at the center
of the reticle.
Immediately after power-on
(Initializing)
Stand-by Target aiming
(Automatic power shut-off after
approx. 8 sec. unattended.)
【
Single measurement
】
【
Continuous measurement function
】
3. Press the
POWERON/
Measurement button once to
start single measurement.
Measurement
1. Press the POWER button for power-on.
(Power turns off 8 seconds after the last
operation.)
Immediately after power-on.
(Initializing)
Stand-by.
3. Press POWER button once to start single measurement.
Measuring.
4. After measurement, “distance” or “fail to measure” indicator are displayed for 8 seconds, then power turns off. If you press the POWER
button during power-on (while the internal display is lit), another single measurement starts.
Failure to measure or
unable to measure distance.
Displays the measured
figure. (Target 1)
Displays the measured
figure. (Target 2)
3. Keep pressing POWER button to start continuous measurement up to 20 seconds. The internal display shows “distance” and
“fail to measure” indicator alternately.
Note: Laser irradiaton mark is blinking during the measurement.
Note: If you stop pressing the button, the continuous measuremen stops
Target focusing.
2. Aim at the target
.
Positionthetargetatthecenterofthereticle
[Single measurement]
Failure to measure or
unable to measure distance.
Upward measurement. Downward measurement.
Displays the measured figure.
[Continuous measurement]
4. After continuous measurement, the measure results are displayed for 8 seconds, then power turns off. If you press the POWER
button during power-on (while the internal display is lit), another measrement starts.
Measurement
1. Press the POWER button for power-on.
(Power turns off 8 seconds after the last
operation.)
Immediately after power-on.
(Initializing)
Stand-by.
3. Press POWER button once to start single measurement.
Measuring.
4. After measurement, “distance” or “fail to measure” indicator are displayed for 8 seconds, then power turns off. If you press the POWER
button during power-on (while the internal display is lit), another single measurement starts.
Failure to measure or
unable to measure distance.
Displays the measured
figure. (Target 1)
Displays the measured
figure. (Target 2)
3. Keep pressing POWER button to start continuous measurement up to 20 seconds. The internal display shows “distance” and
“fail to measure” indicator alternately.
Note: Laser irradiaton mark is blinking during the measurement.
Note: If you stop pressing the button, the continuous measuremen stops
Target focusing.
2. Aim at the target
.
Positionthetargetatthecenterofthereticle
[Single measurement]
Failure to measure or
unable to measure distance.
Upward measurement. Downward measurement.
Displays the measured figure.
[Continuous measurement]
4. After continuous measurement, the measure results are displayed for 8 seconds, then power turns off. If you press the POWER
button during power-on (while the internal display is lit), another measrement starts.
4. After measurement, the "fail to measure" indicator or "measured distance"
is displayed for 8 seconds, then power turns off. If you press the
POWERON/
Measurement
button during power-on (while the internal display is on),
another single measurement starts.
3. Press and hold the
POWERON/Measurementbuttontostartcontinuous
measurement for approx. 8 seconds. The internal display shows "fail to
measure" indicator and "measured distance" alternately.
*
The laser irradiation mark blinks during the measurement.
*
If you release your finger from the button, continuous measurement
stops.
Displays the
measured figure
(Target 1)
Displays the
measured figure
(Target 2)
4. After continuous measurement, the results of final
measurement (measured distance) is displayed for approx.
8 seconds, then power turns off.
If you press the
POWERON/Measurement
button during
power-on (while the internal display is on), another
measurement starts.
Measuring
"Failure to measure" or "Unable
to measure" distance
Displays the measured figure
"Failure to measure" or
"Unable to measure"
distance
 Loading...