24
25
WATER SYSTEM
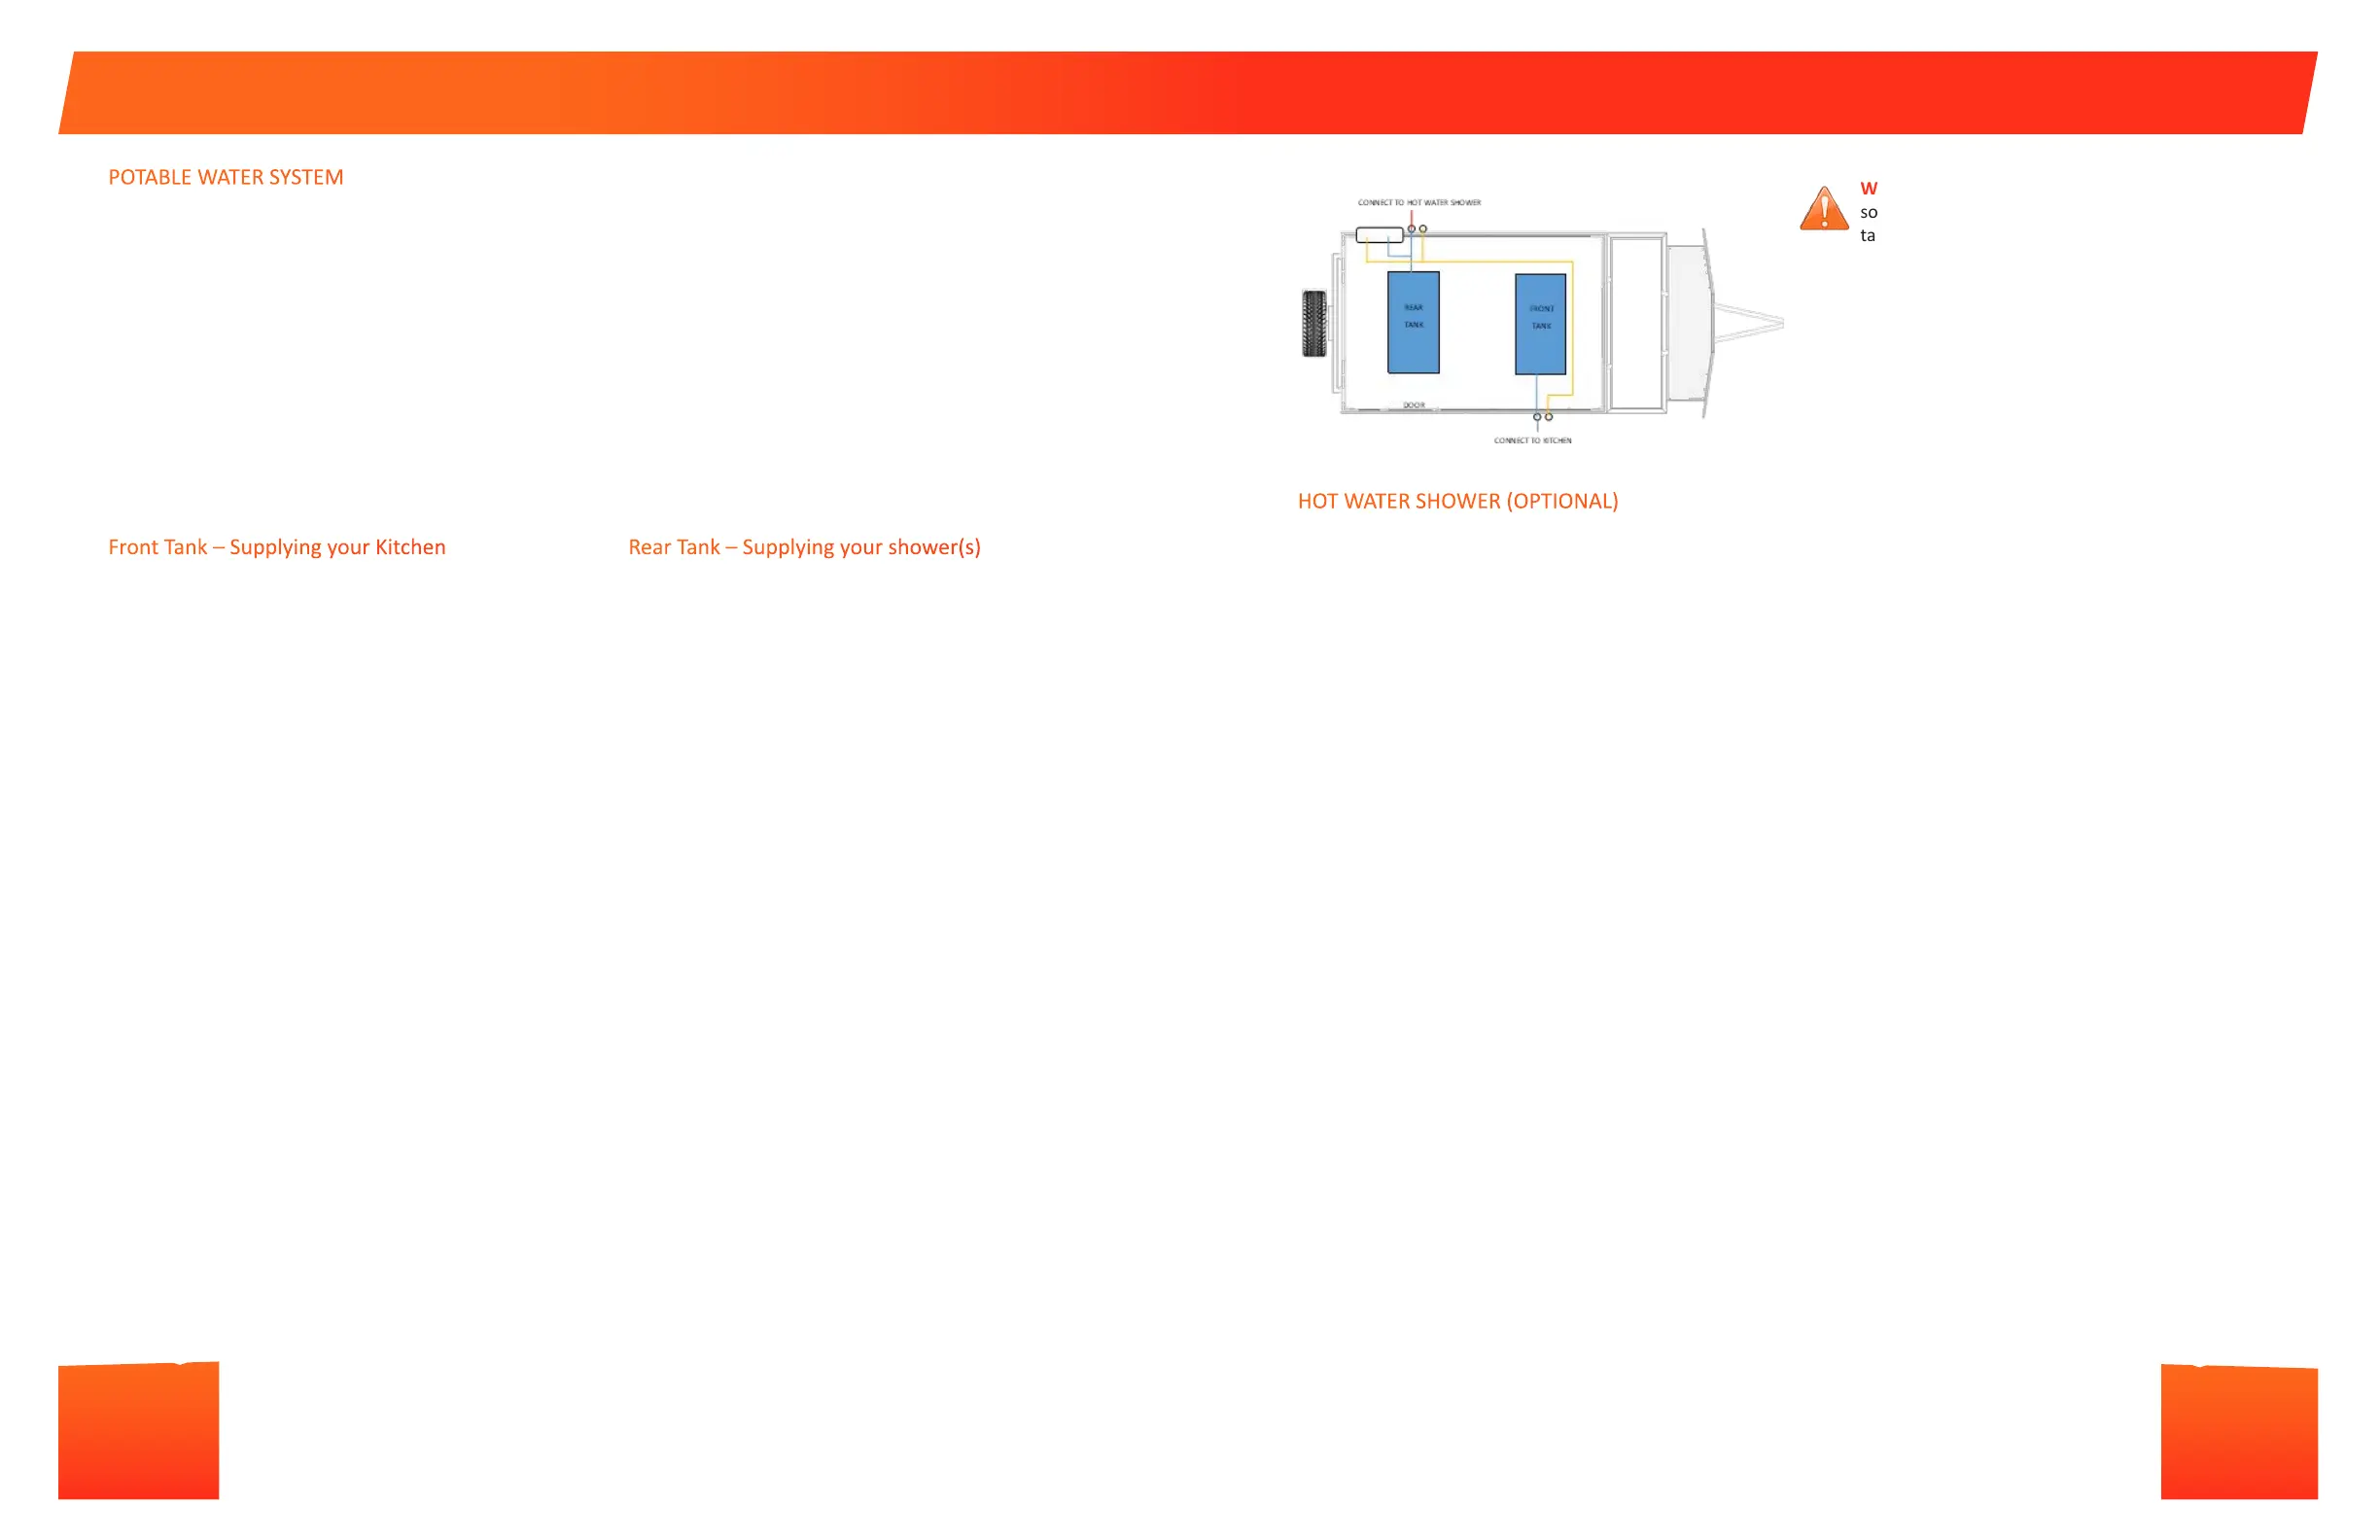
The OP4 is ed with two 20gl potable water tanks, one mounted in front of the axle and one behind. Each tank has its own
lockable ll point located on the driver-side and idened by a blue water faucet icon. Your water tanks are each connected
to a 12v water pump which can be switched on via the main control panel. The water pumps are pressure operated, so once
the main power switch is turned on at the control panel the pump will prime the system and as soon as you turn the tap on
the water will ow. Once the tap is closed, the pump will turn o unl the tap is turned back on. Please turn o your pump at
the main control panel when the water system is not in use as they will connue to use baery power when they are turned
on but not in use. Do not run your water pump when the tanks are empty as this could cause the damage to the water pump
and circuit.
You can use the water gauges on the main control panel to check the water levels in each tank. The tanks are gravity lled and
included with your OP4 is a potable water ll hose which should be sanized regularly. It is important to monitor the water
levels in your tanks. When your water tanks or empty please turn o your water pump. Running your pumps without water
in the tank will cause your water pumps to burn out. Please see the Troubleshoong secon for ps if you are not able to
draw from your potable water tanks.
POTABLE WATER SYSTEM
WARNING! Only use potable water from a reliable
source in these tanks. Do NOT store water in the
tanks for more than two weeks.
WARNING! Sanize, ush and drain the water tanks before
using and a minimum of every 6 months.
WARNING! If you suspect there’s an issue with the quality of
your water, ush and drain your tanks.
IMPORTANT! Do NOT use bleach to sanize the tanks, as
they will cause corrosion to the stainless steel.
See the OPUS Care & Maintenance secon of this manual for
more informaon on sanizing your water system. Failure to
maintain your tank can result in death or serious injury.
HOT WATER SHOWER (OPTIONAL)
If you have chosen the oponal Eccotemp Hot Water shower you can hook this up directly to your water tank and propane
supply on the driver’s side of your OPUS®. Please note that this is a ow-through system meaning that your hot water is
almost instantaneous from when you turn the shower on and no heat-up me is required.
IMPORTANT! Please read the supplied Eccotemp User Manual before using your Hot Water Shower for full instrucons and
safety notes. The below user guide is intended for seng up your Hot Water Shower with your OPUS camper and not as a
full guide for the shower.
1. Rotate the shower bracket out from the back of the OPUS® by the spare wheel carrier, to sit at 90° from the side of
your OPUS® where the cold-water shower is located.
2. Mount your portable Hot Water Shower to the shower bracket using the mounng plate & wing nuts aached to the
back of the shower. To do this, remove the wingnuts from the screws, thread the screws from the back of the shower
through the shower bracket on the OPUS® and then replace & ghten the wingnuts to hold the shower securely on
the bracket
3. Connect the propane hose from the boom of the Hot Water Shower to the propane quick connect on the side of the
OPUS®. The propane quick connect has the blue shut o lever.
4. Connect the water hose from the boom of the Hot Water Shower to the right-hand water quick connect on the side
of the OPUS®.
5. Connect the shower head hose to the boom of the Hot Water Shower.
6. Turn on the propane at the quick connect by turning the blue shut o lever through 90° to sit in line with the valve.
7. Turn on the rear water pump at the Control Panel
8. Turn on the Hot Water Shower using the power switch located on the boom side of the shower.
9. Select your desired temperature using the cold water & hot water dials. Tip: For hot water, turn the cold dial down
and the hot dial up and vice versa for cooler water
10. To acvate the water ow, slide the switch located on the shower head.
WARNING! The Hot Water Shower is capable of producing scalding water temperatures. Please take care to ensure your
safety and those around you when in use. WARNING! The exhaust gas and top of the Hot Water Shower is HOT! Do NOT
place hands or objects near the top of the heater. Always allow the Hot Water Shower to cool before dismounng and stow-
ing. Always dismount the Hot Water Shower before moving your OPUS® Camper.
IMPORTANT! Use only with propane. If you smell gas, turn o the gas valve at the tank immediately.
IMPORTANT! Always turn o the Hot Water Shower using the main power switch AND the propane ow at the Quick con-
nect AND turn o the electric rear water pump at the control panel.
OPTIONAL: To supply your hot water shower with water from the front water tanks to your hot water shower:
1. Ulize one of your blue water hoses to connect the two quick connects on the kitchen-side of the OP4 to each other.
2. Connect the hot water shower water hose to the FRONT quick connect of the driver’s side of the OP4.
3. Turn on the FRONT pump
4. Connect the propane line and use your hot water shower as indicated from step 5 above.
Front Tank – Supplying your Kitchen
Your front tank supplies water to the middle quick connect
on the passenger side of your OP4 by the slide-out kitchen.
It is designed to directly feed potable water to the sink. To
operate your kitchen faucet:
• Use the supplied blue water hose with male quick-
connect ngs on each end.
• Connect one side to the middle quick connect on the
side of the OPUS and the other side to the water quick
connect ng on the kitchen, accessible when the
kitchen is fully extended.
• Turn on the front pump on your control panel
• Open the kitchen faucet.
The kitchen has a drain hose aached to the sink drain. This
is designed to drain to a waste water container or bucket.
WARNING: Do not pour hot oil down the kitchen sink drain!
Rear Tank – Supplying your shower(s)
Your rear tank supplies water to the middle quick connect
on the driver’s side of your OP4, near the built-in cold
water rinse-shower. To operate your built-in cold water
rinse-shower:
• Push the collar on the middle quick connect ng
‘IN’ towards the camper. It will retract in and click into
posion. Do not connect the blue hose.
• Turn on the rear water pump on the control panel
• Turn on both shower faucets
• Open the lever on the top of the shower head.
Water Transfer between your tanks
The front quick connects on both the driver’s side and
kitchen-side of your OP4 are linked together by a single
water hose. They do not pass through any pumps or water
tanks. They are designed to allow you to pump water from
the rear tank to the front tank or vice versa.
PACKING DOWN YOUR OP4 WATER SYSTEM
Located on each potable water tank you will nd a draining valve at the lowest point of the tank. When packing away the OP4
complete the following process to drain the system of any excess water.
A. Switch o the pump on the main control panel
B. Open the faucet & allow the excess water in the pipe to drain
C. Close the faucet once all of the water has drained.
D. Disconnect either side of the quick connect
E. Ensure the sink is emped and that the waste water drain hose is empty before folding it back into the kitchen.
F. Your tanks can be drained of water at a suitable locaon by removing the screw-in drain bolt on the boom of each tank.
The rear tank also has a quick-access valve to on the side of the tank to allow quick drainage for beer towing balance at the
end of your trip in the case that your front tank is more empty than your rear tank. Please note that for long periods of storage
we recommend using the low-point drain on the BOTTOM of the water tank to fully drain your tank of water.
Please refer to the steps in the care and maintenance secon of this user manual for informaon on draining your tanks and
preparing your tanks for storage.
! IMPORTANT! A small amount of water may be present from the connectors and waste hose so a cloth is
useful to remove any excess water.
 Loading...