Section 2: Getting Started
Programming the sprinkler timer can be accomplished in just a few
basic steps. Before you begin programming, it is important to:
• Install the batteries
• Reset the sprinkler timer
• Select the preferred language
• Set the time of day and date
• Determine a watering plan.
Installing the Batteries
This sprinkler timer requires two AA alkaline batteries to store the
program in memory during AC power loss. Fully charged batteries
should provide sufficient power for approximately one year of
protection. Annual battery replacement is recommended.
• Slide the battery cover to the left
[See Figure 1]
• Insert two AA alkaline batteries
• Replace the battery cover
Weak or missing batteries can cause the time, date, and program to
be erased after a power failure. If this happens, you will need to
install fully charged batteries and reprogram the sprinkler timer.
Note: Batteries only retain the program in memory. They will not operate
the valves in your sprinkling system.
Resetting the Sprinkler Timer
If this is the first time the sprinkler timer has been programmed, you
should press the small recessed button labeled RESET. Pressing reset
does not affect the factory installed fail-safe program.
[See Figure 2]
Do not press the reset button again unless you want to completely
remove all your programming.
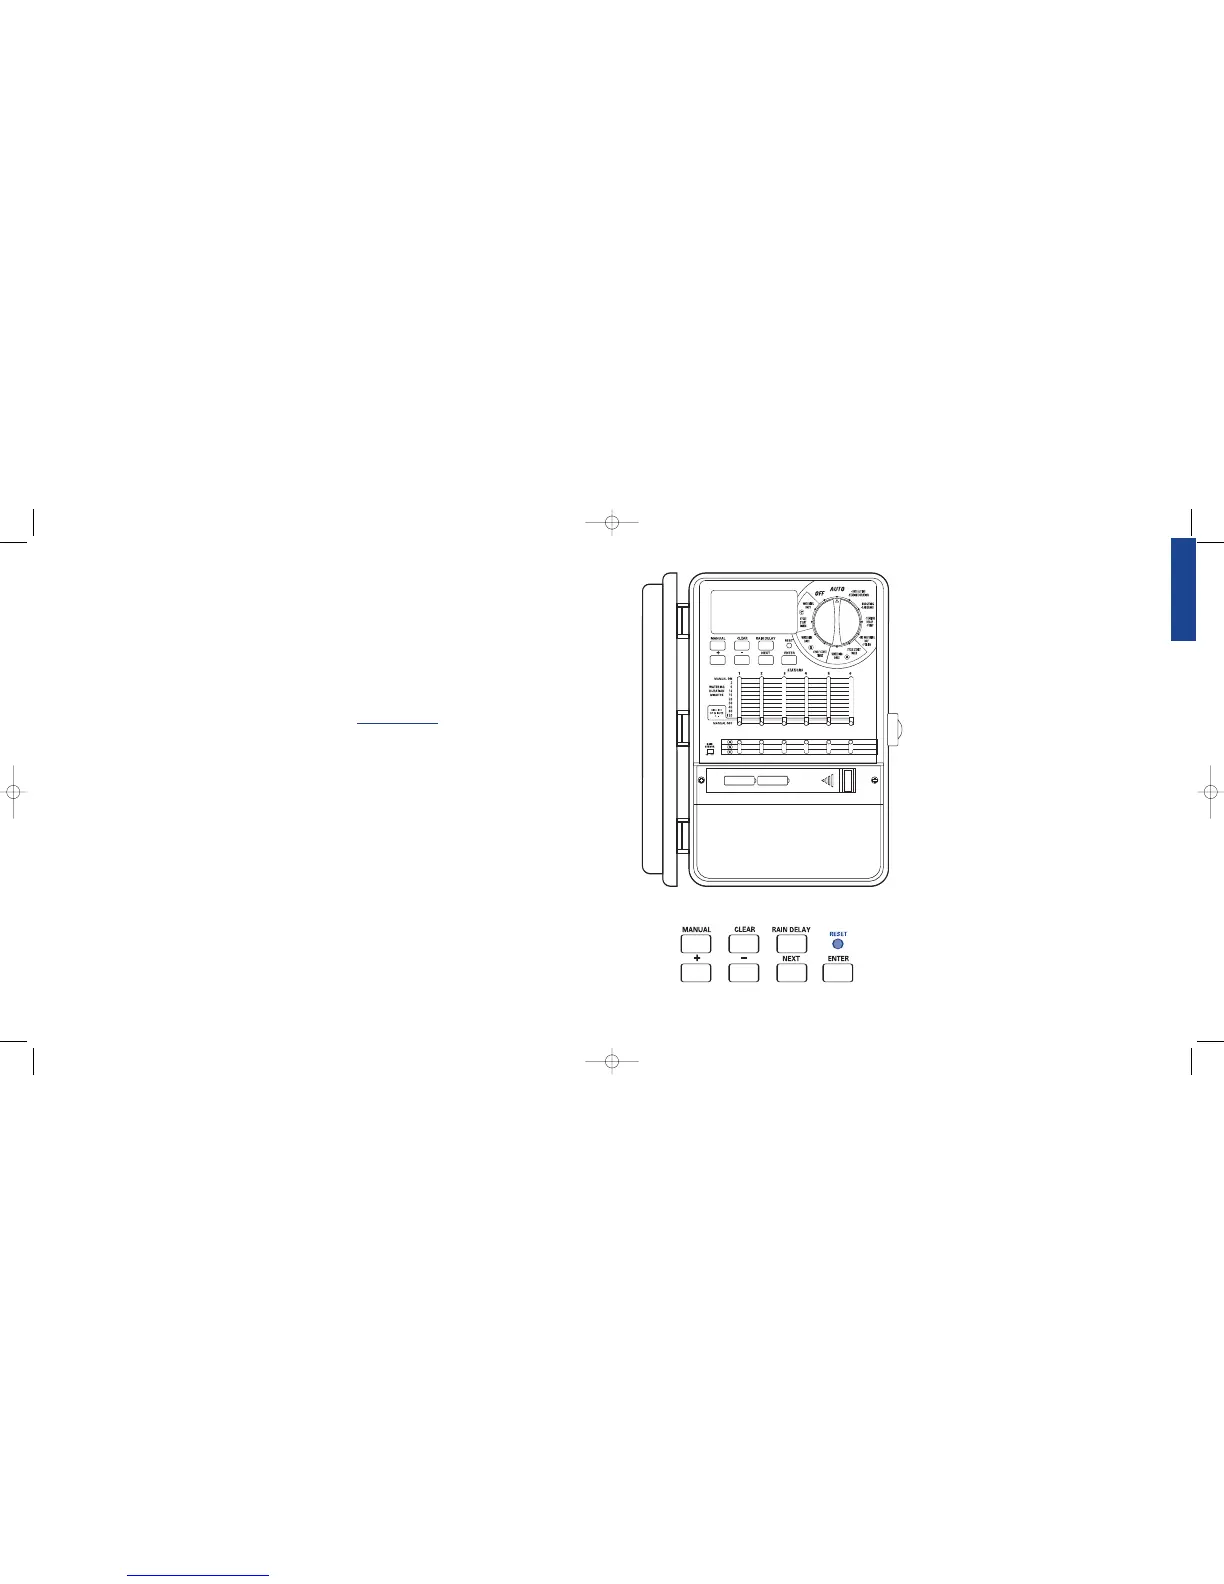
Figure 1: Front view of sprinkler timer
a
b
c
d
f
e
ENGLISH
• Introduction . . . . . . . . . . . . . . . . . . . . . . . . . . . . . . . . . . . . . . . .2
• Getting Started . . . . . . . . . . . . . . . . . . . . . . . . . . . . . . . . . . . . . . .3
• Programming . . . . . . . . . . . . . . . . . . . . . . . . . . . . . . . . . . . . . . . .5
• Automatic Operation and Commonly Used Functions . . . . . . . .9
• Manual Operation . . . . . . . . . . . . . . . . . . . . . . . . . . . . . . . . . . .10
• Additional Features . . . . . . . . . . . . . . . . . . . . . . . . . . . . . . . . . .12
• Installation of Indoor Mount Sprinkler Timer . . . . . . . . . . . . . .14
• Wiring Valves, Sprinkler Timer, Pump Start and Master Valve . .15
• Diagnostics Circuit Breaker . . . . . . . . . . . . . . . . . . . . . . . . . . . .17
• Trouble Shooting . . . . . . . . . . . . . . . . . . . . . . . . . . . . . . . . . . . .18
• Glossary of Terms . . . . . . . . . . . . . . . . . . . . . . . . . . . . . . . . . . .19
• Appendix A: Installation of Outdoor Mount Sprinkler Timer . .20
• Appendix B: Rain Sensor and Terminals and Bypass Switch . . .23
ESPAÑOL
• Introducción . . . . . . . . . . . . . . . . . . . . . . . . . . . . . . . . . . . . . . .24
• Inicio . . . . . . . . . . . . . . . . . . . . . . . . . . . . . . . . . . . . . . . . . . . . .25
• Programación . . . . . . . . . . . . . . . . . . . . . . . . . . . . . . . . . . . . . . .27
• Operación automática y funciones de uso común . . . . . . . . . . .31
• Operación manual . . . . . . . . . . . . . . . . . . . . . . . . . . . . . . . . . . .32
• Funciones adicionales . . . . . . . . . . . . . . . . . . . . . . . . . . . . . . . .34
• Instalación del programador de riego en interiores . . . . . . . . . .36
• Conexión de válvulas, programador de riego,
inicio con bomba y válvulas maestras . . . . . . . . . . . . . . . . . . . .37
• Diagnósticos del interruptor de circuito . . . . . . . . . . . . . . . . . . .39
• Solución de problemas . . . . . . . . . . . . . . . . . . . . . . . . . . . . . . .40
• Glosario de términos . . . . . . . . . . . . . . . . . . . . . . . . . . . . . . . . .41
• Apéndice A: Instalación del programador de riego
en interiores y exteriores . . . . . . . . . . . . . . . . . . . . . . . . . . . . . .42
• Apéndice B: Sensor de lluvia y conmutador de
derivación del sensor de lluvia . . . . . . . . . . . . . . . . . . . . . . . . . .45
Section 1: Introduction
Thank you for selecting an Orbit
®
sprinkler timer. Orbit
®
designers
have combined the simplicity of slide switches with the accuracy of
digital electronics, giving you a sprinkler timer that is both easy to
program and extremely versatile.
Please read the manual completely before you install or use this
sprinkler timer.
To assist you we have included some notable features to
this manual.
1. Glossary of the most common terms (see page 19)
2.
Blue Text relates to the buttons used for programming
3. Blue Underlined T
ext
relates to stop positions for both
rotary dial and slide switches.
Controls Commonly Used
A Digital Display with Text Messaging
A large LCD (Liquid Crystal Display) shows the time of day and
indicates many of the programming settings. Interactive text messag-
ing simplifies programming and current sprinkler timer status.
B Programming Buttons
These 7 buttons are used for programming and other operations.
C Rotary Dial
This dial is used for programming, reviewing and operating the
sprinkler timer.
D Slide Switches – Watering Duration
The vertical slide switches permit the following functions:
1. To set the watering duration for each station
2. To manually run an individual station
3. “Dial Set by Minute” – Permits 1 minute increment time settings,
using the
+ or – buttons.
E Program Slide Switches
The program slide switches allows the user to switch to one of three
programs A, B or C.
F Rain Delay
This button also acts as a shift key for the rotary dial stop positions
in purple.
2
Table of Contents
Figure 2: Programming Keys
ENGLISH
3
 Loading...