Installing the Capacitor Control
(c) Check visually to verify that the switch position indicators on the capacitor
bank switches for all three phases match the Close or Open indication of
the faceplate LEDs.
The CLOSE and OPEN LEDs indicate the last requested operation. Neither
LED will be lit until the bank is switched for the first time.
NOTICE
The capacitor bank Close command is blocked for a period of 5 minutes
after an Open command. This delay provides time for the capacitor
charge to bleed off. For more details, see the “Switching the Capacitor
Bank” section in Instruction Sheet 1024-540, “IntelliCap 2000 Automatic
Capacitor Control: Operation.”
STEP 4. Check Neutral Current and Neutral Voltage indication on the faceplate LCD
screen.
(a) When the Neutral Sensing option is installed, check to see whether the
LCD screen shows **NeutralSensorErr** or **NeutLockErr**. If it
does, continue to Step 4b. If the LCD screen shows **Unit OK** go to Step
5.
(b) Press the NEXT faceplate button once. The LCD screen will show **Menu**
data.
(c) Use the NEXT faceplate button to scroll the data to Nue Fund:= and note
the value displayed.
(d) Use the NEXT faceplate button to scroll to **Setup Sensor Cong**.
(e) Then, use the +/- keys to scroll to **Setup: N Cur Snsr 0 Alm Lvl:** If the
displayed value is greater than the Alm Lvl value, check the capacitor bank
for a problem indicated when neutral voltage or neutral current is present.
The problem must be corrected before the IntelliCap 2000 control will
operate correctly.
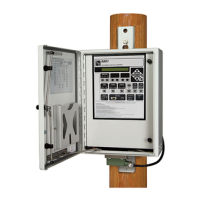
STEP 5. At this stage, the capacitor control is ready for local, manual operation. Set
the control for SCADA Control-Local mode and Operation-Manual mode.
WARNING
Be sure to leave the control in SCADA Control Local mode (not Remote
mode) and in Operation Manual mode (not Auto mode) until the software
in the capacitor control is set up for this installation.
If this capacitor control uses a radio, check that the radio has power.
For most installations, the radio is installed in the enclosure door.
The IntelliCap 2000 control has two remote communication access ports: an Ethernet
port and a serial SCADA port. When used with suitable communication equipment and
protocol, you can remotely monitor and control the capacitor control installation.
S&C supports the IntelliCap 2000 control with a variety of communication hardware
options. Supported manufacturers and hardware options include the following:
• SpeedNet™ Radio
• Microwave Data Systems
• Hayes™ compatible modems
• Cellular transceivers
• Fiber-optic transceivers
For other options, contact S&C Electric Company
DNP 3.0 is the standard protocol for the IntelliCap 2000 control.
All 8-bit, asynchronous SCADA communications (at up to 9600 BAUD) are handled
directly by control software.
Communication
Equipment
S&C Instruction Sheet 1024-510 23

 Loading...