www.scheppach.com
24
|
GB
• The cutting disc should be free to run before the
machine is switched on.
Caution:
water.
Caution: Cutting disc runs with a time lag.
the sides.
• Under normal use conditions, the motor casing can
become hot.
• Do not use force on the machine or on an acces-
-
trial machine. It does a better job at the output for
which it is designed.
•
• Do not leave the machine unattended as long as
it is running.
•
comes to a complete standstill.
•
the power plug from the mains socket.
•
at the cable.
• Do not use cutting discs that do not meet the size
•
whether a working condition is safe of unsafe.
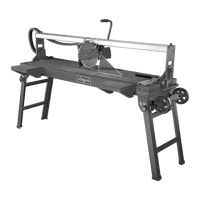
90° cuts (Fig.6 - 7)
1. Loosen the star screw (C)
2. Set the transverse cutting gauge (6) to 90° and
re-tighten the star screw.
3.
cutting gauge (6) into position. (Fig.6)
4. Use the handle (11) to push the machine head (1)
backwards.
5. Place the tile on the stop rail (7) on the transverse
cutting gauge.
6. Use the handle (11) to push the machine head (1)
head again.
7. Switch on the tile cutter. Attention: Wait until the
cooling water has reached the cutting wheel (10).
8. Use the handle (11) to pull the machine head (1)
9.
45° diagonal cut (Fig. 8)
1. Set the angled stop (6) to 45°
2. Perform cutting as described above.
45° longitudinal cut (Fig. 9)
1. Loosen the star knob screw (E) on both sides
•
hearing protection.
• -
tection
Please note that our equipment has not been de-
signed for use in commercial, trade or industrial
-
ment is used in commercial, trade or industrial busi-
nesses or for equivalent purposes.
as improper. The manufacturer will not be liable for
damages resulting from such improper use; the risk
10. Installation
m IMPORTANT!
You must fully assemble the appliance before
using it for the rst time!
Replace cracked diamond cutting discs.
•
with its use and its restrictions, but also with the
• -
sure that it is able to achieve the intended output.
In case of doubt, please replace the concerned
component.
•
the power plug into the mains socket.
• Ensure that the machine is cleaned and lubricat-
• Before start-up, check the machine for damaged
-
• Check the alignment of all moving parts, all bro-
ken or fastening parts, and all other conditions that
-
• Do not use the machine if a switch cannot be ac-
On/O switch (Fig. 4)
-
fore starting the cutting process, wait until the cutting
wheel reaches its maximum speed and the cooling
water pump (13) has fed the water to the cutting
(Fig. 4).
Operation
•
• Check that the voltage on the nameplate matches
the existing voltage; connect the power plug to the
 Loading...